Creating an Atomic Starburst Quilt is a rewarding experience that combines mid-century modern aesthetics with intricate quilting techniques.
This tutorial will guide you through each step of the process, ensuring you have all the information you need to create a stunning quilt.
Whether you’re a seasoned quilter or a beginner looking to tackle a new project, this guide covers everything from fabric selection to final assembly. Let’s dive into the process of making your very own Atomic Starburst Quilt.
Choosing the Right Fabrics
Selecting the right fabrics is crucial for the Atomic Starburst Quilt. The design thrives on bold, contrasting colors that echo the retro charm of the mid-20th century. Opt for vibrant solids or small-scale prints that won’t overpower the intricate starburst pattern.
When choosing fabrics, consider a mix of bright colors like teal, mustard, and coral, paired with neutral tones such as white or gray. These combinations will make the starburst motifs pop. It’s also essential to choose high-quality quilting cotton, which provides the best structure and longevity for your quilt.
Before you start cutting, ensure that your fabrics are pre-washed and ironed. Pre-washing helps prevent shrinking and color bleeding later on, ensuring that your quilt looks as good after washing as it did when you first completed it.
Cutting the Fabric Pieces
Accurate cutting is the foundation of a successful quilt. For the Atomic Starburst Quilt, you’ll need to cut several pieces in specific shapes and sizes. Here’s a breakdown of what you’ll need:
- Center Squares: Cut 4 squares measuring 4.5 inches each. These will form the center of your starbursts.
- Starburst Rays: Cut 48 rectangles measuring 2.5 x 6.5 inches. These will be sewn around the center squares to create the starburst effect.
- Background Squares: Cut 32 squares measuring 4.5 inches each. These will be placed between the starbursts to create the quilt’s overall structure.
- Border Strips: Depending on your quilt size, cut border strips to frame the quilt. For a lap-sized quilt, you might need 4 strips measuring 4.5 x 50 inches.
Take your time with this step, ensuring all pieces are cut precisely. Using a rotary cutter and a quilting ruler can help achieve straight, accurate cuts.
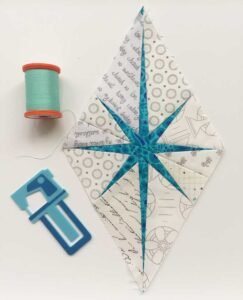
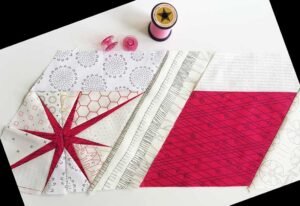
Assembling the Starburst Blocks
The starburst blocks are the focal point of this quilt, and assembling them requires careful attention to detail. Begin by sewing the starburst rays to each side of the center square. Place the first rectangle right sides together with the square and sew using a ¼-inch seam allowance.
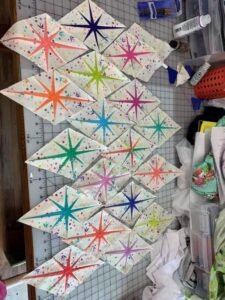
Press the seam open and repeat this process for the remaining three rectangles. Once all four rectangles are attached, you should have a starburst block with the center square in the middle. Repeat this process to create all the starburst blocks you need for your quilt.
Once you have all the blocks assembled, arrange them on your design wall or a large, flat surface. Play around with the layout until you’re happy with the color distribution and overall design.
Adding the Background Squares
After you’ve assembled and arranged your starburst blocks, it’s time to add the background squares. These squares will be placed between the starbursts to help the design stand out and give the quilt its distinctive look.
To start, place one background square at each corner of your starburst blocks. Sew the squares together, maintaining a ¼-inch seam allowance throughout. Press the seams toward the background squares to reduce bulk and create a smoother finish.
Continue adding the background squares until all the starbursts are connected, forming a complete quilt top. Double-check your seams for accuracy, as even small deviations can affect the quilt’s overall appearance.
Assembling the Quilt Top
With the starburst blocks and background squares sewn together, your quilt top is nearly complete. The next step is to add the border strips, which will frame the quilt and give it a finished look.
Start by sewing the border strips to the top and bottom of the quilt top. Ensure the strips are centered and that the seams align with the edges of the quilt. Press the seams toward the borders, then repeat the process for the sides of the quilt.
Once the borders are attached, give the entire quilt top a final press. This will help set the seams and prepare the top for quilting. Make sure to check for any loose threads or areas that need reinforcement before moving on to the quilting stage.
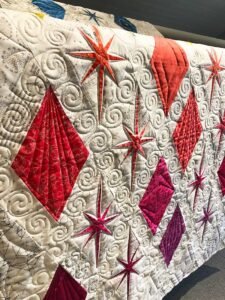
Quilting the Layers Together
Quilting is where the Atomic Starburst design truly comes to life. Before you begin, you’ll need to create a quilt sandwich by layering the quilt top, batting, and backing fabric. Secure the layers together with safety pins or basting spray to prevent shifting during quilting.
For the Atomic Starburst Quilt, consider using a combination of straight-line and free-motion quilting. Straight-line quilting along the seams of the starbursts will enhance the design, while free-motion quilting in the background squares can add texture and depth.
Take your time quilting each section, ensuring that your stitches are even and consistent. If you’re new to free-motion quilting, practice on scrap fabric before working on your quilt. This will help you gain confidence and refine your technique.
EXPLORE THE BEST QUILT PATTERNS FOR INSPIRATION!
Binding and Finishing
Once the quilting is complete, the final step is to bind the quilt. Binding encases the raw edges and gives the quilt a polished finish. Cut binding strips from your fabric, each measuring 2.5 inches wide. You’ll need enough strips to go around the entire perimeter of the quilt.
Join the strips end-to-end using diagonal seams, then press the seams open. Fold the binding in half lengthwise, wrong sides together, and press again. Attach the binding to the front of the quilt using a ¼-inch seam allowance, then fold it over to the back and hand-stitch it in place.
After the binding is attached, give your quilt a final press. Your Atomic Starburst Quilt is now complete and ready to be enjoyed. Whether you use it as a cozy throw or a decorative piece, this quilt is sure to be a striking addition to any home.
Creating an Atomic Starburst Quilt is an enjoyable and fulfilling project that combines the precision of quilting with the bold aesthetics of mid-century design.
By following this tutorial, you’ll be able to craft a quilt that not only looks stunning but also showcases your skills as a quilter. Remember to take your time with each step, and most importantly, enjoy the process. Happy quilting!


