Autumn Wonders Block – TUTORIAL is a creative and fun way to bring the warm, earthy tones of autumn into your quilting projects. This detailed tutorial will guide you through the process of creating a beautiful autumn-themed block that you can use in a variety of designs. Whether you’re a beginner or an experienced quilter, this project will inspire you to embrace the beauty of the season while expanding your skills. In this tutorial, we’ll walk you through all the steps, from materials to assembly, so you can create your own stunning Autumn Wonders Block. Let’s dive in!
The Autumn Wonders Block is a perfect project for anyone looking to incorporate the colors and textures of autumn into their quilting. The combination of rich browns, oranges, and golds captures the essence of fall foliage, making this block ideal for creating quilts, wall hangings, and even decorative pillows. With its versatility, it’s no wonder this block has gained popularity among quilters everywhere.
This tutorial will break down the process into manageable steps to ensure that even beginners can follow along. Each section will guide you through a specific stage of the block’s creation, providing tips and tricks along the way to help you achieve a perfect result. By the end of this tutorial, you’ll have a beautiful autumn-inspired quilt block ready to showcase in your next project. Now, let’s get started!
1. Materials Needed for the Autumn Wonders Block
Before you begin creating your Autumn Wonders Block, it’s important to gather all the necessary materials. Having everything on hand will make the process smoother and more enjoyable. Here’s a list of what you’ll need:
SEE OTHER FACE PATTERNS HERE!
- Fabric: The key to capturing the essence of autumn in your block is choosing the right fabrics. Opt for rich, warm tones such as orange, yellow, brown, and deep reds to represent the colors of fall leaves. You can also mix in some neutral fabrics, like cream or light brown, to balance out the design.
- Quilt Batting: Select a medium weight quilt batting for a soft and sturdy block. This will provide structure to your block while allowing for flexibility when sewing.
- Thread: Choose a thread that complements your fabric colors. A neutral cream or light brown thread will work well for most of the stitching, while a dark orange or red thread could be used for accents.
- Rotary Cutter and Mat: Precision cutting is essential for a clean and neat block. A rotary cutter paired with a self-healing cutting mat will allow you to cut your fabric into the required shapes and sizes with ease.
- Quilting Ruler: A quilting ruler will help ensure your cuts are accurate. This is especially important when creating the various shapes that make up the Autumn Wonders Block.
- Pins or Clamps: Use pins or fabric clamps to hold your fabric pieces together before sewing. This will prevent any shifting or misalignment.
Now that you have your materials ready, let’s move on to the next section, where we’ll explain how to cut your fabric pieces.
2. Cutting the Fabric for Your Block
Cutting the fabric pieces accurately is one of the most important steps in creating the Autumn Wonders Block. For this block, you’ll need to cut a variety of shapes, including squares, triangles, and strips. Here’s how to do it:
- Squares: Begin by cutting several square pieces of fabric. For a standard Autumn Wonders Block, you’ll need squares in different colors of fall-inspired tones. Use your quilting ruler and rotary cutter to create precise squares that are the correct size for the pattern.
- Triangles: Next, cut triangular pieces from your fabric. You can achieve this by cutting a square fabric piece in half diagonally. These triangles will form part of the design, giving the block its geometric appeal.
- Strips: Cut fabric strips of various widths to create the block’s border and to add some dimension to the overall design. Depending on your pattern, you might need narrow or wider strips.
- Precise Measurements: It’s crucial to measure accurately to ensure that all the pieces fit together perfectly when you assemble the block. Take your time when measuring and cutting, as uneven pieces can make the final product look sloppy.
- Organizing Your Pieces: Once everything is cut, organize the fabric pieces by color and shape. This will help you stay organized during the sewing process and reduce any confusion as you begin assembling your block.
- Cutting Tips: Always make sure your cutting mat is clean and in good condition. A dull rotary cutter can result in uneven cuts, which can affect the overall look of your block.
With your fabric pieces cut and ready to go, it’s time to start assembling the block. Let’s move on to the next section to learn how to sew the pieces together.
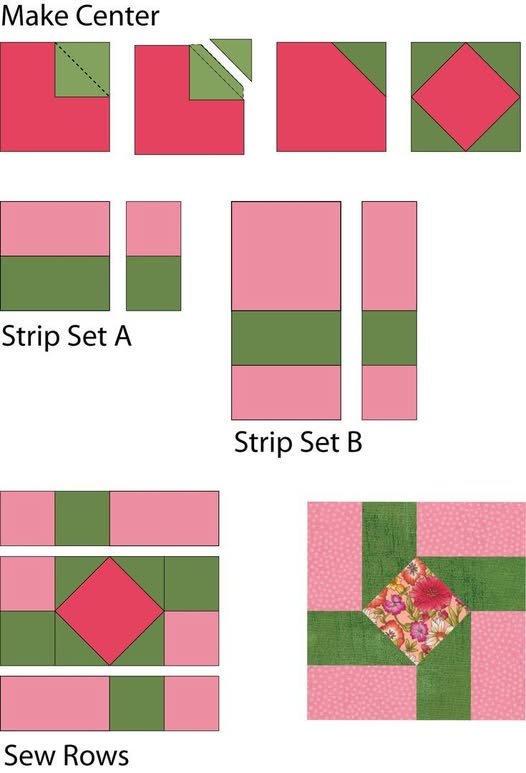
3. Assembling the Autumn Wonders Block
Now comes the fun part: assembling your Autumn Wonders Block. With your fabric pieces cut and organized, you’ll begin piecing everything together. Follow these steps for a perfect block:
- Start with the Center: Begin by sewing the center square of the block. This will be the focal point of your design. Make sure to sew the fabric pieces together with a quarter-inch seam allowance for consistency.
- Add the Triangles: Next, attach the triangular pieces around the center square. These will create the star-like design that is characteristic of the Autumn Wonders Block. Sew each triangle to the square, ensuring the edges align perfectly.
- Attach the Strips: Once the triangles are attached, it’s time to add the strips. Sew the strips around the edges of the block, creating a border that frames the design. These strips will help give the block a finished look.
- Press the Seams: After sewing each section, press the seams open with an iron. This will help the block lay flat and prevent any puckering or twisting.
- Square Up the Block: Once the block is fully assembled, use your quilting ruler to square up the edges. This will ensure that your block is the correct size and that all the edges are straight.
- Final Touches: Inspect your block for any loose threads or uneven seams. Trim any excess fabric and make sure everything is neatly finished before moving on to the next block.
Your Autumn Wonders Block is now complete! The next step is to add it to your quilt project or display it on its own as a decorative piece.
4. Adding the Block to Your Quilt or Project
Now that you have completed your Autumn Wonders Block, you can incorporate it into your larger quilting project. Here’s how to add it to a quilt or use it for other decorative purposes:
- Quilt Layout: If you’re creating a quilt, lay out your blocks to determine the final arrangement. You can mix and match with other autumn-themed blocks or use several Autumn Wonders Blocks for a cohesive design.
- Join the Blocks: Once you’ve decided on the layout, sew the blocks together. Use a consistent seam allowance to ensure that all the blocks align perfectly. Press the seams open to keep everything neat and flat.
- Quilt the Layers: If you’re turning your block into a quilt, add quilt batting between the top layer (the Autumn Wonders Block) and the backing fabric. Quilt the layers together by stitching along the seams or using your preferred quilting pattern.
- Finish the Edges: Once the quilt top is complete, finish the edges with a quilt binding. You can choose a fabric that complements the autumn theme or go with a contrasting color for added interest.
- Decorative Pillow or Wall Hanging: If you prefer, you can use the Autumn Wonders Block as a decorative pillow or wall hanging. Simply add a backing fabric and either quilt it or add some decorative stitching for extra flair.
- Gift Idea: An Autumn Wonders Block makes a wonderful gift, whether it’s part of a quilt, pillow, or wall hanging. It’s a thoughtful way to share the beauty of autumn with friends and family.
With these final touches, your Autumn Wonders Block is ready to be enjoyed in your home or as a gift.
FAQ – Autumn Wonders Block Tutorial
1. What fabrics are best for the Autumn Wonders Block?
Fabrics in autumn-inspired colors such as orange, brown, gold, yellow, and deep reds work best. You can also mix in cream or light brown to balance the design.
🌟Join our exclusive Quilt broadcast list on Messenger! Receive the best patterns, tips, and updates directly in your inbox. Our team is ready to send you delightful content that will inspire your projects. Don’t miss this opportunity to stay updated and create amazing pieces. Join now and be part of this passionate quilt community!✨📩
2. Can I use this tutorial for a beginner quilting project?
Yes! This tutorial is beginner-friendly, as it breaks down the process into easy-to-follow steps. With careful attention to cutting and sewing, even a beginner can create a beautiful Autumn Wonders Block.
3. How do I ensure my fabric pieces fit together properly?
Accurate cutting is key. Use a quilting ruler and rotary cutter to ensure all your fabric pieces are the correct size. Also, use a consistent quarter-inch seam allowance when sewing the pieces together.
4. How do I add this block to my quilt?
After assembling your Autumn Wonders Block, lay out the blocks in your desired arrangement. Sew them together, and add quilt batting and backing to complete your quilt. Don’t forget to bind the edges for a finished look.
5. Can I create other projects with this block?
Absolutely! You can turn the Autumn Wonders Block into a decorative pillow, wall hanging, or table runner. The possibilities are endless!
Conclusion
In this tutorial, we’ve covered everything you need to know to create a beautiful Autumn Wonders Block. From selecting fabrics and cutting pieces to assembling the block and incorporating it into your quilt or project, each step is designed to guide you through the process smoothly. We hope this tutorial inspires you to embrace the autumn season with your quilting projects.
Please leave your sincere opinion and any suggestions you might have for future tutorials. We’d love to hear about your experience with the Autumn Wonders Block and see how it turned out!


