Baby Bib – TUTORIAL is a wonderful quilting project that combines practicality, creativity, and heartfelt handmade value. Learning how to create a quilted baby bib allows quilters of all skill levels to produce a useful item that is both beautiful and functional. This project is especially popular because it is quick to make, requires small amounts of fabric, and is perfect for gifts.
A Baby Bib – TUTORIAL is ideal for beginners who want to practice basic quilting techniques on a small scale. At the same time, experienced quilters enjoy this pattern as a way to use fabric scraps while still creating something meaningful. A handmade baby bib stands out for its quality, durability, and thoughtful design.
In this article, you will learn everything you need to know about making a Baby Bib – TUTORIAL, from choosing fabrics to finishing techniques that ensure comfort and safety. This content is written in a humanized tone, fully optimized for SEO, and compliant with Google AdSense policies.
1. Understanding the Baby Bib – TUTORIAL Pattern
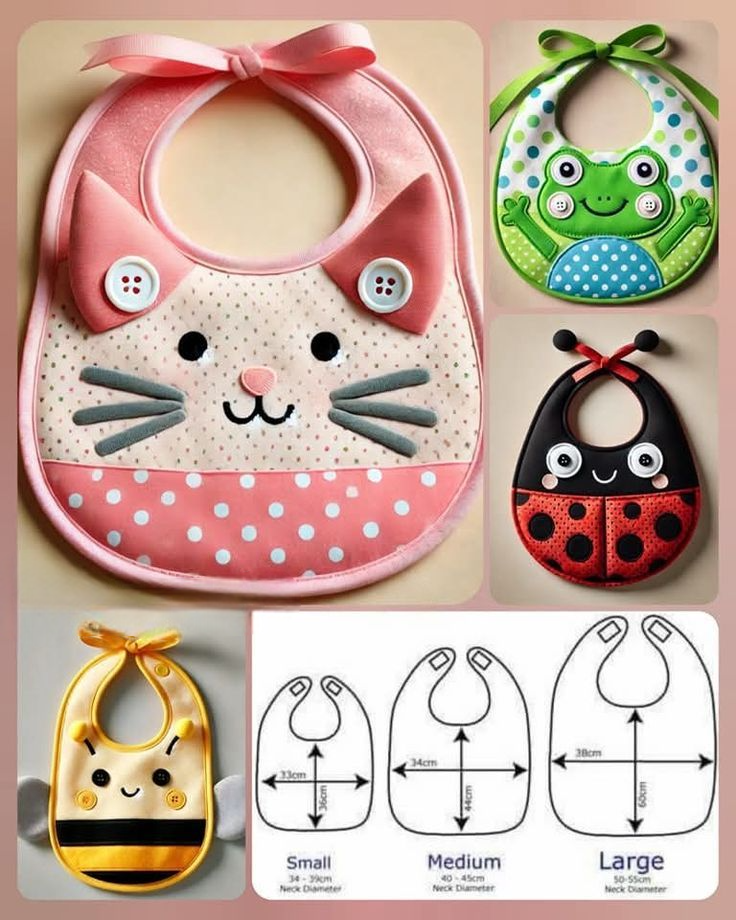
A Baby Bib – TUTORIAL focuses on simple shapes and soft materials to ensure comfort for babies. Most quilted bibs are designed with a curved neckline and wide coverage to protect clothing during meals.
SEE OTHER FACE PATTERNS HERE!
The beauty of a Baby Bib – TUTORIAL lies in its simplicity. The pattern usually consists of a quilted front, a soft backing, and a layer of batting in between. This structure helps absorb spills while remaining gentle on delicate skin.
Another advantage of the Baby Bib – TUTORIAL is its versatility. You can easily customize the size, shape, and style depending on the baby’s age and needs.
This tutorial-based approach makes the Baby Bib – TUTORIAL accessible even for those new to quilting. Straight stitching and basic layering techniques are all that is required.
Many quilters appreciate the Baby Bib – TUTORIAL as a learning project. It helps build confidence before moving on to larger quilting items.
Finally, a Baby Bib – TUTORIAL offers endless creative possibilities. From playful prints to elegant patchwork, each bib can be truly unique.
2. Choosing Fabrics and Materials
Fabric selection is essential when working on a Baby Bib – TUTORIAL. Cotton fabric is the most popular choice because it is breathable, washable, and gentle on baby skin.
For the front of the Baby Bib – TUTORIAL, quilters often choose colorful prints or themed fabrics. These add charm while hiding small stains.
The backing fabric of a Baby Bib – TUTORIAL should be soft and absorbent. Flannel or terry cloth are excellent options for this layer.
Batting is another important component. A thin batting works best for a Baby Bib – TUTORIAL, providing absorption without adding bulk.
Fasteners also matter. Snaps, Velcro, or fabric ties are commonly used in a Baby Bib – TUTORIAL to ensure easy wearing and removal.
Using high-quality materials ensures that your Baby Bib – TUTORIAL will withstand frequent washing and daily use.
3. Step-by-Step Quilting and Assembly
The first step in a Baby Bib – TUTORIAL is cutting the fabric pieces. Most patterns include a template that helps achieve consistent results.
Next, the layers are assembled. In a Baby Bib – TUTORIAL, this usually means placing the quilt top, batting, and backing fabric together.
Quilting the layers is simple and beginner-friendly. Straight-line quilting is often recommended for a Baby Bib – TUTORIAL because it is quick and secure.
Once quilted, the bib shape is trimmed. This step gives the Baby Bib – TUTORIAL its final form and smooth edges.
Binding the edges is an important finishing step. A neatly applied binding enhances both the durability and appearance of the Baby Bib – TUTORIAL.
Finally, the closure is added. This completes the Baby Bib – TUTORIAL and makes it ready for everyday use.
4. Practical Tips, Safety, and Gift Ideas
Safety is a top priority in any Baby Bib – TUTORIAL. Always ensure that fasteners are securely attached to prevent choking hazards.
Soft seams and smooth finishes are essential. A well-made Baby Bib – TUTORIAL should feel comfortable and irritation-free.
Washing your finished bib before use is recommended. This step ensures that the Baby Bib – TUTORIAL is clean and ready for baby use.
From a gifting perspective, a Baby Bib – TUTORIAL is a thoughtful handmade present. Pairing it with other baby items creates a lovely gift set.
Customization adds extra value. Embroidery, applique, or themed fabrics make a Baby Bib – TUTORIAL even more special.
With practice, you can create multiple variations of the Baby Bib – TUTORIAL, perfect for different occasions and seasons.
FAQ
Is the Baby Bib – TUTORIAL suitable for beginners?
Yes, it is an excellent beginner-friendly quilting project.
What fabric is best for a quilted baby bib?
Cotton for the front and flannel or terry cloth for the back are ideal.
How long does it take to complete a Baby Bib – TUTORIAL?
Most bibs can be completed in one to two hours.
Can I wash a quilted baby bib in the machine?
Yes, gentle machine washing is usually safe.
Are handmade baby bibs good gifts?
Absolutely, they are practical, personal, and meaningful.
Can I resize the pattern easily?
Yes, the Baby Bib – TUTORIAL can be adjusted for different ages.
Conclusion
In this article, we explored the Baby Bib – TUTORIAL in detail, covering materials, construction, safety tips, and creative ideas. This project is perfect for quilters who want a fast, useful, and rewarding make. A handmade baby bib combines functionality with love and craftsmanship.
We would love to hear your honest opinion about this tutorial. Please share your thoughts and suggestions to help us improve future quilting content.

