The Bannard Hills Block – TUTORIAL is a beautiful quilt block that combines movement, contrast, and classic piecing techniques in a design that feels both timeless and fresh. Whether you are building a sampler quilt, experimenting with new block layouts, or creating a full quilt top based on a single striking unit, the Bannard Hills Block offers endless creative possibilities.
In this complete guide, you’ll learn how to construct the block step by step, choose the best fabrics, and customize the layout for stunning results. This tutorial is designed to be clear, practical, and approachable for quilters at different skill levels.
Let’s explore how to bring this elegant block to life.
1. Understanding the Bannard Hills Block Design
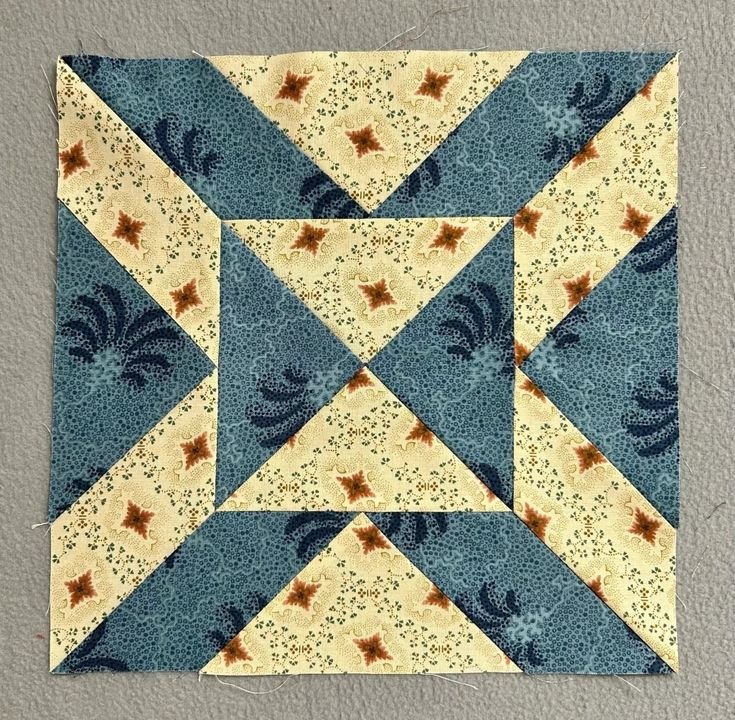
The Bannard Hills Block – TUTORIAL features a dynamic structure that plays with contrast and direction. The design often combines half-square triangles, strong diagonals, and balanced geometry to create visual movement across the quilt.
DISCOVER MORE FREE PATTERNS HERE!
One of the most appealing aspects of this block is how it looks different depending on fabric placement. High contrast fabrics highlight the geometric structure, while low contrast fabrics create a softer, blended effect.
This block works beautifully in:
Sampler quilts
Modern minimal quilts
Scrappy patchwork designs
Two-color high-contrast layouts
Seasonal themed quilts
Because of its structured layout, precision in cutting and sewing is important. However, the construction relies on fundamental quilting techniques, making it achievable even if you are still developing your piecing skills.
The final look of the Bannard Hills Block can vary dramatically depending on color value placement. Light and dark fabric positioning plays a crucial role in defining the pattern’s movement.
2. Materials and Preparation
Before starting the Bannard Hills Block – TUTORIAL, gather your essential quilting tools and materials.
You will need:
Quilting cotton fabrics (at least two contrasting colors)
Rotary cutter
Cutting mat
Quilting ruler
Sewing machine
Coordinating thread
Iron and pressing surface
Fabric Selection Tips
Choose fabrics with clear contrast. A strong light-and-dark combination makes the geometric elements stand out. For a modern look, use solid fabrics. For a traditional feel, select small-scale prints or classic patterns.
You can also experiment with:
Monochromatic color schemes
Bold modern prints
Soft pastel palettes
High-impact black and white combinations
Press and starch your fabric before cutting. Accurate cutting ensures your block will finish square and align correctly with other blocks.
Cutting the Pieces
While exact measurements depend on your desired finished size, the block typically includes:
Squares for half-square triangles
Background squares
Accent pieces for contrast
Label your pieces after cutting to keep your layout organized. This small step saves time and prevents confusion during assembly.
3. Step-by-Step Bannard Hills Block – TUTORIAL
Now let’s walk through the construction process of the Bannard Hills Block – TUTORIAL.
Step 1: Create Half-Square Triangles
Start by pairing your contrasting fabric squares right sides together. Draw a diagonal line from one corner to the opposite corner on the back of the lighter square.
Sew a quarter-inch seam on both sides of the drawn line. Cut directly on the line to separate the units. Press the seams open or toward the darker fabric, depending on your preference.
Trim the half-square triangles to the exact unfinished size required. Precision at this stage ensures your block will assemble neatly.
Step 2: Arrange the Layout
Lay out all your pieces on a flat surface before sewing. The Bannard Hills Block relies on directional placement, so take a moment to double-check orientation.
Arrange the half-square triangles and background pieces to form the characteristic diagonal or geometric structure of the block.
Taking a photo of your layout can help prevent mistakes when transferring the design to your sewing machine.
Step 3: Sew Row by Row
Piece the block row by row. Sew units together with a consistent quarter-inch seam allowance.
Press seams carefully after each row. You may alternate pressing directions to reduce bulk at intersections. Accurate seam allowances are critical for maintaining sharp points and aligned corners.
Step 4: Join the Rows
Once the rows are assembled, sew them together. Pin at seam intersections to ensure perfect alignment.
Press the completed block flat. Measure the unfinished block to confirm it matches your intended size.
If needed, trim slightly to square up the block, being careful not to cut off important points.
Your Bannard Hills Block – TUTORIAL is now complete and ready to be incorporated into a quilt top.
4. Layout Ideas and Creative Variations
One of the most exciting aspects of the Bannard Hills Block – TUTORIAL is how dramatically the overall quilt changes depending on layout.
Single Block Focus
Use one large Bannard Hills Block as the centerpiece of a wall hanging or table topper. Add borders to frame the design and highlight its geometry.
Repeated Block Quilt
When multiple blocks are placed together, the diagonals can create secondary patterns across the quilt. Rotate alternating blocks to form new shapes and visual pathways.
Two-Color Modern Version
Choose one bold color and one neutral background for a clean, contemporary look. This style works beautifully in minimalist home décor.
Scrappy Interpretation
Use a variety of coordinated scraps for the triangle sections while keeping the background consistent. This adds texture and personality without overwhelming the design.
Play With Scale
Increase or decrease the block size to create baby quilts, throw quilts, or king-size quilts. Larger blocks emphasize bold geometry, while smaller blocks create intricate detail.
Because this block relies on contrast and direction, experimentation is highly encouraged. Try different fabric placements before final assembly to see how the overall effect changes.
Frequently Asked Questions (FAQ)
Is the Bannard Hills Block suitable for beginners?
Yes. While precision is important, the block uses fundamental quilting techniques such as half-square triangles and straight seams.
What is the most important tip for accuracy?
Consistent quarter-inch seam allowances and careful trimming of half-square triangles are essential for sharp points and proper alignment.
Can I resize the block?
Yes. By adjusting your starting square measurements, you can scale the block to fit different quilt sizes.
What fabrics work best?
High-contrast quilting cotton fabrics produce the most defined geometric effect. Solids and small-scale prints both work well.
Can I use this block in a sampler quilt?
Absolutely. The Bannard Hills Block pairs beautifully with other geometric quilt blocks in sampler layouts.
Conclusion
The Bannard Hills Block – TUTORIAL is a striking and versatile quilt block that rewards careful piecing with bold geometric beauty. Its balanced structure, strong diagonals, and adaptability make it a valuable addition to any quilter’s pattern collection.
With thoughtful fabric selection and precise construction, you can transform this single block into an entire quilt full of movement and visual interest. Whether you prefer modern minimalism or scrappy charm, the Bannard Hills Block offers endless creative opportunities.
If you enjoyed this tutorial, share your thoughts and tell me which fabric combination you would use for your Bannard Hills Block. Your next quilt masterpiece might start with this very design.

