Quilting is a cherished tradition that brings together creativity and craftsmanship, resulting in beautiful pieces that tell unique stories. One of the most beloved and timeless quilt patterns is the Bear’s Paw Quilt. With its strong, symbolic design, the Bear’s Paw Quilt is a fantastic project for quilters of all skill levels. Whether you’re a beginner or an experienced quilter, this classic design will bring charm and character to any room. In this article, we will explore the Bear’s Paw Quilt, provide you with a free pattern, and guide you through the process of making your own quilt.
The Bear’s Paw Quilt pattern is a perfect blend of simplicity and elegance. The geometric shapes that make up the bear’s paw evoke both a sense of strength and nature’s beauty, making it a popular choice for quilters who enjoy nature-inspired designs. Additionally, the bold pattern is easy to customize, allowing quilters to experiment with color combinations and fabric choices to create a personalized masterpiece.
Before we dive into the specifics of making your own Bear’s Paw Quilt, it’s important to understand the history behind this iconic design. The Bear’s Paw is a traditional pattern that dates back to the 1800s and has been passed down through generations of quilters. Its symbolic meaning varies, but it is often seen as a representation of strength, survival, and connection to nature.
1. The Meaning and Symbolism Behind the Bear’s Paw Quilt
The Bear’s Paw Quilt is a design deeply rooted in nature and symbolism. In many cultures, bears are seen as powerful creatures that symbolize bravery, resilience, and protection. The Bear’s Paw pattern is often interpreted as a representation of the bear’s tracks, with each paw print symbolizing strength and guidance. Whether you’re making the quilt as a personal project or as a gift for someone special, the symbolism behind the design adds emotional depth to your creation.
SEE OTHER FACE PATTERNS HERE!
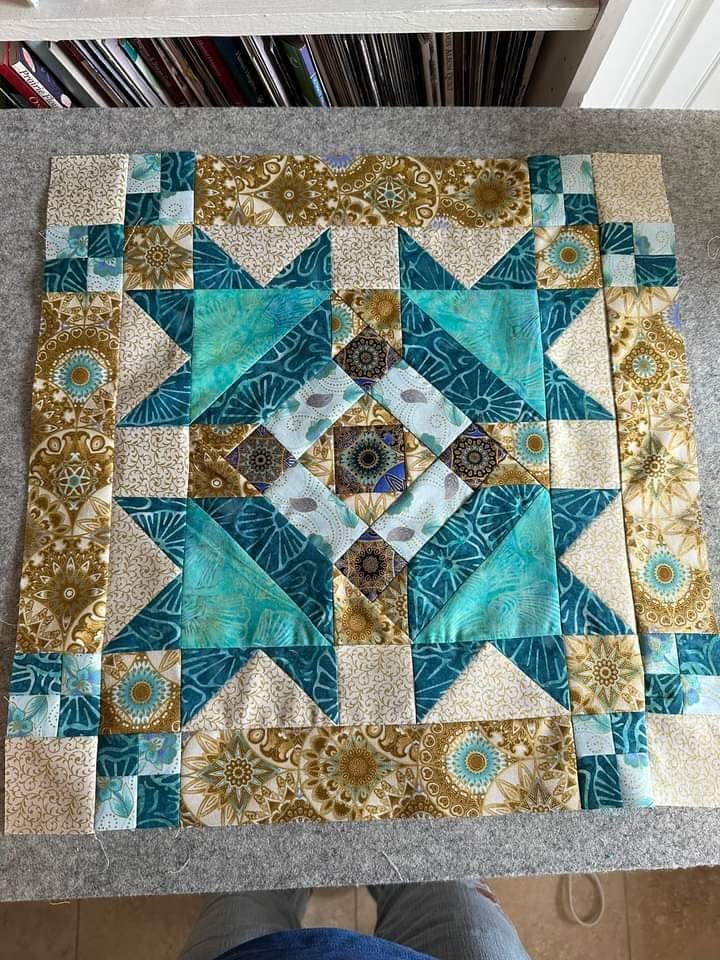
The pattern itself is made up of geometric shapes, including squares, triangles, and diamonds. These simple shapes come together to form the recognizable paw print, and the layout can vary depending on how you choose to assemble the pieces. The Bear’s Paw pattern is versatile and can be adapted to suit different styles. For instance, some quilters prefer a more traditional design with muted colors, while others opt for vibrant, bold colors that make the bear’s paw stand out. Whichever approach you choose, the result is always striking and meaningful.
Many quilters find that the Bear’s Paw Quilt design works well for all occasions. From baby quilts to bedspreads, the pattern can be scaled up or down to fit your needs. The strong, nature-inspired motif makes it an excellent choice for a rustic or woodland-themed home, while the pattern’s geometric structure also lends itself well to modern interpretations with more abstract or contemporary colors.
2. Materials You’ll Need for Your Bear’s Paw Quilt
Before starting your Bear’s Paw Quilt, it’s essential to gather the right materials. The fabrics and tools you choose will impact the overall look and feel of your quilt. Here’s a list of the basic materials you’ll need to get started:
Fabric Selection:
For a Bear’s Paw Quilt, you will need several different fabric types for the main blocks, the background, and the borders. Quilting cotton is the most popular choice for this project due to its durability and ease of use. You’ll need the following fabric:
- Main fabric: Choose a fabric that will serve as the main color for the paw blocks. This can be a solid color or a pattern that complements the overall design.
- Background fabric: A neutral fabric, such as white, cream, or light beige, works best for the background. This will make the bear’s paw stand out.
- Border fabric: If you want to add a border to your quilt, choose a coordinating fabric that complements the colors you’ve used for the blocks.
Additional Materials:
- Batting: This is the layer that provides warmth and thickness to the quilt. Choose a batting that is soft yet provides enough padding to give the quilt a comfortable weight.
- Backing fabric: This is the fabric that forms the back of the quilt. You can choose a simple solid color or a pattern that complements the quilt front.
- Quilting thread: Select a strong, durable thread for piecing your quilt together. You can also choose a contrasting thread to highlight your stitches or a matching thread for a more seamless look.
Once you’ve gathered your materials, you’ll be ready to start piecing together your Bear’s Paw Quilt. But before you begin, make sure you have the necessary tools, including a sewing machine, quilting ruler, rotary cutter, and pins.
3. Step-by-Step Guide to Creating Your Bear’s Paw Quilt
Creating a Bear’s Paw Quilt is a rewarding experience that requires patience and attention to detail. This traditional design can be broken down into manageable steps, making it accessible to quilters of all levels. Here’s a step-by-step guide to help you make your own quilt:
Step 1: Choose and Cut Your Fabrics
First, choose your fabrics based on your desired color palette. Cut the fabric according to the instructions in the pattern. Typically, you’ll need to cut several squares and triangles for the blocks and background.
Step 2: Assemble the Bear’s Paw Blocks
The Bear’s Paw Quilt pattern consists of multiple blocks that come together to form the complete design. Begin by assembling the individual blocks. This usually involves sewing together squares and triangles to create the paw shape. Each block typically consists of a central square surrounded by triangles that form the “claws” of the paw.
Step 3: Join the Blocks Together
Once you’ve completed the individual blocks, it’s time to join them together to create the full quilt. Lay out your blocks in the desired pattern, ensuring that the bear’s paws are aligned. Pin and sew the blocks together, making sure the seams are neat and consistent.
Step 4: Add the Quilt’s Borders
Once all the blocks are joined, you can add a border to frame the quilt. This is an optional step, but it can add an extra touch of elegance to the design. Cut strips of fabric for the border, and sew them onto the edges of the quilt.
Step 5: Quilt the Layers Together
Now that the quilt top is complete, it’s time to quilt the layers. Lay out your quilt top, batting, and backing fabric. Pin the layers together, and then quilt through all three layers. You can either machine quilt or hand quilt, depending on your preference.
Step 6: Bind the Quilt
The final step in creating your Bear’s Paw Quilt is to bind the edges. Cut strips of fabric for the binding, fold them over the edges of the quilt, and sew them into place. This will give your quilt a polished, finished look.
4. Customizing Your Bear’s Paw Quilt Design
One of the best things about the Bear’s Paw Quilt is how easily it can be customized to fit your style. Here are a few tips to help you personalize your quilt:
Tip 1: Play with Color
Experiment with different color combinations to create a quilt that reflects your personal style. For a more traditional look, use earthy tones like browns, oranges, and yellows. If you prefer a modern design, opt for bold colors like teal, coral, and navy blue.
Tip 2: Add Appliqué or Embellishments
To make your Bear’s Paw Quilt even more unique, consider adding appliqué designs or other embellishments. You can add extra details like small bears, trees, or wildlife to complement the main design.
Tip 3: Use Various Fabrics
Mix and match different fabric patterns and textures to create a quilt that’s visually interesting. Consider using flannel for a cozy quilt or denim for a rustic look.
Tip 4: Play with Block Arrangement
You don’t have to follow the traditional layout for the Bear’s Paw Quilt. Try rearranging the blocks in different ways to create new patterns or visual effects.
Tip 5: Add Personalized Elements
If you’re making the quilt as a gift, consider adding a personal touch by embroidering initials, names, or dates into the quilt blocks.
Tip 6: Experiment with Quilting Styles
The quilting technique you choose can have a big impact on the overall look of the quilt. Try free-motion quilting for a more artistic effect, or go with straight-line quilting for a clean, modern look.
FAQ about Bear’s Paw Quilts
1. What size is the Bear’s Paw Quilt pattern? The size of the quilt depends on the number of blocks you create and the size of the individual blocks. You can easily adjust the size by adding or removing blocks.
🌟Join our exclusive Quilt broadcast list on Messenger! Receive the best patterns, tips, and updates directly in your inbox. Our team is ready to send you delightful content that will inspire your projects. Don’t miss this opportunity to stay updated and create amazing pieces. Join now and be part of this passionate quilt community!✨📩
2. How long does it take to make a Bear’s Paw Quilt? The time it takes to make a Bear’s Paw Quilt varies depending on the complexity of the design and your skill level. On average, it may take anywhere from a few days to several weeks.
3. Can I make a Bear’s Paw Quilt by hand? Yes, you can make a Bear’s Paw Quilt by hand. Many quilters prefer hand-piecing for the tactile experience, but machine piecing is faster and more efficient.
4. What fabrics should I use for a Bear’s Paw Quilt? Cotton quilting fabric is the most popular choice, but you can also use other fabrics like flannel or linen for a different texture.
5. Can I use a Bear’s Paw Quilt as a bedspread? Yes, the Bear’s Paw Quilt is a versatile design and can be used as a bedspread, wall hanging, or throw depending on the size of the quilt.
The Bear’s Paw Quilt is a classic pattern that brings together nature-inspired design and quilting tradition. Whether you are making the quilt as a gift, a personal project, or a decorative piece for your home, it is sure to become a cherished heirloom.
By following the steps outlined in this guide, you’ll be well on your way to creating a beautiful Bear’s Paw Quilt that reflects your unique style. Don’t forget to experiment with color, fabric, and layout to make the quilt your own. We’d love to hear about your experiences with this pattern, so feel free to leave a comment or share your suggestions below!


