Quilting is a creative and relaxing hobby that allows you to turn beautiful fabric into functional art.
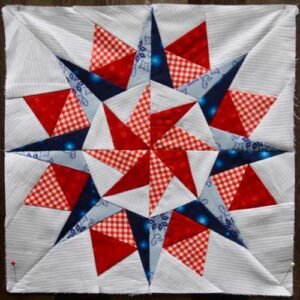
One of the most captivating quilt patterns out there is the Cactus Compass Quilt Block. This intricate design resembles a compass, offering a striking geometric look that stands out in any quilt.
In this tutorial, we’ll guide you through the process of making this stunning quilt block from start to finish, including all the fabric cuts and measurements you’ll need.
1. What is a Cactus Compass Quilt Block?
The Cactus Compass Quilt Block is a dynamic pattern featuring sharp angles and symmetrical points, giving it a sense of direction and movement, much like a compass. It’s an excellent pattern for intermediate quilters who want to expand their skills and create something truly eye-catching.
The key to this block is its precision. It requires careful cutting and sewing to ensure that all the points meet perfectly. While it might look complicated at first, breaking it down into smaller steps will make the process manageable and enjoyable. This block is perfect for anyone looking to enhance their quilt with bold, intricate designs.
Many quilters use the Cactus Compass pattern in wall hangings or statement pieces in larger quilts. Its sharp, clear lines draw the eye, making it a focal point of any project. Plus, it’s versatile – you can experiment with different color combinations to make the pattern uniquely yours.
2. Materials and Fabric Requirements
Before you dive into this project, it’s important to gather all the necessary materials. The right tools and fabrics will ensure that your Cactus Compass Quilt Block comes together seamlessly. Here’s what you’ll need:
- Rotary cutter, ruler, and mat for precise cuts.
- A sewing machine with a ¼-inch foot for accurate seams.
- A selection of fabrics: one dark, one medium, and one light-colored fabric for contrast.
- Thread matching your fabrics.
- Iron and ironing board.
When it comes to fabric selection, you’ll need three different colors or prints. The contrast between the fabrics is essential to highlight the geometry of the quilt pattern. You can opt for a modern look with solids or a more traditional style with prints.
Ensure that you pre-wash and iron your fabric before starting. This will help prevent shrinkage after sewing and give you more accurate cuts. Pre-washing also removes any chemicals used during manufacturing, which can affect your fabric’s texture.
3. Cutting the Fabric for the Cactus Compass Quilt Block
To begin, you’ll need to cut your fabric into specific shapes and sizes. Precision is key here, so take your time with this step. Below is a guide for cutting the pieces needed for one Cactus Compass Quilt Block:
- Dark fabric: Cut 4 triangles measuring 6 ½ inches on the longest side. This fabric will form the sharp, outer points of your compass.
- Medium fabric: Cut 4 rectangles, 5 ½ inches by 2 ½ inches. These will be part of the inner ring around the compass.
- Light fabric: Cut 4 squares, 3 ½ inches by 3 ½ inches. These will help soften the overall look and balance the design.
For those looking to adjust the size of the block, simply scale these measurements up or down, keeping the proportions consistent. The key to a visually appealing Cactus Compass Quilt Block lies in keeping the angles sharp and the points precise.
It’s recommended to label your pieces or keep them organized on a fabric board as you cut them. This will make assembling the block much smoother and ensure that no pieces get misplaced during the process.
4. Assembling the Quilt Block
Once your fabric pieces are cut, it’s time to assemble the block. This is where the quilt pattern starts to come to life. Follow these steps to put together your Cactus Compass Quilt Block:
- Start by sewing the dark fabric triangles together in pairs. Use a ¼-inch seam allowance for all your seams. Press the seams open to reduce bulk.
- Next, sew the medium fabric rectangles to the pairs of dark triangles. This will start to create the outer compass ring. Again, press all seams open or to one side depending on your preference.
- Now, sew the light fabric squares into the center of each medium rectangle. This step creates a balance between the outer and inner points of the compass, drawing attention to the center of the block.
As you sew, it’s important to maintain accuracy with your ¼-inch seams. This will ensure that your block stays true to size and that all points align correctly. If your seams aren’t accurate, your quilt block may come out slightly off, making it harder to match with other blocks later on.
Take your time during assembly. It’s a good idea to use pins or clips to hold pieces in place, especially when working with the sharp angles of this block. This will prevent fabric from shifting as you sew.
5. Tips for Precision and Accuracy
Precision is crucial when working with quilt patterns like the Cactus Compass. Small inaccuracies can cause misalignment, which may affect the overall appearance of your quilt block. Here are a few tips to help you maintain accuracy throughout the process:
- Always measure your fabric pieces twice before cutting. A small mistake in cutting can affect the entire block.
- Use a rotary cutter and a clear acrylic ruler to ensure straight, even cuts. This is especially important for the triangles in this pattern.
- If you’re new to quilting, consider practicing your seam allowance on scrap fabric first. A consistent ¼-inch seam is vital for proper block assembly.
Pressing is another important factor. Make sure to press (not iron) your seams, as dragging the iron can distort the fabric. Proper pressing will help your block lay flat and ensure that all the points come together perfectly.
Lastly, don’t rush the process. Quilting is meant to be an enjoyable, creative activity. Take your time, and if you make a mistake, it’s okay to undo a seam and try again.
6. Final Touches and Completing Your Block
Once your Cactus Compass Quilt Block is fully assembled, it’s time to check your work. Lay the block flat and examine the points where the seams meet. All the points should align nicely, and the block should measure 12 ½ inches square (or the size you’re aiming for).
If everything looks good, give your block one final press. If your points are slightly off, don’t worry – small imperfections are part of the handmade charm. However, if the block is significantly off, you may want to go back and adjust any seams that are too wide or too narrow.
After completing your first block, consider making several more to create a quilt top. The Cactus Compass pattern looks stunning when repeated, and the symmetry of the design creates a visually cohesive quilt. You can also mix and match with other quilt patterns for a more eclectic quilt project.
🌟 Join our exclusive Quilt broadcast list on Messenger! Receive the best patterns, tips, and updates directly in your inbox. Our team is ready to send you delightful content that will inspire your projects. Don’t miss this opportunity to stay updated and create amazing pieces. Join now and be part of this passionate quilt community! ✨📩
7. Conclusion: Elevate Your Quilt with the Cactus Compass Block
Creating a Cactus Compass Quilt Block might seem intimidating at first, but with a bit of patience and attention to detail, you’ll end up with a stunning quilt pattern that’s sure to impress. The combination of sharp angles, geometric precision, and balanced color choices make this block a great addition to any quilt.
Whether you’re incorporating it into a larger project or using it as a standalone piece, the Cactus Compass is a versatile design that will take your quilting to the next level. With this step-by-step guide, you have everything you need to start your next quilting adventure!


