Creating a festive and eye-catching table runner can be a delightful project, especially during the holiday season.
The Candy Cane Twist Table Runner is a perfect blend of charm and complexity, making it an ideal choice for quilters looking to add a touch of elegance to their decor.
In this tutorial, we’ll walk you through each step of crafting this beautiful table runner using quilt patterns and techniques.
Understanding the Candy Cane Twist Pattern
What Is the Candy Cane Twist Pattern?
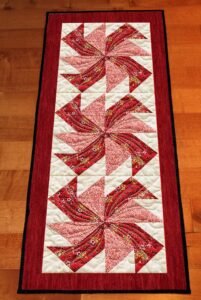
The Candy Cane Twist pattern is a striking quilt design that combines traditional quilt blocks with a modern twist. This pattern features bold diagonal lines and vibrant colors, reminiscent of candy canes and holiday cheer. The design is not only visually appealing but also offers a great way to showcase your fabric choices.
Why Choose the Candy Cane Twist?
Choosing the Candy Cane Twist pattern for your table runner adds a dynamic and festive touch to your table decor. Its geometric shapes and vibrant colors are perfect for holiday gatherings, creating a warm and inviting atmosphere. Additionally, this pattern allows for creativity in fabric selection and color placement, making each runner unique.
Materials and Tools Needed
To create the Candy Cane Twist Table Runner, you’ll need several materials and tools. Gather your quilting fabrics, a rotary cutter, a cutting mat, quilting rulers, and a sewing machine. Make sure you have enough fabric in your chosen color palette to match the dimensions of the runner. Also, prepare to use thread that complements your fabric choices for a polished finish.
Cutting the Fabric
Fabric Requirements
For the Candy Cane Twist Table Runner, you will need various fabric pieces, including background fabric, twist strips, and border fabric. Here’s a basic list of fabric requirements:
- Background Fabric: 1 yard
- Twist Strips Fabric: 1 yard (in contrasting colors)
- Border Fabric: 1/2 yard
- Binding Fabric: 1/2 yard
These measurements will ensure you have enough fabric for the various components of the table runner.
Cutting Background Fabric
Begin by cutting the background fabric into strips. For a standard table runner size of 16 x 40 inches, cut the background fabric into the following dimensions:
- Two strips of 4.5 inches x 40 inches
- Two strips of 4.5 inches x 16 inches
These strips will form the base of your table runner, providing a solid foundation for the twist design.
Cutting Twist Strips
Next, cut the twist strips from your contrasting fabric. These strips will create the twist effect in the design. You’ll need to cut:
- Eight strips of 2.5 inches x 16 inches
- Eight strips of 2.5 inches x 4.5 inches
These strips will be sewn together to form the diagonal twist pattern.
Assembling the Twist Blocks
Creating the Twist Blocks
To assemble the twist blocks, start by pairing the 2.5-inch x 16-inch strips with 2.5-inch x 4.5-inch strips. Arrange them to form a diagonal pattern that resembles a twist. Sew the strips together, making sure to press the seams open to reduce bulk. Each block will consist of a combination of these strips arranged in a specific order to achieve the candy cane effect.
Sewing the Blocks Together
Once you have completed the twist blocks, sew them together to form the central panel of the table runner. Arrange the blocks in a row, ensuring the diagonal twists align properly. Join the blocks with a quarter-inch seam allowance, and press the seams flat.
Adding Borders
After assembling the central panel, cut the border fabric into strips that will frame the runner. For a 16 x 40-inch table runner, cut:
- Two strips of 4.5 inches x 40 inches
- Two strips of 4.5 inches x 16 inches
Attach these border strips to the top and bottom, then to the sides of the central panel. This will complete the top portion of your table runner.
Quilting and Finishing Touches
Preparing for Quilting
Before you start quilting, layer the table runner top with batting and backing fabric. Cut the backing fabric slightly larger than the top, and trim the batting to the same size as the backing fabric. Layer the top, batting, and backing, and pin or baste them together.
Quilting the Table Runner
Use your sewing machine to quilt the layers together. You can choose a simple straight-line quilting pattern or a more intricate design, depending on your preference. For the Candy Cane Twist Table Runner, a diagonal or echo quilting pattern can enhance the twist effect.
🌟 Join our exclusive Quilt broadcast list on Messenger! Receive the best patterns, tips, and updates directly in your inbox. Our team is ready to send you delightful content that will inspire your projects. Don’t miss this opportunity to stay updated and create amazing pieces. Join now and be part of this passionate quilt community! ✨📩
Binding and Final Touches
To finish your table runner, trim any excess batting and backing fabric. Cut the binding fabric into strips and sew them around the edges of the table runner. Fold the binding to the back and hand-stitch it in place for a clean, professional finish. Press the runner to remove any wrinkles and enhance its appearance.
Creating a Candy Cane Twist Table Runner is a rewarding quilting project that adds a festive touch to your holiday decor. By following this tutorial, you can craft a beautiful and unique runner that showcases your quilting skills and creativity.
Whether you’re an experienced quilter or a beginner, this pattern offers a fun and satisfying way to enhance your holiday table setting. Enjoy the process and the finished product as a centerpiece for your celebrations!
This guide ensures that you have a comprehensive understanding of the Candy Cane Twist pattern and the steps involved in creating a stunning table runner. Happy quilting!


