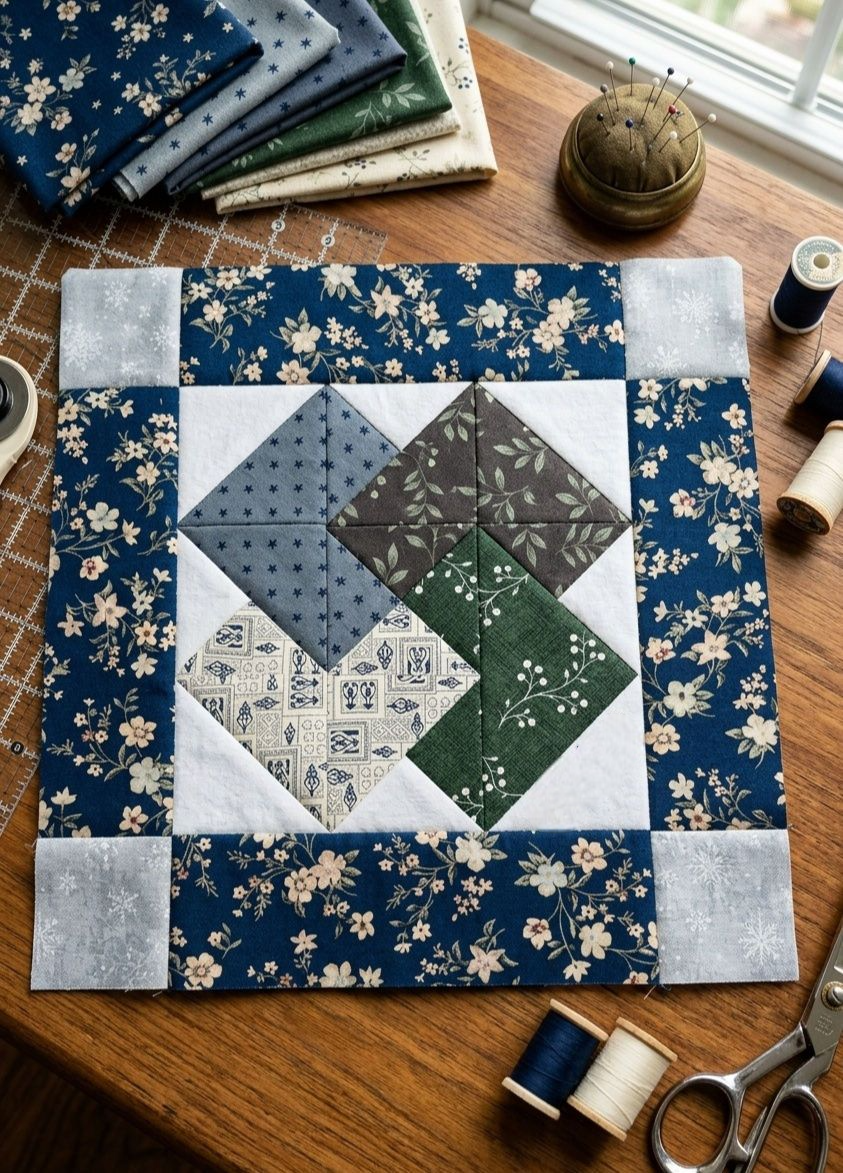
Card Trick Block – Tutorial is a fascinating quilting technique that creates a striking geometric design resembling a fan of playing cards. Learning the Card Trick Block – Tutorial allows quilters to explore color placement, angles, and precision piecing while creating a block that instantly captures attention. This pattern has become a favorite among quilting enthusiasts because of its dynamic layout and the illusion of motion created by carefully arranged fabric pieces.
One of the reasons the Card Trick Block – Tutorial remains so popular is its versatility. The block can be used in full quilts, wall hangings, table runners, and decorative quilt panels. By choosing different fabric colors and prints, quilters can achieve a wide range of visual effects. Some prefer bright contrasting fabrics to highlight the “card” illusion, while others use softer tones for a more subtle appearance.
In this comprehensive Card Trick Block – Tutorial, you will learn how to prepare fabrics, cut the pieces accurately, assemble the block step by step, and incorporate it into larger quilting projects. Whether you are a beginner exploring new quilt blocks or an experienced quilter looking to expand your skills, mastering the Card Trick Block – Tutorial is both rewarding and enjoyable.
1. Materials and Tools for the Card Trick Block
The first step in the Card Trick Block – Tutorial is gathering the materials and tools needed for the project. Having everything prepared before starting helps make the quilting process smoother and more efficient.
DISCOVER MORE FREE PATTERNS HERE!
Cotton quilting fabric is typically the best choice for this pattern. High-quality cotton fabrics are easier to cut, sew, and press, which helps achieve precise block construction.
One of the defining features of the Card Trick Block – Tutorial is the use of multiple colors. Usually, three or four contrasting fabrics are selected to create the illusion of overlapping cards.
You will also need a background fabric. This fabric frames the design and helps the colored sections stand out more clearly.
Essential quilting tools include a rotary cutter, cutting mat, and quilting ruler. These tools help ensure accurate cuts, which are extremely important when constructing angled quilt blocks.
A sewing machine with a reliable quarter-inch seam allowance is also recommended for piecing the block.
Additional supplies such as pins, thread, and an iron will help keep the pieces aligned and properly pressed during the assembly process.
2. Cutting the Fabric Pieces
Accurate cutting is a crucial part of the Card Trick Block – Tutorial. The unique appearance of this block comes from carefully arranged triangles and squares that must be cut precisely.
Start by cutting squares from the colored fabrics that will represent the “cards” in the block design. Each fabric color will form one section of the final pattern.
Next, cut additional squares from the background fabric. These pieces will create contrast and help define the block’s structure.
Many versions of the Card Trick Block – Tutorial require these squares to be cut diagonally into triangles. These triangles are essential for forming the angled shapes that give the block its distinctive appearance.
Using a quilting ruler while cutting helps maintain consistent sizes across all pieces.
After cutting the triangles, organize them by color. This step will make the assembly process easier and prevent confusion during sewing.
Careful preparation at this stage will help ensure that the finished Card Trick Block – Tutorial comes together smoothly and accurately.
3. Assembling the Card Trick Quilt Block
The assembly stage of the Card Trick Block – Tutorial is where the design begins to take shape. Proper placement of each fabric piece is essential to create the illusion of overlapping cards.
Start by arranging the triangles on a flat surface before sewing. This layout step allows you to visualize the block and confirm that the colors are placed correctly.
Many quilters prefer working in rows when assembling the Card Trick Block – Tutorial. Sewing smaller sections first makes the process more manageable.
After stitching the triangles together, press the seams carefully. Pressing the seams open or to one side helps reduce bulk and keeps the block flat.
Continue joining the smaller sections until the full block is formed. Maintaining a consistent seam allowance is important for keeping the block square.
Check alignment as you sew. Matching points and corners will help create the crisp geometric appearance that makes the Card Trick Block – Tutorial so visually appealing.
Once the block is complete, give it a final press to smooth out the seams and reveal the finished design.
4. Using the Card Trick Block in Quilt Projects
After completing the Card Trick Block – Tutorial, you can begin incorporating the block into larger quilting projects. The design works beautifully both as a repeating pattern and as a featured centerpiece.
One popular option is using multiple Card Trick blocks to create a full quilt top. When arranged together, the blocks form a stunning geometric layout.
The Card Trick Block – Tutorial is also ideal for smaller projects like table runners or wall hangings. A single block can make an eye-catching decorative piece.
Some quilters like experimenting with color variations. Changing the order of fabrics in each block can create interesting visual movement across the quilt.
Adding sashing between blocks is another design choice. Sashing helps separate the blocks and highlight each individual pattern.
Borders can also enhance the final quilt design by framing the block arrangement and giving the quilt a finished appearance.
The versatility of the Card Trick Block – Tutorial allows quilters to adapt the pattern for both traditional and modern quilt styles.
FAQ – Card Trick Block Tutorial
Is the Card Trick Block suitable for beginners?
Yes, although the Card Trick Block – Tutorial involves angled pieces, beginners can complete it successfully by carefully following the cutting and assembly steps.
Why is it called the Card Trick Block?
The name comes from the visual illusion created by the fabric pieces, which resemble overlapping playing cards.
What size is a typical Card Trick quilt block?
Many versions of the Card Trick Block – Tutorial produce blocks that measure around 12 inches, although the size can vary depending on the pattern.
How many fabrics are needed for the block?
Most patterns use three or four colored fabrics plus a background fabric to create the layered card effect.
Can the block be made using scraps?
Yes. The Card Trick Block – Tutorial works well with scrap fabrics, especially if you enjoy colorful quilts.
What quilting projects work best with this block?
This block can be used in full quilts, table runners, decorative pillows, and wall hangings.
Conclusion
The Card Trick Block – Tutorial is a classic quilting pattern that combines geometric design with creative fabric placement. Its illusion of overlapping cards makes it one of the most visually striking quilt blocks in traditional quilting.
In this tutorial, you learned how to gather the necessary materials, cut fabric pieces accurately, assemble the block step by step, and incorporate it into a variety of quilt projects. With practice, this technique becomes easier and opens the door to more complex quilting designs.
Quilting projects like the Card Trick Block – Tutorial demonstrate how thoughtful color selection and precise piecing can transform simple fabric shapes into impressive patterns.
PATTERN VIDEO:
If you enjoyed this tutorial, feel free to leave your honest opinion and share suggestions. Your feedback helps inspire new quilting tutorials and creative ideas for the quilting community.

