The Chicken Appliqué Fabric Panel – Tutorial is a creative quilting project that brings a cozy countryside feel into your home decor. This design transforms simple pieces of fabric into a decorative panel featuring a charming chicken motif, making it ideal for rustic or farmhouse-style environments.
Over the years, quilting has become more than just a functional craft—it’s now a form of artistic expression. The Chicken Appliqué Fabric Panel – Tutorial is a perfect example of how fabric, texture, and design can come together to create something visually appealing and meaningful.
In this guide, you’ll discover how to make your own Chicken Appliqué Fabric Panel – Tutorial, including the materials required, detailed instructions, and helpful tips. This project is suitable for all skill levels and offers a relaxing and rewarding crafting experience.
1. What Is the Chicken Appliqué Fabric Panel – Tutorial and Why It’s So Loved
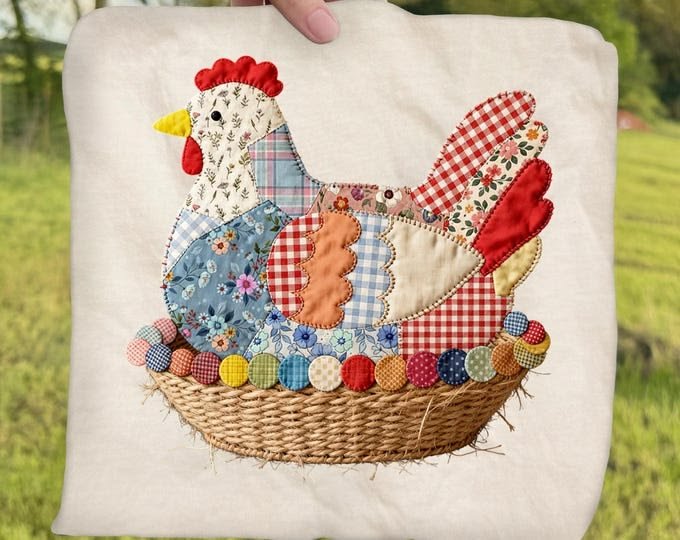
The Chicken Appliqué Fabric Panel – Tutorial is a quilting technique where a chicken design is layered onto a fabric background using appliqué methods. The result is a decorative panel that can be used in various creative ways.
DISCOVER MORE FREE PATTERNS HERE!
One of the main reasons people love this project is its warm, rustic style. Chicken-themed designs are commonly associated with countryside living and bring a welcoming atmosphere to any space.
Another advantage is its flexibility. The finished panel can be used as wall decor, incorporated into quilts, or even turned into functional items like cushion covers.
The Chicken Appliqué Fabric Panel – Tutorial is also easy to follow, making it a great starting point for beginners who want to explore appliqué techniques.
It also encourages creativity, as you can choose different fabrics, colors, and patterns to create a design that reflects your personality.
Additionally, it’s an excellent way to reuse leftover fabric, making it both economical and environmentally friendly.
2. Materials and Tools for the Chicken Appliqué Fabric Panel – Tutorial
To begin your Chicken Appliqué Fabric Panel – Tutorial, you will need a base fabric that will serve as the background. Neutral tones or subtle prints work best to highlight the design.
You’ll also need various fabric pieces for the chicken itself. Using vibrant colors for details like the comb and beak can make the design stand out.
Essential tools include a rotary cutter, cutting mat, ruler, and pins to ensure precise measurements and clean cuts.
A sewing machine is highly recommended for faster assembly, although hand stitching is also an option for those who prefer a traditional method.
Fusible web or fabric adhesive can help secure the appliqué pieces before sewing them permanently.
Thread, scissors, and optional embroidery materials will complete your setup for the Chicken Appliqué Fabric Panel – Tutorial.
3. Step-by-Step Instructions for the Chicken Appliqué Fabric Panel – Tutorial
Start your Chicken Appliqué Fabric Panel – Tutorial by cutting your background fabric to the desired size and ironing it to remove wrinkles.
Next, prepare a chicken template and cut out each part from your selected fabrics, including the body, wings, and smaller details.
Arrange all the pieces on the background fabric until you are satisfied with the composition. This step allows you to adjust placement before attaching them.
Secure the pieces using fusible web or pins, then stitch around the edges with your preferred stitch type to hold everything in place.
Add finishing touches such as embroidered eyes or feather details to give your design more personality and depth.
Complete your panel by finishing the edges or adding a border, finalizing your Chicken Appliqué Fabric Panel – Tutorial.
4. Tips for Customization and Better Content Optimization
The Chicken Appliqué Fabric Panel – Tutorial can be adapted in many creative ways. You can experiment with different styles of chickens, from simple silhouettes to more detailed designs.
Mixing patterns and textures can enhance the visual appeal of your panel and make it more dynamic.
You might also consider adding background elements such as flowers or grass to create a more complete scene.
Quilting the background lightly can add texture and improve the overall finish of your project.
For those publishing content online, applying SEO strategies is important. Be sure to include the keyword Chicken Appliqué Fabric Panel – Tutorial naturally throughout your text.
Organize your article with clear headings and easy-to-read paragraphs to improve both user experience and search engine visibility.
FAQ About Chicken Appliqué Fabric Panel – Tutorial
1. Is this project beginner-friendly?
Yes, the Chicken Appliqué Fabric Panel – Tutorial is simple enough for beginners with basic sewing knowledge.
2. What fabrics should I use?
Cotton fabrics are the best choice because they are easy to handle and durable.
3. Can I use leftover materials?
Yes, this project is perfect for using fabric scraps creatively.
4. How do I attach the appliqué pieces securely?
You can use fusible web combined with stitching to ensure they stay in place.
5. Can this panel be turned into other items?
Definitely. It can be transformed into pillows, quilt blocks, or decorative runners.
6. How should I wash the finished piece?
It’s best to wash it gently by hand or use a delicate machine cycle.
Conclusion
The Chicken Appliqué Fabric Panel – Tutorial is a fun and creative quilting project that allows you to turn simple materials into a beautiful decorative piece. In this article, you’ve learned about the tools, techniques, and customization options that make this project so enjoyable.
By following these steps, you can create a personalized fabric panel that adds warmth and charm to your home. Quilting projects like this are a wonderful way to express creativity while making something meaningful.
If you liked this tutorial, don’t hesitate to share your honest opinion and leave your suggestions. Your feedback helps improve future content and inspires even more creative ideas.