The Chicken Doorstop – PATTERN is a delightful quilting and sewing project that combines charm, functionality, and creativity. This handcrafted piece is perfect for adding a cozy farmhouse touch to your home while serving a practical purpose—keeping doors securely open or closed.
Creating your own Chicken Doorstop – PATTERN allows you to explore fabric combinations, textures, and colors that match your personal décor. Whether you prefer a rustic country style or something more modern, this project can be easily customized to suit your taste.
In this complete guide, you will learn how to make a Chicken Doorstop – PATTERN step by step. From selecting materials to assembling and finishing your piece, this tutorial is designed to help both beginners and experienced crafters achieve a durable and beautiful result.
1. Materials and Preparation for Chicken Doorstop – PATTERN
To start your Chicken Doorstop – PATTERN, choosing the right materials is essential for both durability and appearance. Quilting cotton is a popular choice because it is easy to sew and comes in a wide variety of patterns.
DISCOVER MORE FREE PATTERNS HERE!
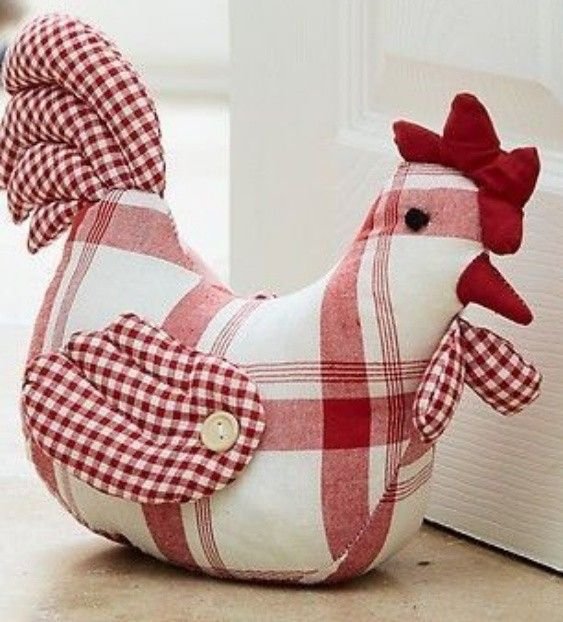
You can select different fabrics for the body, wings, and comb to create contrast and visual interest. Mixing prints such as florals or gingham can enhance the farmhouse aesthetic.
Basic sewing tools are required, including scissors, pins, a sewing machine or needle, and strong thread. These tools will help you achieve clean and secure seams.
For filling, you will need a combination of soft stuffing and weighted material like rice, sand, or small pellets. This ensures your doorstop is both stable and well-shaped.
A pattern template is also important. You can draw your own or use a printed design to guide your fabric cutting and assembly.
Before beginning, wash and press your fabric. This step prevents shrinkage and gives your Chicken Doorstop – PATTERN a polished finish.
2. Cutting and Assembling the Pattern
The construction of the Chicken Doorstop – PATTERN begins with cutting out all fabric pieces according to your template. Accuracy at this stage ensures that all parts fit together properly.
Start by sewing smaller components such as the wings, comb, and beak. These pieces are easier to handle individually and will be attached later.
Next, place the main body pieces with right sides facing each other and sew around the edges, leaving an opening for turning and filling.
After sewing, turn the fabric right side out and gently shape the curves. This step defines the overall look of your chicken.
Begin filling the base with weighted material, followed by soft stuffing on top. This layering technique gives your doorstop stability and a pleasing shape.
Finally, close the opening with a hidden stitch, ensuring the seam is secure and neat to complete your Chicken Doorstop – PATTERN.
3. Design Ideas and Customization Options
One of the most enjoyable parts of the Chicken Doorstop – PATTERN is the opportunity to personalize your project. You can experiment with colors, prints, and textures to create a unique piece.
For a classic farmhouse style, use neutral tones combined with soft patterns like checks or florals. This creates a warm and inviting look.
You can also adjust the size of your doorstop depending on your needs. Larger versions are ideal for heavy doors, while smaller ones can be decorative.
Adding embroidery details can enhance the design. Simple stitches can create feathers, outlines, or even personalized initials.
Consider using buttons or fabric pieces for the eyes and beak to add character. These details bring your chicken to life.
You might also add a fabric loop or handle for easy movement. This makes your Chicken Doorstop – PATTERN more practical and user-friendly.
4. Finishing Techniques and Practical Benefits
Finishing your Chicken Doorstop – PATTERN properly ensures a long-lasting and professional result. Start by reinforcing all seams to handle the weight of the filling.
Trim any excess threads and press the fabric lightly to improve the overall appearance. A well-finished project always looks more refined.
Check the balance of the doorstop. It should sit firmly on the floor without tipping over, ensuring it functions effectively.
This project offers both decorative and practical benefits. It keeps doors from moving while adding a charming handmade touch to your home.
The Chicken Doorstop – PATTERN is also an eco-friendly option. You can use leftover fabric scraps and repurpose materials.
Additionally, it makes a thoughtful handmade gift. Its combination of usefulness and creativity makes it suitable for many occasions.
FAQ about Chicken Doorstop – PATTERN
Is this project suitable for beginners?
Yes, the Chicken Doorstop – PATTERN is beginner-friendly and uses basic sewing techniques.
What is the best filling for a doorstop?
A mix of weighted materials like rice or sand with soft stuffing works best.
Can I wash the doorstop?
Spot cleaning is recommended unless the filling is removable.
How heavy should it be?
The weight depends on your door, but 1–2 kilograms is usually sufficient.
Can I sew this by hand?
Yes, although using a sewing machine will make the process faster.
What fabrics are best?
Quilting cotton, canvas, or linen are ideal for durability and ease of use.
Conclusion
The Chicken Doorstop – PATTERN is a fun and practical quilting project that combines creativity with everyday functionality. In this guide, you’ve learned how to select materials, assemble the pattern, customize your design, and finish your piece professionally.
This handmade item not only enhances your home décor but also serves a useful purpose. With endless possibilities for personalization, you can create a doorstop that truly reflects your style.
Now it’s your turn to try the Chicken Doorstop – PATTERN. Share your honest feedback and leave your suggestions—your ideas can inspire even more creative quilting projects!