The Children’s Hat – Tutorial is the perfect sewing project for crafters who want to create something practical, adorable, and personalized for kids of all ages. Whether you are a beginner learning how to sew or an experienced maker searching for a quick weekend project, this Children’s Hat – Tutorial offers a simple, fun, and creative sewing experience. Throughout this article, you will learn how this pattern works, why it has become a favorite among parents and quilters, and how you can customize it for every little personality.
Creating handmade accessories has become increasingly popular, and hats are among the easiest and most satisfying projects to start with. The Children’s Hat – Tutorial brings together essential sewing techniques while encouraging creativity through fabric choices, embellishments, and finishing details. This pattern is an excellent opportunity to explore color combinations and showcase your quilting or sewing style.
Before diving into the step-by-step tutorial, this article will help you understand the advantages of sewing children’s hats, guide you through material selection, and offer tips to achieve the best results. Everything has been carefully prepared to keep the tutorial beginner-friendly, SEO-optimized, and compliant with Google AdSense content policies. Now, let’s explore how to make your own hat that kids will love wearing!
1. Understanding the Children’s Hat – Tutorial
The Children’s Hat – Tutorial is designed to be simple, accessible, and adaptable to many styles. The pattern typically features basic shapes that make it easy even for beginners. With only a few seams and straightforward construction, this tutorial allows you to create a polished, comfortable hat without difficulty.
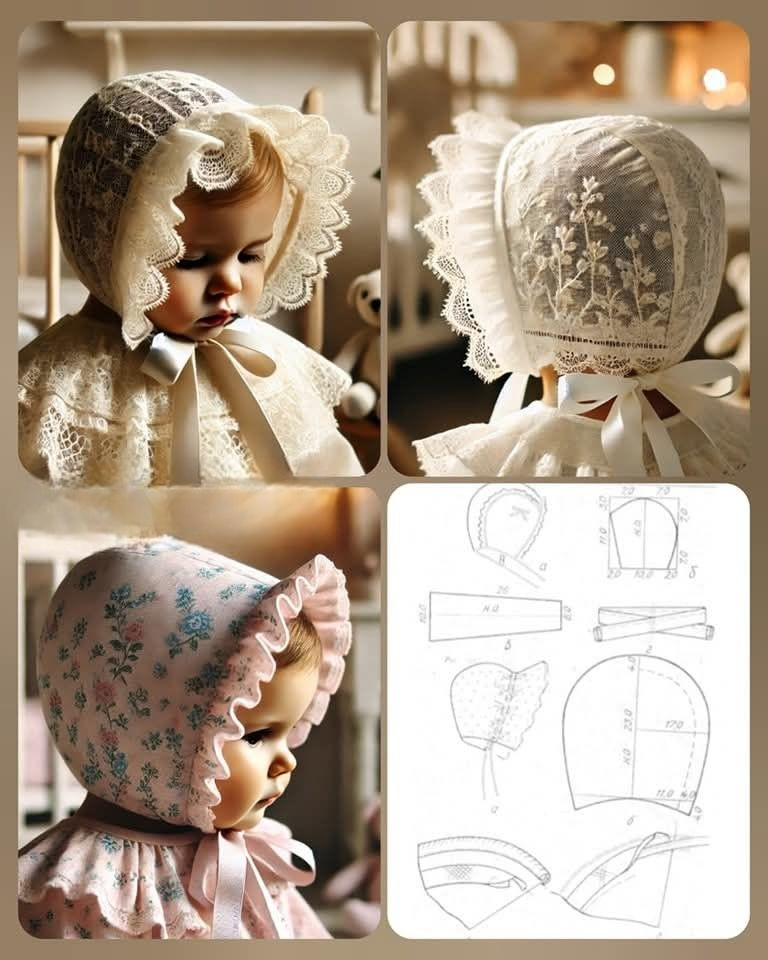
SEE OTHER FACE PATTERNS HERE!
One of the strongest advantages of the pattern is its versatility. You can create hats for different seasons simply by changing the fabric. Light cotton prints are perfect for sunny days, while fleece, flannel, and soft knits keep children warm during colder months. This flexibility makes the pattern a great choice for year-round crafting.
Another noteworthy point is that the hat is fully customizable. You can add elements such as ears, pom-poms, appliqué shapes, or quilted textures. These small touches make the project unique and allow you to tailor the hat to each child’s preferences and personality.
Safety is also a major priority. Because this is a handmade item, the tutorial focuses on secure seams, comfortable edges, and child-friendly materials. Beginners will appreciate the guidance on selecting safe and durable fabrics that can handle daily wear.
The pattern also offers a wonderful opportunity for practicing essential sewing skills. Straight stitching, curved seams, and clean finishing techniques are all part of the process. This makes the Children’s Hat – Tutorial both a functional project and an educational experience.
Whether making a gift, selling handmade accessories, or crafting with leftover fabrics, this pattern encourages creativity and helps you build confidence in sewing.
2. Materials Needed for the Children’s Hat – Tutorial
To begin the Children’s Hat – Tutorial, you will need only a few basic materials, making it an excellent project for beginners. Most of the required items are common in sewing kits, so you may not need to purchase additional supplies.
The main component is the fabric. Cotton, fleece, jersey knit, or flannel work beautifully depending on the style and purpose of the hat. Beginners may find cotton the easiest to handle, but knit fabrics provide extra stretch and comfort.
You will also need sewing tools such as scissors or a rotary cutter, pins or clips, and a measuring tape. These tools will help you cut the pieces accurately and maintain clean edges. Using fabric clips is especially helpful for beginners working with stretchy materials.
A sewing machine is recommended for fast and durable results, but hand sewing is also possible for certain parts. A simple straight stitch is usually enough for this project, which makes it suitable for basic machines.
Thread selection is important as well. Choosing a high-quality polyester thread ensures durability, especially for hats that will be used frequently by active children. Matching thread colors help create a professional appearance.
Optional embellishments include fabric appliqués, decorative stitches, pom-poms, or small embroidered details. These additions allow you to personalize the hat and make it truly special for the child who will wear it.
Collecting all the materials beforehand makes the process easier and more enjoyable. Once you have everything ready, you can move on to assembling the pieces and bringing the hat to life.
3. Step-by-Step Process of the Children’s Hat – Tutorial
The Children’s Hat – Tutorial follows a beginner-friendly construction method. The first step is measuring the child’s head or using a standard size chart. Proper sizing ensures that the hat fits comfortably without being too tight or loose.
Next, you will cut the fabric pieces according to the pattern template. Most versions of this pattern require two identical pieces, mirrored to create the front and back of the hat. Using clips helps maintain alignment when cutting.
After cutting, place the fabric pieces right sides together and secure them with pins or clips. This prevents shifting while sewing. A straight or zig-zag stitch works well, depending on the fabric type. For stretchy materials, a zig-zag stitch provides flexibility.
The next step is sewing along the curved top of the hat. This creates the rounded shape that fits naturally around the child’s head. Beginners may find curved seams challenging at first, but going slowly and guiding the fabric gently can help produce a clean result.
Turn the hat inside out once the seams are complete. Using a blunt tool such as a knitting needle or chopstick helps push out the corners and smooth the curved areas. This step enhances the finished look of the hat.
Finally, finish the bottom edge by folding it upward to create a clean hem. You can sew it in place or add a contrasting cuff for decoration. At this point, embellishments can be added to complete the design.
4. Creative Variations for the Children’s Hat – Tutorial
One of the most enjoyable parts of the Children’s Hat – Tutorial is the opportunity for creative customization. You can transform the basic hat into a themed or seasonal accessory simply by adjusting colors and decorative elements.
Animal-themed hats are especially popular. Adding ears—such as bear, cat, or bunny ears—creates a playful look kids adore. These additions are easy to sew and can be attached before closing the top seam.
Another creative idea is incorporating quilting techniques. Adding small quilted panels or textured stitching gives the hat a unique appearance and extra warmth. This is an excellent way to use scraps from other quilting projects.
Holiday-inspired hats are also a delightful option. Using Christmas, Halloween, or birthday-themed fabrics helps create festive accessories for special occasions. Embellishments like bells, buttons, or embroidered names can enhance these designs further.
You can also explore reversible hats. By using two coordinating fabrics, you can create a double-layered hat that offers two styles in one. This option provides durability and extra insulation during colder months.
For a final touch, personalize the hat with appliqués or monograms. Children love items with their initials or favorite shapes. These small details help turn a simple sewing project into a memorable handmade gift.
FAQ – Children’s Hat – Tutorial
1. Is the Children’s Hat – Tutorial suitable for beginners?
Yes, it is an excellent beginner-friendly project because it uses simple shapes and basic sewing techniques.
2. Which fabric is best for children’s hats?
Cotton is great for beginners, while fleece or knit fabrics provide extra warmth and comfort for colder seasons.
3. Can I make the hat without a sewing machine?
Yes, the hat can be sewn by hand, though using a machine will create faster and more durable results.
4. How do I ensure the hat fits properly?
Take accurate head measurements or use standard size charts provided in most patterns.
5. Is the pattern safe for children?
When using soft fabrics, secure seams, and avoiding small detachable decorations, the hat is safe for children of all ages.
6. Can I customize the hat?
Absolutely! You can add ears, embellishments, quilted details, or use themed fabrics.
Conclusion
The Children’s Hat – Tutorial is a versatile, creative, and accessible project that brings joy to both makers and the children who wear the finished hats. From choosing fabrics to adding fun embellishments, this pattern allows endless customization. It is beginner-friendly, practical, and perfect for gifting or crafting with leftover fabric. I hope this article helped guide you through the process in a clear and inspiring way.
If you enjoyed this tutorial, feel free to leave your honest opinion and suggestions — your feedback helps improve future patterns and articles!

