Creating a Christmas Tree Block is a festive and delightful way to add a touch of holiday spirit to your quilting projects.
This quilt pattern not only captures the essence of the season but also offers a charming and versatile design that can be incorporated into various quilting projects.
In this tutorial, we’ll walk you through the step-by-step process of crafting a Christmas Tree Block, including all fabric cuts and measurements, ensuring you have everything you need to bring this holiday-inspired quilt pattern to life.
Materials and Fabric Selection
Before diving into the cutting and piecing process, selecting the right materials and fabrics is crucial for achieving a beautiful Christmas Tree Block. Opt for high-quality cotton fabrics in traditional holiday colors like green, red, and white. These colors will help bring out the festive theme of the block, making it a perfect addition to any holiday quilt project.
SEE OTHER FACE PATTERNS HERE!
When choosing fabrics, consider incorporating different patterns and textures to add depth and interest to your Christmas Tree Block. Fabrics with small prints or subtle patterns work well for the tree sections, while solid colors can be used for the background. Don’t forget to pre-wash your fabrics to prevent any shrinkage and ensure that the colors don’t bleed.
In addition to fabric, you’ll need basic quilting supplies such as a rotary cutter, cutting mat, quilting ruler, and a sewing machine. Make sure you have matching thread for your fabrics and a good quality iron to press your seams as you go. With all your materials ready, you’re set to start creating your Christmas Tree Block.
Cutting the Fabric
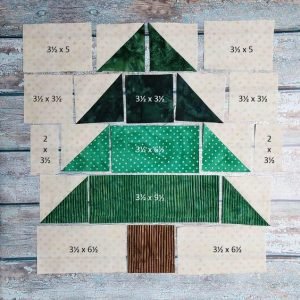
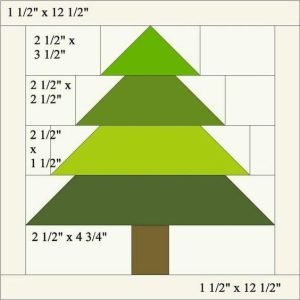
The first step in creating your Christmas Tree Block is cutting the fabric according to the required measurements. Precision is key here, as accurate cuts will make piecing the block together much easier and will result in a more polished final product. For this tutorial, we’ll be creating a 12-inch finished block.
Start by cutting the fabric for the tree sections. You’ll need three green fabric pieces for the tree triangles: cut one piece 6.5 inches by 6.5 inches, one piece 5.5 inches by 5.5 inches, and one piece 4.5 inches by 4.5 inches. These squares will be used to create half-square triangles that will form the tree.
Next, cut the fabric for the tree trunk. Use a brown fabric and cut a rectangle measuring 2.5 inches by 3.5 inches. This will serve as the base of your tree. For the background, cut four white fabric squares at 3.5 inches by 3.5 inches and two white rectangles at 2.5 inches by 6.5 inches. These pieces will be used to frame the tree and create the block’s background.
Finally, prepare the fabric for the star at the top of the tree. You’ll need a small yellow square measuring 2.5 inches by 2.5 inches. This will be used to create a simple star that adds a festive touch to your block. With all your pieces cut, you’re ready to move on to piecing the block together.
Assembling the Tree Sections
Assembling the tree sections involves creating half-square triangles (HSTs) from the green squares and then piecing them together to form the tree shape. Start by taking the 6.5-inch green square and the 6.5-inch white square. Place them right sides together and draw a diagonal line from corner to corner on the back of the white square.
Sew a seam 1/4 inch away from the drawn line on both sides. After sewing, cut along the drawn line to create two half-square triangles. Press the seams towards the green fabric. Repeat this process with the 5.5-inch and 4.5-inch squares to create a total of six HSTs, which will form the layers of the tree.
Once you have your HSTs ready, arrange them to create the tree shape. Start with the largest HSTs at the bottom and gradually use the smaller ones as you move upwards, creating a triangular tree shape. Sew the HSTs together, ensuring that the points align correctly. Press the seams flat to reduce bulk and give your tree a crisp, clean look.
After piecing the tree, attach the brown rectangle to the bottom to form the tree trunk. Ensure that it is centered and aligned with the tree. This step completes the main structure of your Christmas Tree Block, and you’re now ready to add the background and star details.
Adding the Background and Star
With the tree assembled, it’s time to add the background fabric to complete the block. Begin by sewing the 3.5-inch white squares to the sides of the tree. These pieces will frame the tree and create a clean background that allows the tree to stand out. Make sure the seams are aligned and pressed towards the white fabric to reduce bulk.
Next, sew the 2.5-inch by 6.5-inch white rectangles to the top and bottom of the block. These pieces will complete the background and bring the block to its finished 12-inch size. As always, press the seams flat to ensure a smooth and professional finish. Your Christmas Tree Block is now almost complete, with just the star left to add.
For the star, take the 2.5-inch yellow square and place it at the top of the tree. You can either sew it on as a simple square or get creative and turn it into a star by adding small triangle pieces to the corners. This extra detail adds a festive touch and completes the holiday look of your block.
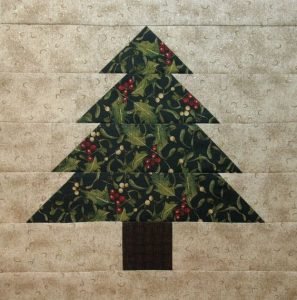
Once the star is in place, give your block a final press to ensure everything is smooth and flat. Your Christmas Tree Block is now ready to be incorporated into a larger quilt project or used as a standalone piece for holiday decorations.
Finishing Touches and Quilting Ideas
After completing your Christmas Tree Block, it’s time to think about how to incorporate it into a larger quilt or use it as a standalone piece. This block can be repeated to create an entire quilt top filled with festive trees, or it can be used as a centerpiece in a holiday wall hanging or table runner. The possibilities are endless, and the choice is yours.
When deciding on quilting patterns, consider echoing the shape of the tree with your quilting lines to enhance the design. Simple straight-line quilting can be effective, or you could add swirls and loops to mimic the look of snowflakes falling around the tree. If you’re feeling adventurous, you could even quilt small ornaments or lights onto the tree for added detail.
🌟Join our exclusive Quilt broadcast list on Messenger! Receive the best patterns, tips, and updates directly in your inbox. Our team is ready to send you delightful content that will inspire your projects. Don’t miss this opportunity to stay updated and create amazing pieces. Join now and be part of this passionate quilt community!✨📩
Finally, don’t forget to add a binding that complements the colors of your block. A red or green binding would tie the whole design together and add a festive finishing touch. With your Christmas Tree Block complete, you’re ready to enjoy the holiday season with a handmade quilt that captures the spirit of Christmas.
This Christmas Tree Block tutorial not only provides a step-by-step guide to creating a festive quilt pattern but also incorporates key SEO techniques to ensure that your blog reaches a wider audience. By focusing on the keywords [quilt, quilt patterns], this tutorial is designed to attract readers interested in holiday quilting projects while providing valuable content that can be easily followed and replicated.


