The Circle Scrappy Coasters – PATTERN is a wonderful quilting project that transforms leftover fabric into stylish, functional home décor. Whether you’re a beginner looking for a small starter piece or an experienced quilter seeking a quick and satisfying scrap buster, this pattern brings joy, sustainability, and creativity into your quilting routine.
These quilted coasters are not only practical—they also provide an ideal opportunity to use up fabric scraps in a meaningful way. Small but mighty, each round coaster combines traditional quilting techniques with a modern twist, adding charm and warmth to any table setting.
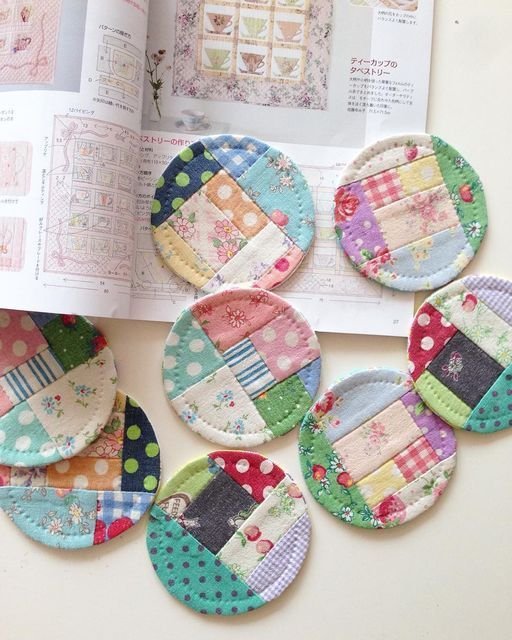
In this tutorial, you’ll learn how to sew circular quilted coasters using fabric scraps, basic quilting materials, and simple techniques. Let’s dive into the world of circular quilting and give your leftovers a new life with the Circle Scrappy Coasters – PATTERN!
1. Why Quilters Love the Circle Scrappy Coasters Pattern
There are many reasons the Circle Scrappy Coasters – PATTERN is a favorite among modern and traditional quilters alike. One of the biggest is its focus on using scrap fabric—something every quilter has in abundance.
SEE OTHER FACE PATTERNS HERE!
Instead of letting those colorful leftover strips, squares, or odd-shaped pieces collect dust, this pattern gives them new purpose. Each coaster becomes a tiny canvas for creative expression, and since the size is small, you can finish one in under an hour.
Another appeal is versatility. These quilted coasters make perfect gifts, housewarming sets, stocking stuffers, or even craft fair products. They’re a practical handmade item that people will actually use, yet they feel personal and artistic.
The circular shape is another highlight. It offers a fresh break from the usual square quilting projects and allows quilters to practice cutting and sewing curves—a skill that’s useful in more advanced patterns.
Plus, you can use any color scheme. From coordinated neutral tones to rainbow explosions of scraps, the end result is always vibrant and eye-catching. No two coasters will ever be alike, and that’s what makes them so special.
They also offer a great way to practice free-motion quilting or decorative topstitching. You can experiment with designs like spirals, loops, or echo quilting—making each coaster even more dynamic.
2. Materials and Fabric Preparation
To begin making your Circle Scrappy Coasters – PATTERN, gather the following materials and tools. You won’t need much, and most of it is likely already in your quilting supply collection.
Fabric scraps:
Choose cotton quilting fabric scraps in various colors and patterns. Each coaster uses small pieces, so this is your chance to play with bold prints, batiks, solids, or even novelty fabrics.
Batting:
Low-loft cotton or polyester batting works well. You’ll need pieces just slightly larger than your finished coaster size—about 5 to 6 inches across.
Backing fabric:
This can be plain or decorative, but make sure it complements the front. It can be a single piece or made from scraps, too.
Thread:
Use a color that blends well or contrasts, depending on your quilting design. Cotton thread is ideal for durability.
Basic quilting tools:
You’ll need a rotary cutter, quilting ruler, cutting mat, fabric scissors, and pins or clips.
Circle template:
Use a cup, bowl, or compass to create a circle template. A diameter of 4.5 to 5.5 inches works well for standard coasters.
Sewing machine and optional walking foot:
For smooth quilting lines and stitching through multiple layers.
Before you begin, iron all fabric scraps to ensure smooth cutting and piecing. Organize your scraps by color, tone, or pattern to help with layout planning.
3. How to Quilt a Circle Scrappy Coaster – Step-by-Step
Let’s walk through the steps to make a classic Circle Scrappy Coasters – PATTERN using a quilt-as-you-go technique. This method allows you to piece and quilt at the same time!
Step 1: Create a foundation base.
Cut a circle of batting and use it as your foundation. You can also cut a slightly larger square of batting and trim it later into a circle after quilting.
Step 2: Prepare your scraps.
Cut scraps into strips or wedges. For a spiral effect, use slightly curved shapes. For a sunburst look, use narrow triangles or straight strips radiating from the center.
Step 3: Start in the center.
Place your first scrap in the center of the batting. Lay the next piece on top, right sides together, and sew along one edge. Flip open and press.
Step 4: Continue building outward.
Repeat the stitch-and-flip method, working your way out from the center, covering the entire batting surface. Each added piece is sewn and flipped open before adding the next.
Step 5: Trim into a circle.
Once your foundation is fully covered, use your circle template to trim the piece into a perfect round shape.
Step 6: Add the backing.
Place the quilted circle right sides together with the backing fabric. Sew around the circle, leaving a 2-inch gap for turning.
Step 7: Turn and topstitch.
Turn the coaster right side out through the opening, gently pushing out the edges. Press flat and topstitch around the entire edge to close the gap and secure the shape.
Optional: Add extra quilting lines or decorative stitching to the front for more detail and texture.
Repeat this process for as many coasters as you’d like in your set. You can batch the steps to make production faster—cut all the batting, then quilt all pieces, then trim and finish.
4. Creative Variations and Gift Ideas
Once you’ve mastered the basic Circle Scrappy Coasters – PATTERN, try some of these creative twists to make your coasters even more exciting and personal.
Change the shape:
While circles are fun, you can also try ovals, hearts, or scalloped edges using different templates and decorative stitches.
Add embroidery or applique:
Include a monogram, flower, or small motif stitched into the center of your coaster for a personalized touch.
Make double-sided versions:
Quilt each side with different scraps so users can flip them for a different look. This is great for seasonal or reversible sets.
Use a color palette theme:
Create a coordinated set in cool tones, warm tones, holiday colors, or rainbow gradients. These make thoughtful gifts that feel curated.
Include with gifts:
Pair a set of coasters with a handmade mug, coffee beans, or tea for a cozy and unique gift set.
Sell or donate them:
These quilted coasters are perfect for craft fairs, charity donations, or fundraising events. They’re small, fast to make, and highly sellable.
You can also bundle them in groups of four with a fabric tie or a small drawstring pouch for professional presentation.
🌟Join our exclusive Quilt broadcast list on Messenger! Receive the best patterns, tips, and updates directly in your inbox. Our team is ready to send you delightful content that will inspire your projects. Don’t miss this opportunity to stay updated and create amazing pieces. Join now and be part of this passionate quilt community!✨📩
FAQ – Circle Scrappy Coasters – PATTERN
Can beginners make this project?
Yes! This pattern is perfect for new quilters. It involves basic piecing and quilting skills, and the small size makes it very approachable.
Do I need to quilt the coasters?
Yes. The quilting not only adds visual appeal but also helps hold the layers together during use and washing.
What size should each coaster be?
Most coasters are 4.5 to 5.5 inches in diameter. You can adjust the size based on your needs or available scraps.
Can I wash these coasters?
Yes. Use washable cotton fabrics and quilt batting. Wash in cold water and lay flat to dry or tumble dry on low.
What’s the best way to make the circle shape?
Use a cup, bowl, or round template. A compass or rotary cutter with a circle attachment can also be helpful for precision.
How do I make the coaster lie flat?
Press your pieces well during construction and trim carefully. If needed, lightly steam or block the coaster after finishing.
Conclusion
The Circle Scrappy Coasters – PATTERN is a fun, fast, and eco-conscious quilting project that turns your leftover fabric into something beautiful and practical. Whether you’re making a single set or a dozen for gifts, each coaster carries your creativity and craftsmanship in every stitch.
It’s a great way to experiment with new layouts, practice quilting skills, and enjoy a quick finish that brings instant satisfaction. Plus, it’s perfect for all seasons and all levels of experience.
We’d love to hear from you! Have you tried the Circle Scrappy Coasters pattern? Share your thoughts, tips, or color combinations in the comments below. Your input helps grow our quilting community and inspires makers around the world. 🧵🟠✨


