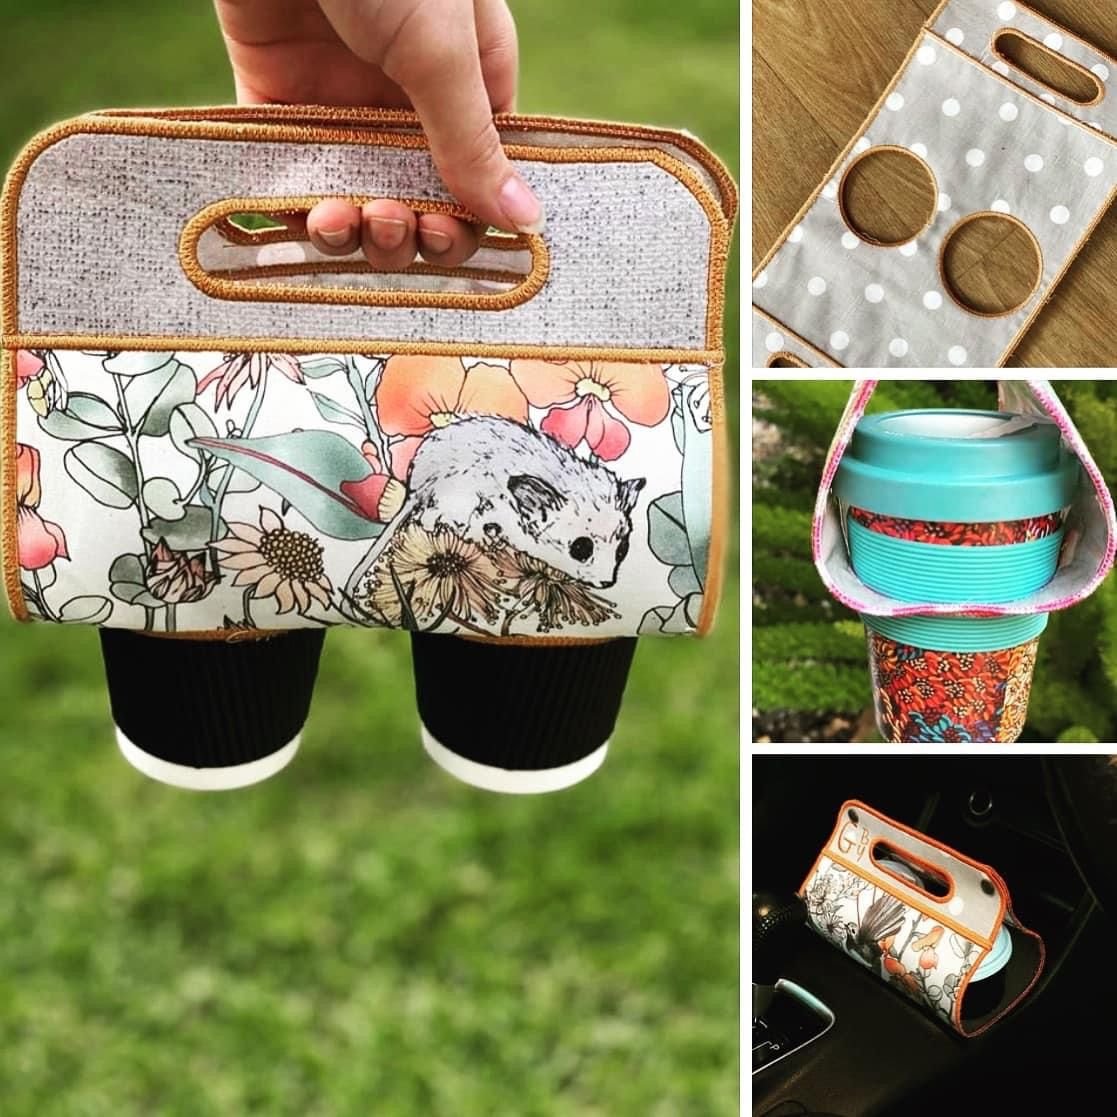
Looking for a creative and eco-friendly way to carry your favorite drinks on the go? This Coffee Cup Carrier – Tutorial will guide you through every step to sew your own reusable, fabric cup holder. Whether you’re a beginner in the world of sewing or an experienced quilting enthusiast, this project is perfect for using fabric scraps and showcasing your personal style. Plus, it’s a fantastic handmade gift idea for coffee lovers!
This DIY cup holder not only protects your hands from hot beverages but also reduces waste by replacing disposable sleeves. With just a few basic materials and a little sewing time, you’ll have a functional and stylish accessory you’ll love to use daily. In this tutorial, you’ll find all the details needed to complete the project and helpful tips to make it your own.
Ready to add a new handmade favorite to your coffee routine? Let’s dive into this step-by-step guide and create the perfect quilted coffee cup carrier!

1. Materials You’ll Need to Start
To make the most of this Coffee Cup Carrier – Tutorial, gather these basic materials before you start. Most of them are common in any crafter’s sewing kit or easily found at your local fabric store.
SEE OTHER FACE PATTERNS HERE!
You will need two pieces of cotton fabric: one for the outside and one for the lining. Choose contrasting prints or your favorite color combination for extra flair. Quilting cotton works best as it’s soft but durable.
You’ll also need a small piece of batting or insulated interfacing to give the cup carrier structure and heat protection. If you prefer a firmer finish, fusible fleece is a great option.
Elastic or Velcro can be used to secure the wrap around the cup, but you could also sew on a button or snap closure if that’s your preference.
A basic sewing machine, matching thread, scissors or rotary cutter, pins or clips, and an iron will complete your toolkit. Optional: decorative trims or personalized embroidery.
Once everything is ready, prepare your pieces by cutting them to size. A standard cup carrier typically measures around 11″ x 3.75″, but you can adjust this based on your favorite mug or travel cup.
Don’t forget to pre-wash your fabric if it’s brand new. This prevents shrinking and ensures your carrier keeps its shape after repeated washes.
2. Step-by-Step Sewing Instructions
Follow this easy Coffee Cup Carrier – Tutorial to complete your project in less than an hour. It’s simple, fun, and very beginner-friendly!
Start by layering your fabric: place the outer fabric and lining right sides together, then add your batting or interfacing on the bottom. Pin or clip the layers in place.
Sew around all edges using a 1/4″ seam allowance, leaving a 2″ opening along one long side for turning the fabric right side out.
Clip the corners and carefully turn your carrier right side out through the opening. Use a chopstick or a turning tool to push out the corners neatly.
Press the piece flat with an iron, making sure the seam allowance is tucked in at the opening. Topstitch around the entire rectangle to close the opening and give it a finished look.
Add your closure: if using elastic, sew a loop at one end and attach a button at the opposite side. Alternatively, stitch on a Velcro tab or press a snap into place.
Test your coffee cup carrier by wrapping it around your cup. Make adjustments to the fit or closure if needed. You now have a quilted sleeve that is stylish, reusable, and completely handmade.
Optional: personalize your cup carrier with embroidery, appliqué, or a small pocket for a tea bag or sugar packet!
3. Customization Ideas for a Personal Touch
Now that you’ve completed your Coffee Cup Carrier – Tutorial, you might want to get creative with your next project. Here are some customization ideas to spark inspiration.
Use seasonal fabrics to make themed cup carriers. Think holiday prints, florals for spring, or cozy plaids for winter.
Add a quilted design or decorative stitching on the outer fabric before sewing the layers together. This adds both texture and charm.
Incorporate patchwork or improv quilting techniques using fabric scraps to give your carrier a fun, boho look while reducing waste.
Make a matching set by creating a fabric coaster or small tote bag in the same fabrics. Perfect for gift-giving!
Add labels or tags with your name or a meaningful message. Iron-on labels or handwritten fabric tags add a special touch.
Experiment with different closures: toggle buttons, magnetic snaps, or hook-and-loop tape. Choose what works best for your needs.
Customizing your cup carrier makes it more than just a sewing project—it becomes a unique and personal accessory you’ll love to show off.
4. Care Tips and Gift Ideas
To keep your Coffee Cup Carrier – Tutorial project looking fresh, follow these simple care instructions and consider fun ways to gift your creation.
Wash your carrier gently in cold water and let it air dry to maintain its shape and vibrant colors. You can also give it a quick press with a warm iron.
If your carrier includes interfacing or batting, avoid using high heat in the dryer to prevent distortion.
Make several carriers in different colors to match your outfits or moods. They’re quick to make and so satisfying to use!
Bundle one with a reusable cup, a coffee shop gift card, or a homemade treat to make a thoughtful and practical gift set.
They also make great teacher gifts, holiday stocking stuffers, or craft fair items if you enjoy selling your handmade creations.
Always keep one in your purse, office desk, or car—having a reusable coffee carrier handy helps reduce waste and keeps your drinks cozy.
FAQ – Coffee Cup Carrier – Tutorial
Q1: What size should I cut my fabric for the coffee cup carrier?
A standard size is about 11 inches wide by 3.75 inches tall, but you can adjust based on your favorite cup size.
Q2: Can I make the carrier without a sewing machine?
Yes, it’s possible to hand-stitch the project, though it will take longer. Use strong, even stitches for durability.
Q3: What is the best fabric for this tutorial?
Quilting cotton is ideal because it’s soft, durable, and easy to sew. You can also experiment with canvas or denim.
Q4: Is insulation necessary for the cup sleeve?
It’s not required, but it helps protect your hands from heat. Insul-Bright or fusible fleece work great for insulation.
Q5: How do I clean my fabric coffee cup carrier?
Wash it gently in cold water and air dry. Iron as needed. Avoid high heat if using interfacing.
Q6: Can I personalize my carrier?
Absolutely! Add embroidery, tags, buttons, or fabric paint to give your carrier a unique flair.
Conclusion
The Coffee Cup Carrier – Tutorial is a simple, fun, and eco-friendly sewing project perfect for any level of crafter. From selecting fabrics to adding personal touches, every step lets you express your creativity while making something useful.
TUTORIAL VIDEO:
Whether you make it for yourself or as a gift, this DIY project is a great addition to your handmade lifestyle. If you enjoyed this tutorial, leave a comment below with your thoughts and any suggestions—we’d love to hear what you created!


