Learning how to make your own coin purse is a fun, rewarding experience, and in this Coin Purse – Tutorial, we’re going to walk you through everything you need to know. Whether you’re a beginner in sewing or someone looking to add a handmade item to your accessories collection, this guide is designed to make the process clear, creative, and enjoyable.
The term Coin Purse – Tutorial is searched frequently by crafters, hobbyists, and people interested in practical DIYs. That’s why we’ve developed this comprehensive article that provides simple instructions, expert tips, and helpful resources to make your first (or next) coin purse a success.
Throughout this guide, we’ll also explore useful materials, sewing techniques, creative decoration ideas, and ways to ensure durability. Not only is it a fantastic craft project, but a handmade coin purse also makes for a charming and personal gift.
1. Choosing the Right Materials for Your Coin Purse
When starting your Coin Purse – Tutorial, the first step is selecting the right materials. The fabric you choose determines not only the look but also the functionality of the final piece.
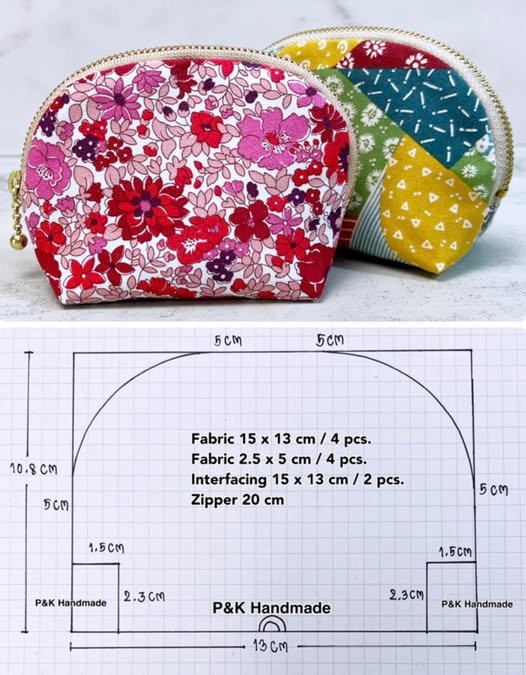
SEE OTHER FACE PATTERNS HERE!
Cotton, canvas, denim, and faux leather are popular choices because they are easy to handle and durable. It’s best to pick a fabric that holds its shape and doesn’t fray easily, especially for beginners.
You’ll also need a lining fabric. Lining enhances the overall durability of the coin purse and makes it look professionally made. Try using contrasting or printed linings for a creative twist.
A key component is the closure. Depending on your style and skill level, you can opt for a zipper, snap button, or metal frame clasp. Each option offers a different aesthetic and functionality.
Other tools include scissors, sewing pins, thread, a sewing machine (or needle for hand sewing), and optional embellishments like buttons, beads, or embroidery thread.
Choosing high-quality supplies is crucial. Not only do they make the process easier, but they also ensure that your finished coin purse lasts longer and performs well.
2. Step-by-Step Instructions to Sew a Coin Purse
This part of the Coin Purse – Tutorial will walk you through making a simple zipper coin purse that’s perfect for beginners but looks polished and stylish.
Start by cutting two pieces of your chosen fabric and two of the lining, all measuring approximately 5 x 4 inches. This size is ideal for carrying coins, cards, and small items.
Next, place one outer fabric piece face up, then center the zipper on top, followed by one lining piece face down. Pin them together and sew across the edge, securing the zipper in between the fabrics.
Repeat this for the other side of the zipper using the remaining fabric and lining. Once sewn, open the pieces to reveal the zipper in the middle and press the fabric flat with an iron.
Now, match the outer fabrics together and do the same with the linings, keeping the zipper open halfway. Stitch all around, leaving a small opening at the bottom of the lining for turning the purse inside out.
Trim excess fabric at the corners and turn the purse right side out through the gap. Push out the corners for a clean finish and sew the gap in the lining closed.
Give it a final press with the iron and admire your new handmade coin purse!
3. Customizing Your Coin Purse Design
One of the most exciting parts of following a Coin Purse – Tutorial is customizing the design to reflect your personal style.
Start with fabric prints—floral, geometric, or animal patterns can give your coin purse personality. You can even repurpose fabric from old clothes for an eco-friendly touch.
Think about adding external elements like decorative stitching, patches, or heat-transfer vinyl decals. These add charm and uniqueness to your design.
Inside, you can sew small compartments or use contrasting fabric for a surprise effect each time you open the purse. It’s a small detail that adds a professional feel.
Using embellishments like lace, beads, or small fabric flowers makes your coin purse look high-end and gift-worthy. Just make sure to secure them tightly to avoid wear and tear.
Don’t forget to play with shapes too! While rectangular is easiest, you can explore rounded bottoms, triangles, or even novelty shapes like hearts or animals for something fun and different.
Personalization—like monograms or hand embroidery—is another great touch. This makes your coin purse ideal for birthday presents, wedding favors, or personal keepsakes.
4. Tips to Ensure Durability and Practical Use
In this part of the Coin Purse – Tutorial, we’ll share ways to make your creation not just beautiful but also sturdy and long-lasting.
Choose reinforced stitching methods, such as backstitching on the zipper ends and corners, to prevent unraveling from frequent use.
Use interfacing—a special fabric that adds stiffness between the layers. It helps your coin purse hold its shape and resist collapsing.
Opt for nylon or polyester zippers instead of metal for a smoother glide and longer wear. Make sure the zipper is slightly longer than your fabric pieces to avoid tight seams.
Consider waterproof lining material if the coin purse will be used daily or exposed to liquids. This protects both the purse and its contents.
Double stitching stress points—like the zipper ends and bottom corners—can extend the lifespan of the purse, especially if it holds more than just coins.
Finally, test the finished product by opening and closing it multiple times and filling it with weight to check the strength of the seams. A well-made coin purse can last for years with the right construction.
🌟Join our exclusive Quilt broadcast list on Messenger! Receive the best patterns, tips, and updates directly in your inbox. Our team is ready to send you delightful content that will inspire your projects. Don’t miss this opportunity to stay updated and create amazing pieces. Join now and be part of this passionate quilt community!✨📩
FAQ – Coin Purse – Tutorial
Q1: Can I make a coin purse without a sewing machine?
Yes! While a sewing machine speeds things up, you can hand-sew a coin purse using basic stitches like the running stitch or backstitch.
Q2: What size is best for a beginner coin purse?
A 5 x 4-inch purse is ideal for beginners. It’s small enough to manage but large enough to learn key sewing techniques.
Q3: How long does it take to make a coin purse?
On average, it takes 30–60 minutes, depending on your experience and design complexity.
Q4: Can children make coin purses?
Absolutely! With adult supervision and safe tools, children can enjoy making simple felt or fabric coin purses.
Q5: What’s the best closure for a beginner?
Zippers are a good start. They’re secure and easy to find. You can also try magnetic snaps or Velcro if you prefer.
Q6: Where can I find coin purse patterns?
There are many free printable patterns online, and some craft books include templates too. You can even sketch your own based on the size and shape you want.
Conclusion
In this Coin Purse – Tutorial, we’ve explored how to make a simple yet beautiful handmade coin purse from scratch. From choosing materials to sewing and customizing your design, each step adds to a satisfying and creative experience.
We hope this guide helps you feel confident to begin your own project or improve your sewing skills. Coin purses are timeless, practical, and personal—they’re also great for gifts or small business ideas.
If you enjoyed this tutorial, please leave your honest opinion below and feel free to share any suggestions or questions you might have. Your feedback helps improve future tutorials and encourages more DIY creators like you!


