The Dancing Ribbons Tutorial is a creative and inspiring way to learn how to make a unique quilting design that captures movement, flow, and elegance. This pattern has been loved by quilters of all levels because it allows both beginners and advanced makers to explore curves, colors, and textures in an artistic way. If you’ve been searching for a quilting idea that combines beauty with ease, this tutorial is the perfect guide for you.
By following the Dancing Ribbons Tutorial, you will learn how to cut, arrange, and sew fabric pieces in a way that resembles ribbons gracefully moving in the wind. It’s more than just a pattern—it’s a technique that helps you build confidence in sewing curves and working with bold contrasts. Whether you’re making a wall hanging, a table runner, or a full quilt, this project gives you the flexibility to adapt the design to your vision.
One of the greatest strengths of the Dancing Ribbons Tutorial is how it blends creativity with precision. While the pattern looks complicated at first glance, it becomes approachable once broken down into clear steps. The design allows you to experiment with color placement, making every quilt truly one of a kind. In this article, you’ll not only learn about the construction but also discover tips for fabric selection, sewing strategies, and finishing touches.
1. Understanding the Dancing Ribbons Design
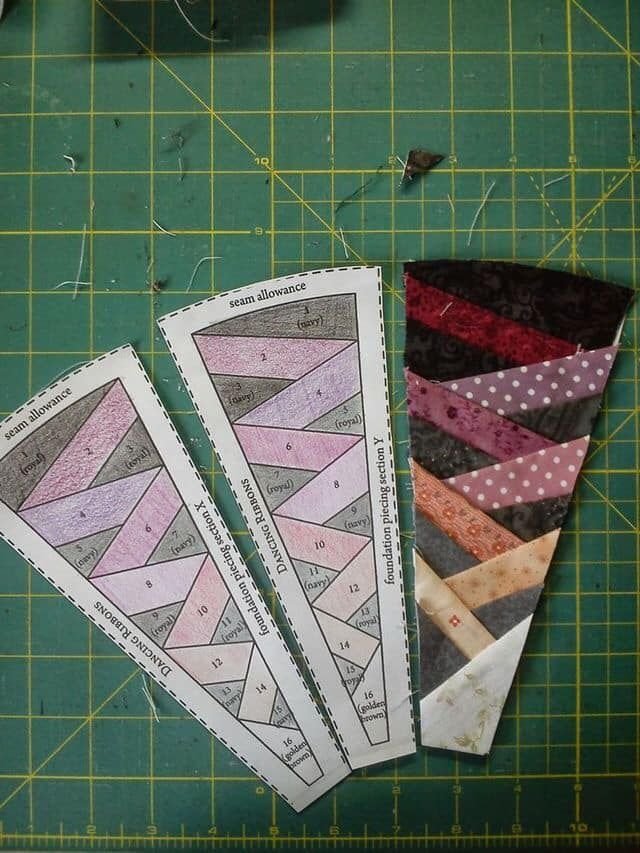
The Dancing Ribbons Tutorial introduces a design built on curves that mimic flowing ribbons. At first, the layout may seem intimidating, but once you study its structure, you’ll realize it’s made from a combination of simple units. These units, when pieced together, create the illusion of movement. The ribbons often intersect and overlap, giving the quilt a dynamic appearance that feels almost three-dimensional.
SEE OTHER FACE PATTERNS HERE!
When starting out, it’s helpful to choose fabrics that contrast well. Solid colors paired with bold prints can highlight the curves and emphasize the ribbon effect. The design works well with seasonal themes too—for example, using warm autumn colors for a fall-inspired quilt or bright pastels for spring. The beauty of the Dancing Ribbons Tutorial is its adaptability to your personal style.
Cutting the fabric accurately is one of the most important steps. Curves require precision to ensure that the pieces fit smoothly together without puckering. Many quilters use templates to trace and cut consistent shapes. Investing a bit of time in preparation ensures that sewing will be easier and the final design crisp and balanced.
Sewing curves can be a challenge for beginners, but with patience, it becomes second nature. Pinning carefully, sewing slowly, and pressing seams properly all contribute to success. Each ribbon section needs to flow naturally, and gentle handling of the fabric prevents distortion. With practice, these techniques quickly build confidence.
Another aspect of the design is its versatility. Some quilters prefer symmetrical ribbons that repeat across the quilt, while others enjoy a more abstract approach. Both options are valid and equally beautiful. The tutorial encourages experimentation, reminding makers that quilting is as much about personal expression as it is about technique.
Finally, the Dancing Ribbons Tutorial is not limited to quilts alone. The pattern can be adapted into table runners, wall hangings, and even quilted pillows. Once you master the technique, the possibilities for projects are endless, allowing you to create matching sets or standalone statement pieces.
2. Step-by-Step Process for Beginners
The first step in the Dancing Ribbons Tutorial is gathering your materials. You will need quilting cotton in several colors, a rotary cutter, ruler, cutting mat, pins, and your sewing machine. Having high-quality tools makes the process smoother and more enjoyable. For beginners, starting with smaller projects like a wall hanging can build confidence before attempting a full quilt.
After cutting your fabric pieces, focus on arranging them on a design wall or flat surface. This allows you to visualize how the ribbons will flow across your project. Taking photos during this stage is helpful, as it lets you compare different arrangements and choose the one that speaks to your creative vision.
When you start sewing, remember that curves need extra attention. Aligning the edges carefully and sewing slowly is key. Many beginners find it helpful to use more pins than usual to keep the fabric stable. If you make a mistake, don’t get discouraged—unpick the seam and try again. The Dancing Ribbons Tutorial emphasizes practice as part of the learning journey.
Pressing seams after each step is essential for maintaining accuracy. Curved seams especially benefit from gentle pressing with steam. This ensures the ribbons look smooth and professional. Ironing may seem like a small detail, but it makes a huge difference in the final appearance of your quilt.
Once the main ribbon sections are sewn, you can add borders or background pieces. These additional fabrics help frame the design and enhance the movement effect. Some quilters prefer neutral backgrounds to let the ribbons stand out, while others enjoy blending gradients for a softer look. Both approaches are effective depending on your chosen theme.
The final step for beginners is basting, quilting, and binding the project. Simple straight-line quilting can complement the ribbons without distracting from their flow. Alternatively, free-motion quilting can enhance the curves and add even more movement. Binding ties the entire piece together, giving it a polished finish.
3. Advanced Tips for Perfect Results
For more experienced quilters, the Dancing Ribbons Tutorial offers opportunities to push boundaries. One advanced technique is experimenting with fabric textures. Mixing cotton with batiks or metallic fabrics creates stunning visual effects, especially under different lighting. These subtle differences make your quilt unique and memorable.
Another tip is playing with scale. Instead of keeping all ribbons the same size, try enlarging or shrinking certain sections. This variation adds depth and keeps the eye moving across the quilt. It’s a powerful way to highlight focal points within the design.
Color theory also plays a role in advanced ribbon quilts. Using complementary colors can create bold, striking contrasts, while analogous colors result in a more harmonious and calming effect. Deciding on your color palette before cutting fabric ensures consistency throughout the project.
Precision in sewing is even more critical at advanced levels. Small inaccuracies can accumulate quickly in a quilt full of curves. Tools like curved rulers and specialty sewing feet can help improve accuracy and save time. Don’t hesitate to invest in high-quality quilting accessories—they make a noticeable difference.
Quilting design is another area where experienced makers can shine. Instead of simple lines, try echo quilting along the ribbons to enhance the flowing effect. Alternatively, custom motifs such as swirls or feathers can add elegance. This step transforms the quilt from handmade to truly artistic.
Lastly, advanced quilters often enjoy teaching or sharing their creations. Posting your work online or gifting it to loved ones allows the Dancing Ribbons Tutorial to inspire others. Every finished piece tells a story, and your creative interpretation contributes to the quilting community as a whole.
4. Creative Variations and Project Ideas
One exciting variation of the Dancing Ribbons Tutorial is using it for seasonal projects. For instance, holiday-themed ribbons in red, green, and gold create festive decorations, while icy blues and silvers evoke winter themes. These seasonal quilts make thoughtful handmade gifts or special home décor pieces.
Another idea is incorporating scraps. Many quilters have bins filled with leftover fabric pieces, and this design is perfect for putting them to use. Scrappy ribbons add character and sustainability to your project, turning what might have been discarded into a beautiful quilt.
You can also experiment with backgrounds. A dark background makes bright ribbons pop dramatically, while a light background creates a softer, airy feel. Changing just the background fabric can completely alter the mood of the quilt.
Mini quilts are another fun option. By scaling down the design, you can create small wall hangings, placemats, or even tote bag panels. These smaller projects are great for practicing the technique without committing to a large quilt.
Some quilters like to combine the Dancing Ribbons Tutorial with other patterns. For example, pairing ribbons with stars, flowers, or geometric blocks can create an intricate, eye-catching quilt. This fusion of designs demonstrates creativity and skill.
Finally, think beyond quilts altogether. The ribbon motif works beautifully in home décor items such as pillow covers, table runners, or even framed textile art. These variations allow you to incorporate the flowing ribbon design into different aspects of daily life.
FAQ about the Dancing Ribbons Tutorial
What skill level is required for the Dancing Ribbons Tutorial?
The tutorial is suitable for confident beginners and above. While sewing curves takes practice, the instructions are clear enough for motivated beginners to follow successfully.
Do I need special tools for this project?
While standard quilting tools work, curved rulers and templates can make the process easier and more accurate. A walking foot or free-motion foot may also help with quilting.
How much fabric will I need?
Fabric requirements depend on the project size. A small wall hanging requires less than a yard of each color, while a full quilt may need several yards. Always check measurements before cutting.
Can I use scraps for this design?
Yes, scraps are a great option. They add variety and make the quilt more eco-friendly. Just ensure the fabrics are of similar weight to maintain balance.
How should I quilt the finished top?
Both straight-line and free-motion quilting work well. Echoing the curves is a popular choice, as it emphasizes the ribbon effect. Choose quilting designs that complement the flow of the ribbons.
Is the Dancing Ribbons Tutorial good for gifts?
Absolutely. Handmade ribbon quilts are thoughtful and personal. Seasonal versions in particular make excellent gifts for holidays, birthdays, or special celebrations.
Conclusion
The Dancing Ribbons Tutorial is a beautiful way to explore quilting through movement, color, and creativity. From beginners learning to sew curves to advanced quilters experimenting with textures and layouts, this design offers something for everyone. Its adaptability allows it to shine in quilts, wall hangings, and other projects, ensuring your work always feels unique.
Now that you’ve discovered how to bring ribbons to life in fabric, it’s your turn to try the Dancing Ribbons Tutorial and create something truly special. We’d love to hear your thoughts—share your honest opinion and suggestions in the comments, and let’s keep inspiring each other in the wonderful world of quilting.


