If you’re looking to make a quilt that combines elegance with a touch of nature’s beauty, the Diamond Garden Quilt is the perfect choice. This stunning quilt pattern features diamond-shaped blocks that come together to form a beautiful, geometric garden design. Whether you’re an experienced quilter or just getting started, this Diamond Garden Quilt – Tutorial will walk you through each step of the process. By the end of this guide, you’ll be able to create your own lovely quilt with a sense of pride and accomplishment.
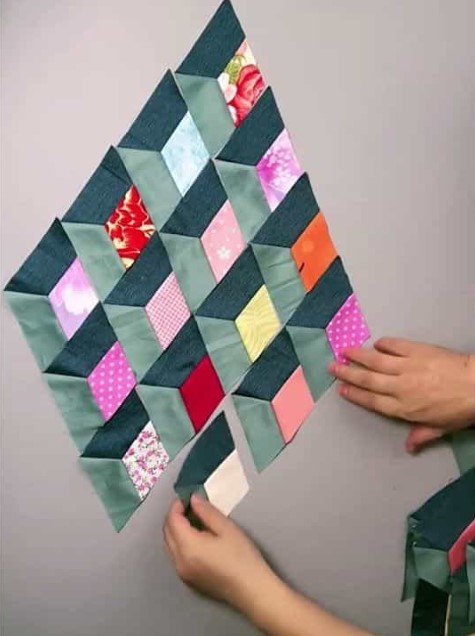
The Diamond Garden Quilt is characterized by its symmetrical diamond shapes, which are often made using vibrant colors that mimic a garden in full bloom. The beauty of this quilt lies in the repetition of the diamond blocks, which can be arranged in numerous ways to create striking patterns. In this tutorial, we’ll break down the process of making your very own Diamond Garden Quilt, from selecting fabrics to sewing the blocks and assembling the quilt top.
Whether you want to create a quilt for a cozy throw, a bedspread, or even as a gift, the Diamond Garden Quilt – Tutorial will provide you with all the essential tips and techniques you need. We’ll cover everything from cutting the fabric to piecing the blocks and adding the finishing touches to give your quilt a professional and polished look.
1. Materials Needed for the Diamond Garden Quilt
Before starting your Diamond Garden Quilt – Tutorial, it’s important to gather all the materials you’ll need. Having everything on hand will ensure you can smoothly move through the project without interruptions. Here’s a list of materials you’ll need:
SEE OTHER FACE PATTERNS HERE!
- Fabric: Choose a variety of fabrics in different colors and prints for the diamond shapes. Typically, you’ll need a selection of light, medium, and dark fabrics to create contrast and depth in the quilt.
- Quilt Batting: Batting provides the soft middle layer of the quilt. Make sure to choose a batting that’s appropriate for your quilt’s intended use, such as cotton or polyester.
- Quilt Backing Fabric: The fabric you’ll use for the back of the quilt. This can be a solid color or a fun print, depending on your design preference.
- Rotary Cutter and Cutting Mat: These tools will make cutting your fabric pieces easier and more precise.
- Quilting Ruler: To ensure you’re cutting straight lines and precise angles for the diamond shapes.
- Thread: You’ll need a good quality thread in a neutral color that will blend well with your fabric.
- Quilt Pins: To hold your fabric pieces in place while you sew them together.
- Sewing Machine: A reliable sewing machine that can handle quilting tasks.
- Iron: To press your seams and fabric pieces for a crisp and clean finish.
Once you have all your materials ready, you’re all set to start creating your Diamond Garden Quilt!
2. Cutting Your Fabric for the Diamond Blocks
The first step in making the Diamond Garden Quilt is cutting your fabric into the appropriate shapes. The main feature of this quilt is the diamond-shaped blocks, and you’ll need to cut the fabric pieces carefully to ensure everything fits together properly. Here’s how to do it:
- Cutting the Fabric for Diamonds: Using your rotary cutter and quilting ruler, cut your fabric into squares. The size of your squares will depend on the size of the finished diamonds you want to create. A common size for the squares is 5 inches, but you can adjust this based on your desired quilt size. To create the diamond shape, cut each square diagonally in half from corner to corner. You will now have two triangle-shaped pieces that will form the diamond blocks.
- Choosing Fabric Colors: For a vibrant and balanced quilt, choose a variety of fabric colors. Consider using different shades of light, medium, and dark fabrics for the diamond pieces. The contrast between the fabrics will help the diamonds stand out and create a beautiful effect once assembled.
- Cutting the Background Fabric: In addition to the diamonds, you’ll need to cut fabric for the background of your quilt. This fabric will frame the diamonds and help the design stand out. You can either use a single solid color or a subtle print to complement your diamond shapes.
Once all your fabric pieces are cut, it’s time to begin piecing the blocks together.
3. Assembling the Diamond Blocks
Now comes the fun part: piecing the fabric together to create the diamond blocks. This is where the magic of the Diamond Garden Quilt happens! Follow these steps to assemble your blocks:
- Sewing the Diamond Shape: Take two of the triangle-shaped fabric pieces and sew them together along the straight edges to form a diamond shape. Use a 1/4-inch seam allowance to keep the blocks consistent in size. Press the seams open or to one side to reduce bulk.
- Creating the Block Layout: Once you’ve sewn several diamonds, arrange them in a pleasing layout. You can experiment with different color combinations and arrangements, such as alternating dark and light diamonds or creating a gradient effect. Lay out your diamonds on a flat surface to find the arrangement that looks best to you.
- Sewing the Rows Together: Once you have your layout, begin sewing the diamonds together in rows. Use your quilting pins to hold the pieces in place while you sew. Be sure to match the seams where the diamonds meet for a clean, precise look.
- Assembling the Quilt Top: After sewing the rows of diamond blocks, sew the rows together to create the quilt top. Press the seams open as you go to ensure everything lies flat.
With the quilt top completed, you’re ready to move on to the next step: adding the quilt backing and batting.
4. Quilting and Binding Your Diamond Garden Quilt
Once you’ve finished piecing the quilt top, it’s time to add the final touches. This includes adding quilt batting, sewing the quilt sandwich, and binding the edges. Here’s how you do it:
- Preparing the Quilt Sandwich: Lay the quilt backing fabric on a flat surface, with the right side facing down. Place the quilt batting on top, followed by the quilt top, right side facing up. Smooth out any wrinkles or bubbles, and pin the layers together to secure them.
- Quilting the Layers: Using your sewing machine, quilt the layers together by sewing along the seams or creating a pattern of your choice. You can use straight lines, curved lines, or even free-motion quilting to add texture to your quilt.
- Trimming the Edges: Once you’ve quilted all the layers, trim any excess fabric along the edges of the quilt to ensure the sides are even and straight.
- Binding the Quilt: To finish the quilt, create quilt binding by cutting strips of fabric and folding them to encase the raw edges of the quilt. Sew the binding onto the quilt’s edges, making sure to miter the corners for a professional finish.
Your Diamond Garden Quilt is now complete!
Frequently Asked Questions (FAQ) About Diamond Garden Quilt
1. What size should my diamond blocks be for the quilt? The size of the diamond blocks depends on the final size of your quilt. Typically, a 5-inch square is used, which, when cut diagonally, creates a 4.5-inch diamond. Adjust the size based on your preferences and the quilt’s intended use.
🌟Join our exclusive Quilt broadcast list on Messenger! Receive the best patterns, tips, and updates directly in your inbox. Our team is ready to send you delightful content that will inspire your projects. Don’t miss this opportunity to stay updated and create amazing pieces. Join now and be part of this passionate quilt community!✨📩
2. Can I use a pre-cut fabric bundle for this quilt? Yes, using a charm pack or fat quarters can be a convenient way to gather fabric for your Diamond Garden Quilt. These pre-cut fabric bundles usually come in coordinating colors and prints, making them ideal for quilts.
3. How do I avoid the diamonds shifting while piecing the blocks? Using quilting pins to hold the fabric pieces together will help prevent shifting. You can also use a walking foot on your sewing machine to help feed the fabric evenly through the machine.
4. How can I customize the quilt’s design? The Diamond Garden Quilt is versatile and can be customized in many ways. You can change the layout of the diamonds, experiment with different color combinations, or add additional borders around the quilt.
5. What kind of batting should I use for this quilt? Choose a batting based on your preference for quilt thickness and softness. Cotton batting is lightweight and breathable, while polyester batting is more resilient and offers a fluffier feel.
INSPIRATION VIDEO
Conclusion
Creating a Diamond Garden Quilt is a rewarding and enjoyable project that results in a stunning and timeless piece. In this tutorial, we covered everything from cutting fabric and assembling the blocks to quilting and binding the quilt. With a little patience and attention to detail, you can create a beautiful quilt that’s perfect for any occasion.
We’d love to hear about your experience making the Diamond Garden Quilt! Share your thoughts, tips, and suggestions in the comments below. Happy quilting!


