If you’re looking for a creative and practical sewing project, this Fabric coasters, square cats – Tutorial is the perfect place to start. Combining functionality and cuteness, these fabric coasters featuring square cat designs are ideal for gifts, home decor, or simply enjoying a cozy afternoon of crafting.
In this tutorial, we’ll guide you through the process of making these adorable square cat fabric coasters, from materials to finishing touches. Whether you’re a beginner or a seasoned sewer, this project offers a satisfying and charming result — all while being an excellent way to use up fabric scraps and personalize your space.
By following this Fabric coasters, square cats – Tutorial, you’ll learn how to sew durable, washable, and unique coasters that showcase your personality and creativity. This project also ranks high in terms of search interest and Pinterest trends, making it an ideal blog post for engaging DIY enthusiasts and home decor lovers.
1. Choosing Materials for Your Fabric Coasters
The first step in this Fabric coasters, square cats – Tutorial is gathering your materials. The quality and texture of your fabric will affect both the look and durability of your coasters.
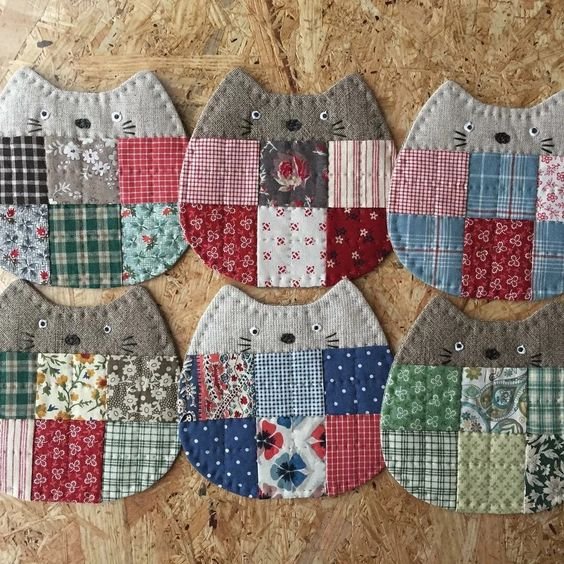
SEE OTHER FACE PATTERNS HERE!
Start by selecting two different cotton fabrics — one for the front, where your square cats will be featured, and one for the backing. Cotton is breathable, easy to work with, and absorbs moisture, making it perfect for coasters.
You’ll also need a middle layer for structure. Cotton batting or fusible fleece is highly recommended. It adds thickness and absorbs condensation, protecting surfaces from heat and moisture.
To emphasize the square cats design, you can either use printed fabric or applique your own square cat illustrations. This adds a personal touch and lets your creativity shine.
Don’t forget basic sewing tools: fabric scissors, sewing machine, iron, pins, and matching thread. If you’re new to sewing, a rotary cutter and mat can also make cutting squares more precise.
Make sure your fabric is pre-washed and ironed. This prevents shrinking and puckering later on, ensuring a smooth and professional finish.
2. Cutting and Preparing Your Fabric Squares
Now that your materials are ready, the next step in our Fabric coasters, square cats – Tutorial is cutting your fabric to size. Precision here will result in clean, even coasters.
Each coaster requires three layers: front fabric, batting, and backing. Cut each square to approximately 5 x 5 inches. If you’d like slightly larger or smaller coasters, adjust accordingly but keep all pieces the same size.
Lay the front fabric right-side up. If you’re adding your own square cats design, now is the time to applique or embroider it onto the front piece.
Next, layer the batting over the wrong side of the front fabric. This will help the coaster hold its shape and absorb moisture. Then place the backing fabric on top, right side down, so that the front and back fabrics are facing each other.
Pin or clip all the layers together. This helps prevent shifting while you sew and keeps your coaster evenly aligned.
If you’d like rounded corners or decorative edges, now’s the time to trace them using a round object or template. However, square corners are classic and work well with the square cat theme.
Remember to mark a 2-inch gap on one side — you’ll need this opening to turn your coaster right-side out after sewing.
3. Sewing and Turning Your Coasters
With everything pinned and prepped, this part of the Fabric coasters, square cats – Tutorial focuses on the actual sewing process. Take your time for clean and even stitching.
Begin sewing around the edge of the coaster using a 1/4-inch seam allowance. Start just after the opening you marked and stop just before the other side of it, leaving that gap unsewn.
Backstitch at the beginning and end to secure the stitches. This is important because you’ll be turning the fabric, and you don’t want it to unravel.
Once sewn, trim the corners diagonally to reduce bulk. Be careful not to cut through the stitches — just snip enough to allow for a crisp corner once turned.
Use the gap to gently turn the coaster right-side out. A point-turner, chopstick, or even a pencil can help push out the corners neatly.
Press your coaster flat with an iron, tucking in the raw edges of the opening so they align with the rest of the seam.
To close the gap and give the coaster a finished look, topstitch around the entire perimeter, about 1/8 inch from the edge. This also reinforces the structure.
4. Finishing Touches and Care Tips
This final section of the Fabric coasters, square cats – Tutorial is all about adding flair and ensuring your coasters last a long time.
You can add decorative stitching in a square or spiral pattern inside the coaster. This not only looks cute but also helps the layers stay together during washing.
If you used a plain fabric, consider adding fabric paint or embroidery to enhance the square cats design. Personalizing each coaster makes it a wonderful handmade gift.
To keep your coasters looking fresh, make them machine-washable by securely topstitching and using cotton materials. Avoid synthetic fabrics that might warp or melt.
Let them air dry flat after washing to maintain their shape. A quick press with an iron brings them back to crisp condition.
Store your fabric coasters stacked in a small basket or tray on your table. They add a cozy, welcoming feel to your home while protecting furniture.
Finally, consider making sets of four or six and tying them with ribbon for an easy and thoughtful gift for cat lovers or handmade market booths.
🌟Join our exclusive Quilt broadcast list on Messenger! Receive the best patterns, tips, and updates directly in your inbox. Our team is ready to send you delightful content that will inspire your projects. Don’t miss this opportunity to stay updated and create amazing pieces. Join now and be part of this passionate quilt community!✨📩
FAQ – Fabric Coasters, Square Cats Tutorial
Q: What size should I make my fabric coasters?
A: A standard size is 5 x 5 inches, but you can customize depending on the size of your cups or design preference.
Q: Do I need a sewing machine to make these coasters?
A: While a sewing machine speeds things up, you can hand-sew these coasters if you’re patient and enjoy the process.
Q: What is the best fabric to use for coasters?
A: 100% cotton is best due to its absorbency, durability, and ease of washing. Avoid slippery or stretch fabrics.
Q: How do I make the square cats design?
A: You can use cat-themed fabric, applique a simple square-shaped cat design, or even embroider a cat face onto plain fabric.
Q: Are these coasters washable?
A: Yes! Use cotton fabric and batting, then topstitch the edges. Wash in cold water and let them air dry flat.
Q: Can kids make these with supervision?
A: Absolutely! With some help cutting and sewing, kids can enjoy designing their own square cats and learn basic sewing skills.
Conclusion
This Fabric coasters, square cats – Tutorial guided you through every step — from choosing fabric to finishing techniques — for creating your own adorable and practical coasters. Whether for personal use, gifts, or selling at markets, these coasters combine charm, function, and creativity.
We hope you enjoyed this DIY guide! If you try making these coasters, leave us your honest feedback in the comments and share your suggestions. We’d love to see how your square cats turned out and what variations you came up with!


