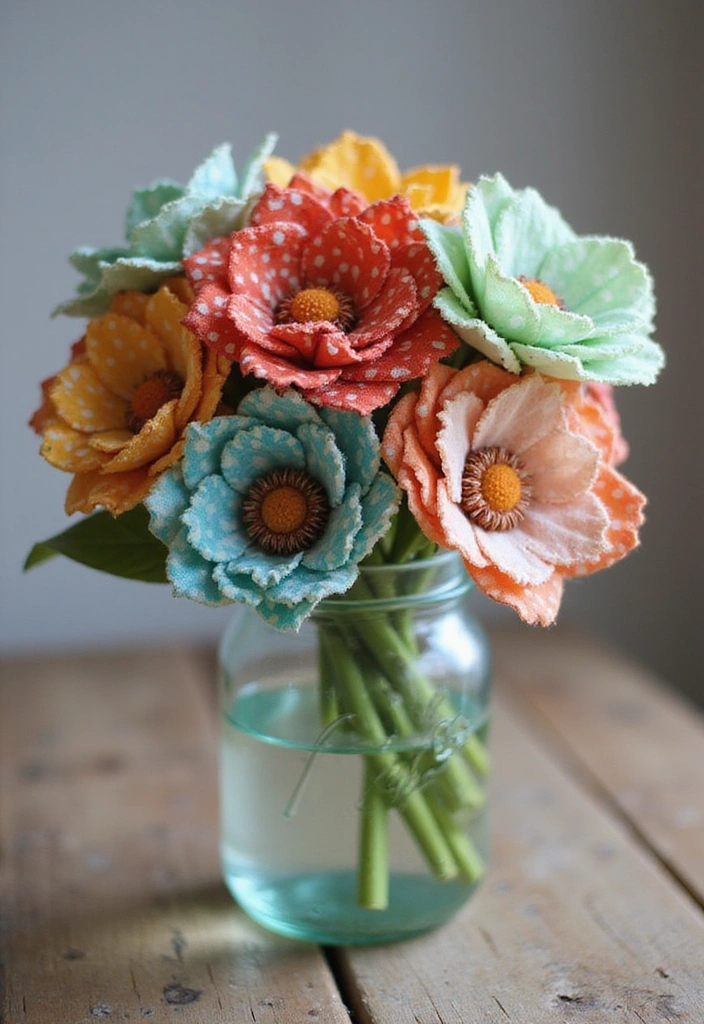
If you love transforming leftover materials into something beautiful, this Fabric Scrap Flower Bouquets – Pattern is the perfect quilting project for you. Designed for crafters who enjoy combining sustainability with creativity, this tutorial shows how to turn simple fabric scraps into charming, everlasting fabric flowers. Whether you’re looking to decorate your home, gift a handmade bouquet, or simply explore a fun quilting idea, this project will bring joy and a touch of color to any space.
The Fabric Scrap Flower Bouquets project is ideal for quilters of all skill levels. It allows you to mix patterns, textures, and colors in imaginative ways while reducing fabric waste. Instead of discarding leftover pieces from past quilts, you’ll repurpose them into stunning floral arrangements that never wilt. Each bouquet is unique, making it a thoughtful and eco-friendly craft that promotes both artistry and mindfulness.
This project also offers endless customization. From small blossoms to large, layered blooms, every flower can tell its own story through fabric. Whether you prefer bold modern designs or soft vintage aesthetics, this Fabric Scrap Flower Bouquets – Pattern gives you the freedom to create arrangements that match your personal style or seasonal décor. Let’s explore how you can bring these everlasting flowers to life with simple quilting techniques and creative vision.
1. Gathering Your Materials and Fabric Scraps
To begin the Fabric Scrap Flower Bouquets – Pattern, you’ll need a collection of fabric scraps in various colors and textures. Cotton fabrics work best, as they hold shape well and are easy to sew. However, you can also experiment with denim, linen, or even silk for an elegant touch.
SEE OTHER FACE PATTERNS HERE!
Organize your scraps by color families before you start. This makes it easier to design cohesive bouquets or mix complementary shades for a vibrant, artistic look. Think about how your final piece will be displayed—will it sit in a vase, decorate a wall, or serve as a gift topper?
You’ll also need a few additional materials: fabric scissors, a needle and thread (or a sewing machine), iron wire or floral stems, glue (optional), and embellishments like buttons or beads for flower centers.
Before cutting your fabric, iron each piece flat. This will ensure clean edges and smooth folds when shaping your flowers. Flattening the scraps also helps highlight the fabric’s patterns and colors.
If you’re using fabric with frayed edges, consider finishing them with a zigzag stitch or fabric glue to keep your flowers neat and durable.
Lastly, remember that variety is your best friend. The charm of Fabric Scrap Flower Bouquets lies in their imperfections and mix of textures. Combine soft fabrics with textured ones to add depth and dimension to your bouquet.
2. Crafting the Fabric Flowers
The most exciting part of the Fabric Scrap Flower Bouquets – Pattern is creating the flowers themselves. Begin by cutting your fabric scraps into various shapes—circles, petals, or spirals—depending on the type of flower you want to make. Each piece should be slightly different to create a natural look.
For a simple rosette, cut a long strip of fabric and twist it loosely as you coil it into a spiral. Stitch or glue the base to secure it. For layered flowers, cut several petal shapes, stack them, and sew through the center to hold them together.
Don’t worry about perfection—real flowers aren’t identical, and that’s what makes this project charming. The more you vary the shapes and sizes, the more natural and dynamic your bouquet will appear.
Once your petals are formed, attach them to a wire stem using thread or floral tape. You can also wrap the base with green fabric or ribbon for a more polished finish.
Add buttons, beads, or small fabric circles in the center of each flower to enhance the detail and bring your blooms to life. This touch adds depth and texture, making your flowers even more eye-catching.
Repeat the process until you have a beautiful selection of flowers ready to assemble into a bouquet. You can make as few or as many as you like—there’s no limit to your creativity!
3. Assembling Your Fabric Scrap Bouquet
Now that your flowers are ready, it’s time to assemble your Fabric Scrap Flower Bouquets into a cohesive arrangement. Start by selecting a few of your favorite blooms to act as focal points. These will be positioned in the center of your bouquet.
Arrange the remaining flowers around the center ones, balancing colors, shapes, and sizes to create visual harmony. Adjust the stem lengths as needed to add depth and variation. Taller stems can sit in the back, while shorter ones fill the front.
If your bouquet feels too tight, gently bend the wires outward to give it a fuller, airier appearance. The flexibility of fabric and wire makes it easy to achieve the desired shape.
Once satisfied with the arrangement, wrap the stems together with floral tape, twine, or a decorative ribbon. This secures the bouquet while adding an elegant finishing touch.
You can also enhance your design by including fabric leaves, lace accents, or even small quilted butterflies. These extras make your Fabric Scrap Flower Bouquets even more unique and artistic.
Finally, decide how you’ll display your creation. Place it in a jar, frame it as a wall hanging, or use it as part of a larger quilt composition. Each display method transforms the bouquet into a timeless piece of art.
4. Adding a Quilted Touch to Your Bouquet Design
What makes this Fabric Scrap Flower Bouquets – Pattern stand out is its connection to quilting. You can use traditional quilting techniques to enhance your bouquet, giving it depth and structure. Try creating quilted backgrounds or fabric vases to complement your flowers.
For a wall art version, sew your flowers onto a quilted base. Choose a background fabric that contrasts with your bouquet for visual impact. Add stitched outlines or embroidered stems for an artistic, hand-finished touch.
If you’re assembling a decorative pillow, appliqué your flowers directly onto the cover. This transforms a simple home accessory into a vibrant, textured masterpiece.
Use patchwork techniques to create unique petals by combining small pieces of fabric within a single flower. This creative twist highlights your quilting skills while giving each bloom a rich, layered appearance.
Consider adding subtle quilting lines in the background to mimic vines, leaves, or swirls of wind. These details tie the entire composition together beautifully.
Lastly, remember that this project is about creativity and expression. There are no strict rules—just let your imagination guide your stitches and your bouquet will bloom with originality.
FAQ – Fabric Scrap Flower Bouquets – Pattern
Q1: Do I need to be an experienced quilter to make this project?
No! The Fabric Scrap Flower Bouquets – Pattern is perfect for beginners. It’s a simple, flexible project that lets you practice cutting, sewing, and basic assembly.
Q2: What’s the best type of fabric for these flowers?
Cotton is the most commonly used, but you can experiment with denim, felt, silk, or linen for different textures and looks.
Q3: How can I make the bouquet last longer?
Keep it away from direct sunlight and moisture. You can also spray fabric protector to prevent dust accumulation.
Q4: Can I turn the flowers into individual accessories?
Yes! Attach clips, pins, or magnets to your fabric flowers to create brooches, hairpieces, or fridge decorations.
Q5: How do I give the flowers more volume?
Layer multiple petal pieces and use slightly stiffer fabrics or interfacing to give them structure and fullness.
Q6: Is this a good project for kids?
Absolutely. With adult supervision for the sewing and cutting steps, it’s a fun and educational craft for children.
Conclusion
The Fabric Scrap Flower Bouquets – Pattern is a beautiful way to combine quilting, creativity, and sustainability. By turning leftover fabric into colorful, everlasting flowers, you can create something meaningful and artistic that brightens any space. It’s an accessible project that invites you to explore color, texture, and design without limits.
Now that you’ve learned how to make your own fabric bouquet, it’s time to bring your imagination to life. Try it, personalize it, and share your version! Leave a comment with your honest opinion and suggestions—we’d love to know how your Fabric Scrap Flower Bouquets turned out and how you made them uniquely yours.

