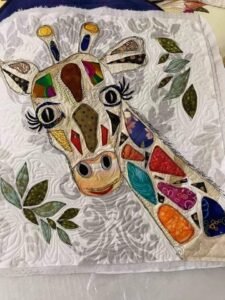
If you’re looking for an adorable and fun quilt pattern to brighten up any space, the Giraffe Patchwork Quilt is perfect for you.
This quilt is great for beginners and seasoned quilters alike, offering a unique design that showcases charming giraffes.
This tutorial will guide you through every step of creating your own Giraffe Patchwork Quilt, complete with fabric measurements and detailed instructions. With quilt and quilt patterns as our main focus, let’s dive into this exciting project!

1. Gathering Your Materials
Before starting any quilting project, it’s essential to gather all necessary materials. Having everything ready helps streamline the process and ensures that you won’t be interrupted once you start quilting.
To create this Giraffe Patchwork Quilt, you’ll need various fabric pieces. Choose high-quality cotton fabrics in giraffe-themed colors like browns, yellows, oranges, and contrasting colors like white or green for backgrounds. For this quilt, a 45-inch by 60-inch finished quilt will require about 1.5 yards of each main color and 2 yards of background fabric.
You’ll also need standard quilting tools: rotary cutter, ruler, cutting mat, pins, quilting needles, and thread that matches or contrasts with your fabric. Finally, don’t forget your batting and backing fabric to complete your quilt!
SEE OTHER FACE PATTERNS HERE!
2. Preparing and Cutting Fabric Pieces
Accurate cutting is crucial in quilting, as each piece must fit perfectly to create a seamless pattern. Take your time with this step to avoid mistakes.
To start, cut your background fabric into 10-inch squares, and your giraffe-colored fabrics into smaller pieces to create the shapes of the giraffes. For each giraffe figure, cut two 6-inch by 8-inch rectangles for the body, two 4-inch by 4-inch squares for the head, and one 1.5-inch by 6-inch strip for the neck. If you plan to add detail, like spots, cut small circles or irregular shapes to apply later.
When all pieces are cut, lay them out to visualize the placement of each section. This layout helps you ensure everything is correctly aligned and allows for adjustments before stitching.
3. Assembling the Giraffe Blocks
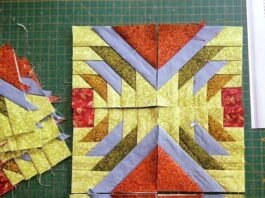
Now that your fabric pieces are cut, it’s time to assemble the giraffe blocks. Start by pairing the body and head pieces to form each giraffe.
Using a quarter-inch seam allowance, sew the giraffe body pieces together, and then attach the neck and head pieces. Make sure to press each seam flat as you go to ensure a smooth finish. Repeat this process for each giraffe block in your quilt layout. Add any additional elements like spots by stitching or appliqué.
Each giraffe block should be separated by a 2-inch strip of background fabric. Once all giraffes are complete, arrange the blocks to see the overall effect before moving on to final assembly.
4. Adding Borders to Frame the Quilt
Borders add structure and balance to your quilt, creating a polished, finished look. For this project, we’ll add two borders: an inner border in a solid color to frame the giraffe blocks and an outer border that complements the quilt’s overall theme.
Cut your inner border fabric into 2-inch strips. Attach these strips around the edges of the quilt, starting with the sides and then the top and bottom. For the outer border, cut 4-inch strips from a complementary fabric, and repeat the process. Press all seams flat as you go.
The borders not only frame the giraffe blocks but also help the quilt reach your desired dimensions, enhancing the quilt’s overall appearance.
5. Creating the Quilt Sandwich
The quilt sandwich consists of three layers: the quilt top, batting, and backing. Proper layering is essential for a well-balanced quilt.
Start by laying your backing fabric on a clean surface, with the wrong side facing up. Smooth out any wrinkles. Next, add your batting layer, ensuring it’s evenly distributed over the backing. Finally, place your quilt top on the batting with the right side facing up. Use pins or basting spray to secure all three layers together.
The sandwich should be tight enough to prevent shifting while quilting but not overly stretched, as this can cause puckering.
6. Quilting the Layers Together
Quilting brings all the layers together and adds texture to your project. For this Giraffe Patchwork Quilt, you can choose from several quilting techniques.
A simple, straight-line quilting along the edges of each giraffe block is a great choice for beginners, providing structure and emphasizing each giraffe shape. Alternatively, try free-motion quilting around the giraffes to give a more dynamic look. Make sure your sewing machine is equipped for quilting and that you have a walking foot or darning foot for free-motion quilting.
Take your time with this step, as quilting requires patience and precision. Keep the quilt smooth and taut, adjusting as needed to prevent wrinkles.
7. Adding the Binding
Binding finishes the quilt edges and gives it a polished, professional look. Cut 2.5-inch wide strips from your chosen binding fabric. You’ll need enough length to go around the entire perimeter of your quilt.
Start by sewing the binding to the front of the quilt, aligning the raw edges. Miter the corners by folding the binding at a 45-degree angle when you reach each corner. Once attached, fold the binding over to the back and hand-stitch it in place for a clean finish.
Binding requires practice, so take your time to ensure a neat edge. This final step gives your Giraffe Patchwork Quilt a cohesive, finished appearance.
🌟 Join our exclusive Quilt broadcast list on Messenger! Receive the best patterns, tips, and updates directly in your inbox. Our team is ready to send you delightful content that will inspire your projects. Don’t miss this opportunity to stay updated and create amazing pieces. Join now and be part of this passionate quilt community! ✨📩
8. Final Touches and Care Instructions
Congratulations, your Giraffe Patchwork Quilt is almost ready! Before you show it off, make sure to add any final touches.
Give your quilt a gentle press to smooth out any creases. If desired, add a quilt label with your name, the date, and any personal message. This little addition can make your quilt a cherished family heirloom.
When it comes to care, machine wash your quilt on a gentle cycle with cold water, and air dry or tumble dry on low. Proper care will ensure your quilt remains beautiful for years to come.
9. Why You Should Try the Giraffe Patchwork Quilt Pattern
The Giraffe Patchwork Quilt pattern is ideal for both beginners and experienced quilters. This charming design brings a playful element to any space, making it perfect for nurseries, children’s rooms, or any quilt collection.
Not only is this pattern fun to make, but it’s also a great way to practice essential quilting skills like cutting, piecing, and quilting techniques. With its adorable giraffe blocks and colorful design, the Giraffe Patchwork Quilt is sure to bring smiles to anyone who sees it.
If you love working with unique quilt patterns, the Giraffe Patchwork Quilt is a must-try! Gather your materials, follow the steps above, and enjoy bringing this delightful quilt to life.
With this guide, creating a Giraffe Patchwork Quilt becomes a straightforward and enjoyable project. Whether you’re making it for yourself or as a gift, this quilt will be a cherished piece that celebrates both creativity and craftsmanship. Happy quilting! 🧵


