Giraffe Wall Hanging Organizer – Tutorial is a creative and practical quilting project that combines adorable design with everyday functionality. From the very first stitch, the Giraffe Wall Hanging Organizer – Tutorial invites you to create something that is not only decorative but also incredibly useful for organizing small items in bedrooms, nurseries, craft rooms, or even entryways.
The charm of the Giraffe Wall Hanging Organizer – Tutorial lies in its playful giraffe design paired with functional storage pockets. It is the perfect blend of quilting artistry and home organization. Whether you are making it for a child’s room, as a baby shower gift, or simply to add a whimsical touch to your space, this project delivers both beauty and practicality.
In this complete guide, you will learn how to create your own Giraffe Wall Hanging Organizer – Tutorial, from fabric selection and cutting techniques to appliqué methods, pocket construction, and finishing details. This tutorial is designed to be accessible for confident beginners while still offering creative opportunities for experienced quilters.
1. Understanding the Design of the Giraffe Wall Hanging Organizer – Tutorial
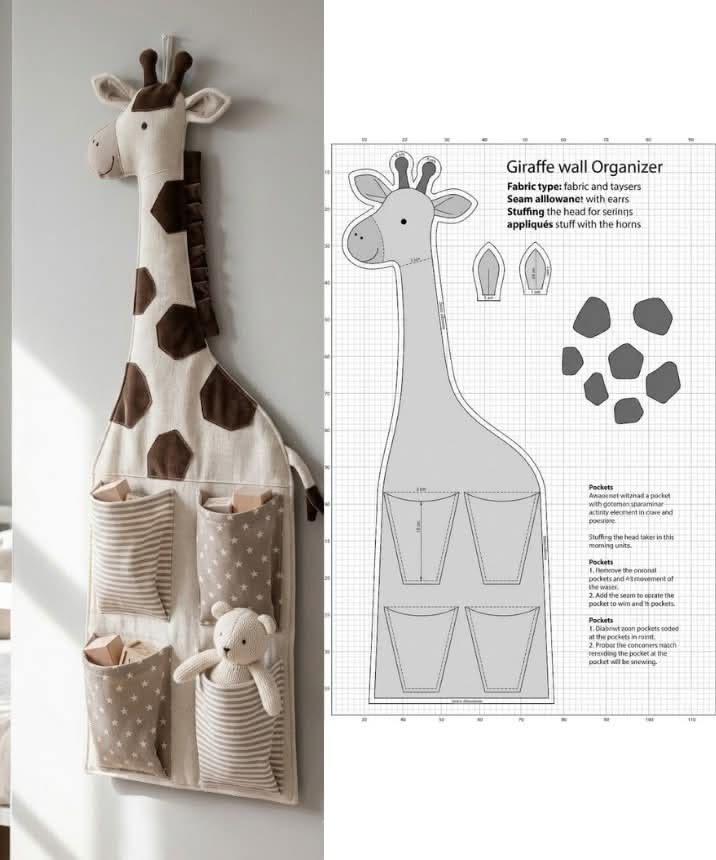
The Giraffe Wall Hanging Organizer – Tutorial typically features a large giraffe silhouette or a detailed giraffe face as the central design element. The long neck of the giraffe naturally lends itself to a vertical wall hanging format.
DISCOVER MORE FREE PATTERNS HERE!
Most versions of this organizer include multiple quilted pockets attached to the lower portion of the design. These pockets can hold small toys, craft supplies, mail, notebooks, or accessories.
Appliqué techniques are often used to create the giraffe’s body, spots, facial features, and other decorative details. This allows for vibrant color combinations and personalized touches.
The background of the wall hanging is usually a solid or lightly patterned fabric that helps the giraffe design stand out clearly.
This pattern can be adapted to different sizes. A smaller version works beautifully in nurseries, while a larger organizer is ideal for classrooms or craft spaces.
Overall, the Giraffe Wall Hanging Organizer – Tutorial combines structure, whimsy, and functionality in a way that feels both charming and purposeful.
2. Materials and Fabric Selection
Choosing the right materials is essential for a durable and visually appealing result. For the Giraffe Wall Hanging Organizer – Tutorial, start with high-quality quilting cotton.
Select warm golden or yellow tones for the giraffe’s body. Brown fabrics work perfectly for the signature giraffe spots and small details.
For the background, consider neutral shades like white, beige, or soft pastel colors. This helps the giraffe design remain the focal point.
You will need batting to provide structure and a backing fabric to complete the quilt sandwich. Medium-weight batting offers enough stability without making the organizer too stiff.
Additional materials include thread, fusible web for appliqué, scissors, rotary cutter, cutting mat, quilting ruler, pins or clips, and a sewing machine.
To hang the organizer, prepare a wooden dowel, hanging rod, or fabric sleeve at the top. This ensures the finished piece hangs straight and securely on the wall.
3. Step-by-Step Construction Process
Begin by cutting your background fabric to the desired size. This will serve as the foundation of your Giraffe Wall Hanging Organizer – Tutorial.
Next, prepare your giraffe appliqué pieces. Trace the giraffe pattern onto fusible web, cut out the shapes, and fuse them to the corresponding fabrics.
Carefully position the giraffe pieces on the background fabric. Once satisfied with placement, press them in place and secure the edges using a zigzag stitch or blanket stitch.
After completing the appliqué, assemble the quilt sandwich by layering the backing fabric, batting, and quilt top. Quilt lightly to add texture and secure the layers.
Now create the pockets. Cut rectangular fabric pieces, fold and hem the top edges, and attach them to the lower portion of the quilt top. Stitch along the sides and bottom to secure.
Finally, add a top sleeve or corner tabs for hanging. Bind the edges with coordinating fabric to give your project a clean, professional finish.
4. Quilting, Finishing, and Customization Ideas
Quilting adds both texture and durability to the Giraffe Wall Hanging Organizer – Tutorial. Straight-line quilting around the giraffe shape enhances the design without overpowering it.
You can also echo quilt around the giraffe silhouette to create a dimensional effect. This technique makes the giraffe stand out from the background.
Consider adding embroidered details such as eyelashes, names, or inspirational quotes. Personalization makes this project even more special as a gift.
For added functionality, divide larger pockets into smaller sections by stitching vertical lines. This helps organize smaller items efficiently.
If you want a playful touch, use patterned fabrics for the pockets, such as polka dots or stripes that complement the giraffe theme.
The Giraffe Wall Hanging Organizer – Tutorial can also be adapted into different animal themes, making it a versatile project for various décor styles.
FAQ – Giraffe Wall Hanging Organizer – Tutorial
Is the Giraffe Wall Hanging Organizer – Tutorial suitable for beginners?
Yes, confident beginners who understand basic quilting and simple appliqué techniques can complete this project successfully.
What type of batting should I use?
A medium-weight cotton or polyester batting works best. It provides structure without making the organizer too bulky.
Can I wash the wall hanging?
Yes, if made with washable cotton fabrics. However, gentle washing and air drying are recommended to preserve the shape.
How do I make the organizer more durable?
Reinforce pocket edges with double stitching and use high-quality thread to increase longevity.
Can I resize the pattern?
Absolutely. You can scale the pattern up or down depending on your available wall space and storage needs.
Is this project good for gifts?
Yes, it makes an excellent handmade gift for baby showers, birthdays, or classroom decorations.
Conclusion
The Giraffe Wall Hanging Organizer – Tutorial is a delightful quilting project that combines artistic expression with practical organization. In this guide, you learned how to understand the design, select materials, construct the appliqué and pockets, and finish your wall hanging with professional touches.
By carefully choosing fabrics, practicing precise stitching, and adding personalized details, you can create a beautiful and functional organizer that brightens any space. This project allows you to showcase your quilting skills while creating something truly useful.
Now it’s your turn to bring this charming giraffe to life. Have you tried the Giraffe Wall Hanging Organizer – Tutorial? Share your honest opinion and suggestions. Your feedback helps inspire others and strengthens our creative quilting community.

