Creating a quilt is a rewarding and creative way to express your artistic side, especially when it involves a delightful theme like Thanksgiving.
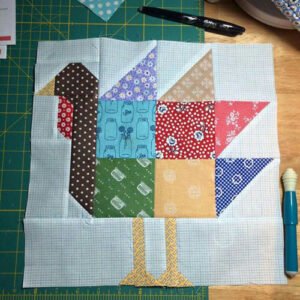
The Gobble Gobble Turkey Blocks Quilt is not only charming but also perfect for adding a festive touch to your home during the holiday season.
In this tutorial, we will provide a step-by-step guide on how to create this lovely quilt, including fabric cuts and measurements, to help you make a beautiful quilt that will be cherished for years to come.
Materials Needed for Gobble Gobble Turkey Blocks Quilt
Before diving into the quilt-making process, it’s important to gather all the materials needed to complete the Gobble Gobble Turkey Blocks Quilt. Having everything organized will make your quilting journey smoother and more enjoyable.
Fabric Requirements
For this quilt, you will need a selection of fabric in various colors to bring your turkey blocks to life. Here’s a suggested fabric list:
- Background Fabric: 2 yards of cream or white fabric
- Turkey Body Fabric: ½ yard of brown fabric
- Turkey Wing Fabric: ½ yard of orange and yellow fabric (you can use both colors or just one)
- Turkey Beak and Feet Fabric: ⅛ yard of red fabric
- Binding Fabric: 1 yard of coordinating fabric
- Backing Fabric: 3 yards of your favorite print or solid fabric
Cutting the Fabrics
Now that you have all your materials, it’s time to cut your fabric pieces according to the required dimensions for the Gobble Gobble Turkey Blocks Quilt. Accurate cutting is crucial to ensure that your quilt pieces fit together seamlessly.
- Background Blocks: Cut 8 squares measuring 6.5 inches x 6.5 inches from your background fabric.
- Turkey Bodies: Cut 8 turkey body pieces measuring 5 inches x 5 inches from your brown fabric.
- Turkey Wings: Cut 16 wing pieces, each measuring 3.5 inches x 3.5 inches, from your orange and yellow fabric.
- Turkey Beaks and Feet: Cut 8 small triangles (about 1.5 inches) from the red fabric.
With all your fabric cut and organized, you are ready to start assembling your Gobble Gobble Turkey Blocks!
Assembling the Turkey Blocks
Assembling the turkey blocks is a fun and creative process that allows you to see your quilt come to life. This section will guide you through the steps needed to create each turkey block for the Gobble Gobble Turkey Blocks Quilt.
Step 1: Create the Turkey Bodies
Start by taking your turkey body fabric pieces and placing them on your background squares. Center the brown square on top of the background square. Pin the edges if necessary to keep them aligned.
Once you have centered the turkey body, sew around the edges using a ¼ inch seam allowance. This will secure the turkey body to the background fabric. After sewing, trim any excess fabric, ensuring you have neat edges.
Step 2: Adding the Turkey Wings
Next, it’s time to attach the wings to the turkey bodies. Take your wing fabric pieces and place them on either side of the turkey body. You can mix and match the orange and yellow fabrics for a playful effect.
Pin the wings in place, making sure they align with the edges of the turkey body. Sew each wing onto the background, using a ¼ inch seam allowance. Repeat this for all turkey blocks, ensuring each turkey has its wings securely attached.
Step 3: Finishing Touches with Beaks and Feet
The last step in assembling your turkey blocks is to add the beaks and feet. Take the small triangles you cut from the red fabric and place them at the base of the turkey body to create the beak.
Sew the beak in place with a small stitch. For the turkey feet, you can simply cut small pieces from the remaining fabric and sew them below the turkey body. This adds a charming touch to your blocks, completing the turkey’s appearance.
Completing the Gobble Gobble Turkey Blocks Quilt
Now that you have all your turkey blocks assembled, it’s time to put them together and finish your Gobble Gobble Turkey Blocks Quilt. This section will cover how to arrange your blocks, sew them together, and prepare the quilt for the final touches.
Arranging the Blocks
Before sewing your turkey blocks together, take some time to lay them out on a flat surface. Experiment with different arrangements until you find one that pleases you.
You can choose to alternate the blocks or create a pattern. Once satisfied with the layout, take a photo to remember the arrangement, as this will help you during the sewing process.
Sewing the Blocks Together
Start sewing your blocks together by joining them in rows. Begin with the first row, placing the turkey blocks side by side. Pin them together and sew along the edges using a ¼ inch seam allowance.
After completing the first row, continue this process for the remaining rows. Once all rows are sewn together, press the seams flat to eliminate any puckering.
Preparing the Quilt Top
With all the rows sewn, it’s time to create the quilt top. Lay your rows on a flat surface and arrange them according to your initial layout. Pin the rows together, ensuring the seams align properly.
Sew the rows together, once again using a ¼ inch seam allowance. After sewing, press the seams for a clean finish. Your quilt top is now complete and ready for the next steps!
Adding the Batting and Backing
To give your Gobble Gobble Turkey Blocks Quilt the softness and warmth it deserves, adding batting and backing is essential. This section will guide you through the steps to layer your quilt properly.
Selecting the Batting
Choose a batting material that suits your preference for warmth and thickness. Cotton batting is a popular choice for quilts, providing a soft and cozy feel. Cut the batting to match the size of your quilt top, adding an extra inch around all edges for ease of handling.
Attaching the Backing Fabric
Once you have your batting cut, it’s time to prepare the backing fabric. Cut the backing fabric to match the size of your quilt top, ensuring you also have an extra inch around the edges.
Lay the backing fabric on a flat surface with the wrong side facing up. Place the batting on top of the backing, followed by the quilt top (right side facing up). Smooth out any wrinkles as you layer the three pieces.
Basting the Quilt Layers
To hold the layers together while quilting, you need to baste them. You can use safety pins, a temporary spray adhesive, or hand stitching to baste your quilt layers. Start from the center and work your way outwards, securing all three layers together.
Make sure the layers are smooth and well-aligned. Once basted, your quilt is ready for the quilting process!
Quilting and Binding the Gobble Gobble Turkey Blocks Quilt
The final steps in completing your Gobble Gobble Turkey Blocks Quilt involve quilting and binding. This is where you will add the finishing touches to your quilt, ensuring it is durable and beautiful.
Quilting Your Quilt
Now that your layers are basted, it’s time to quilt! You can choose to quilt by hand or use a sewing machine, depending on your skill level and comfort. Start by stitching in the ditch, which means sewing along the seams of your turkey blocks.
Feel free to add decorative quilting designs in the background or around the turkeys. The quilting adds texture and dimension to your quilt, making it even more special.
Binding the Quilt
Once you have completed the quilting, it’s time to add the binding. Cut strips of fabric (usually 2.5 inches wide) for the binding. You will need enough fabric to go around the entire quilt, plus a little extra for corners.
Join the binding strips together, press them in half lengthwise, and pin the binding to the edges of the quilt. Sew it in place using a ¼ inch seam allowance, ensuring to miter the corners for a neat finish.
🌟 Join our exclusive Quilt broadcast list on Messenger! Receive the best patterns, tips, and updates directly in your inbox. Our team is ready to send you delightful content that will inspire your projects. Don’t miss this opportunity to stay updated and create amazing pieces. Join now and be part of this passionate quilt community! ✨📩
Final Touches
After attaching the binding, flip it over to the back of the quilt and sew it down by hand or machine. This secures the binding and gives your quilt a polished look.
Finally, give your Gobble Gobble Turkey Blocks Quilt a gentle press to remove any wrinkles and ensure it looks its best. Your quilt is now ready to be displayed or gifted, bringing warmth and joy to your home this Thanksgiving!
Conclusion
Creating the Gobble Gobble Turkey Blocks Quilt is a delightful project that allows you to celebrate the spirit of Thanksgiving with your loved ones. With careful planning, cutting, and assembling, you can create a beautiful quilt that will be cherished for generations. Whether you are an experienced quilter or a beginner, this tutorial provides a clear and detailed guide to help you through the process.
Enjoy your quilting journey, and don’t forget to share your finished project with friends and family! Happy quilting!
This article has been structured with SEO best practices in mind, including the use of relevant keywords such as “quilt” and “quilt patterns,” ensuring that it is optimized for search engines. If you have any specific adjustments or additional details you would like included, feel free to let me know!

")
