The Hard Candy Quilt Block & Hard Candy Recipe – TUTORIAL is a delightful combination of quilting creativity and culinary charm—two crafts that bring warmth, color, and joy into your home. This unique tutorial blends a playful quilt block design inspired by classic hard candies with an easy homemade candy recipe, making it perfect for holiday projects, gift-giving, or simply adding sweetness to your crafting routine. Whether you are a quilter looking for a whimsical block pattern or someone who enjoys mixing crafts and kitchen fun, this tutorial offers a refreshing and enjoyable experience.
Incorporating the Hard Candy Quilt Block & Hard Candy Recipe – TUTORIAL into your sewing projects opens up countless creative possibilities. The quilt block itself features clean geometric lines and a bold candy-like center, allowing you to experiment with color contrasts, festive themes, and fun layouts. This pattern is suitable for beginners and intermediate quilters and can be used in table runners, wall hangings, tote bags, pillows, and full-size quilts. Its playful design brings a nostalgic and cheerful feel.
What makes this tutorial even more special is the inclusion of the candy recipe—a simple, family-friendly activity that pairs perfectly with a cozy quilting session. The candy-making process requires minimal ingredients and brings a sense of old-fashioned charm. Together, the quilt block pattern and the recipe create an experience that feels both creative and comforting, especially during holidays or cold seasons.
1. Understanding the Hard Candy Quilt Block Design
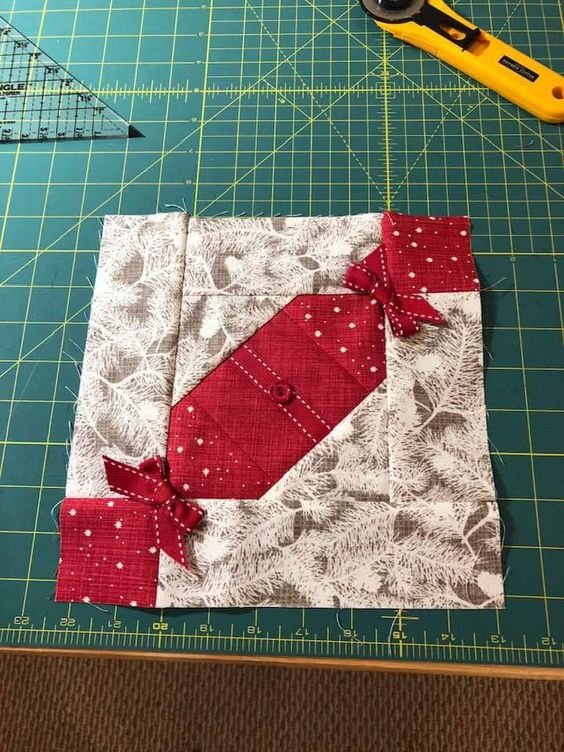
The Hard Candy Quilt Block & Hard Candy Recipe – TUTORIAL begins with the quilt block itself, a design inspired by the symmetrical and colorful look of wrapped candies. The block features a circular or octagonal center framed by straight lines that mimic the twist of candy wrappers. This gives the block its signature playful and classic appearance. Understanding the structure helps you achieve clean, precise results.
SEE OTHER FACE PATTERNS HERE!
The block is normally constructed using squares, rectangles, and triangle units. These shapes create the illusion of curves and folds, even though the block is based entirely on straight-line piecing. This makes it accessible for quilters who prefer simplicity but still want a visually engaging result. Focusing on accurate cutting and pressing ensures the block comes together smoothly.
Color selection plays an important role in achieving the candy-inspired look. Bold reds, pinks, greens, whites, and yellows mimic classic hard candies beautifully. For a festive holiday quilt, using a red-and-white palette can evoke peppermint swirls, while pastel tones can create a soft spring-themed look. High contrast between the candy center and the background fabric helps the “candy” stand out.
Fabric patterns can also elevate the block’s charm. Tiny polka dots, micro florals, and tone-on-tone prints add dimension without overwhelming the design. Solids also work wonderfully if you prefer a crisp, modern finish. The beauty of the Hard Candy Quilt Block & Hard Candy Recipe – TUTORIAL is its flexibility for experimentation.
Another aspect to consider is the block’s final use. If you are planning a full quilt, you may want to adjust the block size for quicker assembly. Larger blocks make bold statements and reduce construction time, while smaller blocks create a beautiful mosaic effect. Either size captures the candy-inspired essence.
Understanding the basics of the design allows you to confidently choose fabrics, colors, block size, and layout. Once you know how the geometry works, constructing the quilt block becomes a relaxing and enjoyable experience.
2. Cutting and Piecing the Hard Candy Quilt Block
The next step in the Hard Candy Quilt Block & Hard Candy Recipe – TUTORIAL focuses on cutting and piecing the block elements. This block is composed of several repeating units that fit together neatly, making it beginner-friendly. Accuracy in cutting is essential for achieving sharp points and clean seams, but the process remains simple and approachable.
Start by preparing the center units, which may be squares or half-square triangles depending on the specific variation you choose. These central shapes form the “candy core.” Pressing all seams properly after stitching keeps the units crisp and flat, improving the overall finish of the block.
The side units, which represent the wrapped ends of candy, are typically formed with flying geese sections, corner snowballing, or simple rectangular strips. These pieces add movement and visual interest to the block. Keeping your seam allowance consistent ensures the block maintains its intended measurements.
Once the center and side units are complete, the block assembly is straightforward. Arrange the pieces following the pattern layout, taking time to adjust colors so the design remains visually balanced. This is where the candy-like illusion truly begins to appear.
Many quilters like to chain-piece their units to speed up the sewing process. This technique saves time and helps maintain consistency across multiple blocks, especially if you are making a full quilt or several matching items like placemats or coasters.
Pressing matters greatly in this block. Pressing seams outward or inward depending on the joining sections can reduce bulk. A well-pressed block lies flat, making quilting easier and improving the final appearance. Taking a few extra moments during this step yields beautiful results.
After piecing the final sections together, square up your block to ensure clean edges. A perfectly squared block fits beautifully into any quilt layout, whether you prefer sashing, alternating blocks, or medallion-style arrangements. This completes the quilt block portion of the Hard Candy Quilt Block & Hard Candy Recipe – TUTORIAL.
3. Making the Hard Candy Recipe Step-by-Step
One of the most charming elements of the Hard Candy Quilt Block & Hard Candy Recipe – TUTORIAL is the inclusion of a homemade candy recipe. This recipe is simple, customizable, and a delightful complement to a cozy afternoon spent quilting. Even those with little cooking experience can succeed using basic ingredients and step-by-step guidance.
Begin with granulated sugar, water, and light corn syrup—these form the base of your hard candies. Candy flavoring oils and food coloring allow you to create endless variations. Peppermint, cinnamon, lemon, and cherry are popular choices. Use gel-based coloring for vibrant colors without thinning the mixture.
The mixture is heated until it reaches the hard-crack stage, typically around 300°F (150°C). Using a candy thermometer ensures accuracy. Watching the sugar syrup transform into a clear, bubbling liquid can be satisfying, and once it reaches the correct temperature, the candy sets beautifully.
After removing the mixture from heat, stir in your chosen flavoring and color. This is the moment when the candy’s personality truly emerges. Be careful during this stage, as the mixture is extremely hot. Mixing thoroughly ensures the flavor and color are evenly distributed.
Pour the mixture onto a greased baking sheet or into silicone molds. If spreading it onto a sheet, allow it to cool slightly before breaking it into pieces with a knife or small mallet. Dusting the candy pieces with powdered sugar prevents them from sticking together.
Once cooled completely, store your candy in an airtight container. Homemade hard candies make wonderful gifts, stocking stuffers, and holiday treats. Pairing them with a quilted item made from the Hard Candy Quilt Block & Hard Candy Recipe – TUTORIAL creates a heartfelt handmade gift set.
4. Mixing Quilting and Candy-Making for Creative Projects
The combination offered by the Hard Candy Quilt Block & Hard Candy Recipe – TUTORIAL makes this project uniquely enjoyable. Quilting stimulates creativity through color and texture, while candy-making connects to nostalgic traditions and simple kitchen crafting. Together, they create a warm and festive atmosphere.
This project is ideal for holiday crafting sessions with family or friends. While one person pieces quilt blocks, another can prepare candy mixtures, creating a fun and collaborative environment. It’s an opportunity to share skills, stories, and laughter while making something meaningful.
The quilt block theme also pairs perfectly with seasonal décor. You can create a small quilted banner featuring the hard candy block and display it alongside bowls of homemade candies. This adds a cheerful touch to your kitchen or living room during festivities.
Using the block design in gift projects adds personal charm. A quilted pouch, mug rug, or pot holder with a candy block motif presented along with homemade candies makes a thoughtful handmade gift. It combines the coziness of quilting with the sweetness of treats.
This tutorial also inspires creative expression through color. You can craft candy-themed quilts in rainbow palettes, pastel palettes, or classic red-and-white combinations. Each variation highlights the versatility of the block and the charm of the candy inspiration.
Bringing the quilt block and recipe together encourages a deeper appreciation for handmade traditions. Whether for gifting, decorating, or personal enjoyment, the Hard Candy Quilt Block & Hard Candy Recipe – TUTORIAL celebrates creativity in both sewing and cooking.
FAQ – Hard Candy Quilt Block & Hard Candy Recipe – TUTORIAL
What skill level is needed for the quilt block?
The block is beginner-friendly and uses basic geometric piecing.
Can I resize the block?
Yes, simply adjust the measurements of the center and side units proportionally.
What fabrics work best?
Cotton quilting fabrics with small prints or solids enhance the candy-inspired design.
Is the candy recipe complicated?
No, it uses simple ingredients and is suitable for beginners.
Can I make flavored variations?
Absolutely—use different oils such as mint, lemon, cinnamon, or cherry.
Is it safe to use real candles in displays with quilted items?
No, always use LED lighting near fabric crafts.
Conclusion
The Hard Candy Quilt Block & Hard Candy Recipe – TUTORIAL brings together two delightful crafts in a fun and memorable way.
PATTERN VIDEO:
With an accessible quilt block design and a simple, customizable candy recipe, this tutorial offers creativity, charm, and heartfelt handmade touches for any season. I hope you enjoyed this article and feel inspired to try both projects. Please leave your sincere opinion and share suggestions for future tutorials—I love hearing your ideas!

