The Heart Pattern for Coasters – TUTORIAL is a delightful quilting project that combines charm and functionality in a small, satisfying design. Perfect for Valentine’s Day décor, romantic table settings, handmade gifts, or everyday home accents, these heart-themed coasters are both practical and meaningful.
If you enjoy quick quilting projects that use fabric scraps creatively, the Heart Pattern for Coasters – TUTORIAL is an excellent choice. These mini quilted pieces allow you to practice precision piecing, appliqué, or decorative quilting while creating something beautiful and useful.
In this guide, you’ll learn how to select fabrics, construct the heart design, assemble sturdy coaster layers, and add professional finishing touches.
1 Choosing Fabrics and Preparing Materials
The success of your Heart Pattern for Coasters – TUTORIAL begins with thoughtful fabric selection. Because coasters are used daily, durability and color coordination are essential.
DISCOVER MORE FREE PATTERNS HERE!
Cotton quilting fabric is the best choice for absorbency and ease of sewing. You may also use linen blends for a rustic aesthetic.
Recommended materials include:
Cotton quilting fabric (at least two colors)
Batting or insulated batting
Backing fabric
Thread matching your design
Rotary cutter and ruler
Sewing machine
Iron
Classic heart colors include red, pink, burgundy, and soft blush tones. However, modern versions can feature neutral palettes, bold contrasts, or seasonal prints.
Pre-washing fabric helps prevent shrinkage and color bleeding, especially when combining darker reds with lighter backgrounds.
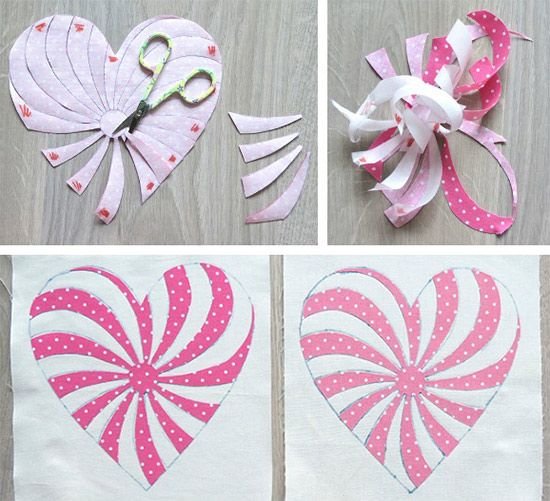
2 Creating the Heart Design
The focal point of the Heart Pattern for Coasters – TUTORIAL is the heart motif itself. There are two popular construction methods: appliqué or piecing.
For appliqué:
Trace a heart template onto fusible web.
Fuse it to your chosen heart fabric.
Cut carefully along the outline.
Press onto the background square.
Secure with a blanket stitch or tight zigzag stitch.
This method allows for smooth curves and clean shaping.
For pieced hearts:
Cut geometric shapes (such as half-square triangles) to form the heart silhouette.
Sew pieces together carefully using a consistent seam allowance.
Press seams flat to reduce bulk.
Precision cutting ensures the heart remains symmetrical and centered on the coaster.
Each finished quilt top should measure slightly larger than your desired final coaster size to allow trimming after quilting.
3 Assembling the Coaster Layers
Once your heart top is complete, it’s time to assemble the layers for the Heart Pattern for Coasters – TUTORIAL.
Layer in this order:
Backing fabric (right side down)
Batting
Heart quilt top (right side up)
Clip or pin the layers securely to prevent shifting during quilting.
Quilting options include:
Straight-line quilting
Diagonal crosshatch
Echo quilting around the heart
Free-motion stippling
Quilting not only enhances the design but also increases durability and absorbency.
After quilting, trim the coaster to a clean square or round shape, ensuring all layers are even.
4 Finishing Edges and Adding Professional Details
The finishing step in the Heart Pattern for Coasters – TUTORIAL makes a big difference in durability and appearance.
You can finish the edges using:
Binding method
Cut binding strips.
Attach around the coaster edge.
Fold over and stitch neatly for a polished finish.
Turned method
Sew around the edges, leaving a small opening.
Turn right side out.
Press flat and topstitch close to the edge.
Binding adds a decorative frame, while the turned method creates a clean, minimalist look.
For extra detail, consider:
Contrasting thread for topstitching
Decorative corner stitches
Embroidered initials
Metallic thread accents
Ensure corners are crisp and seams are secure, as coasters experience frequent use.
Creative Customization Ideas
The beauty of the Heart Pattern for Coasters – TUTORIAL lies in its flexibility.
You can create:
Matching coaster sets
Reversible designs
Patchwork heart backgrounds
Seasonal heart variations
Scrap fabric versions
These coasters make thoughtful handmade gifts for weddings, anniversaries, baby showers, or housewarmings.
Pair them with a quilted mug rug or table runner for a coordinated set.
Care Instructions
Most cotton quilted coasters can be machine washed on a gentle cycle. Air drying helps preserve shape and prevent shrinkage.
If using insulated batting, always follow the manufacturer’s care instructions.
Press lightly after washing to maintain crisp edges.
Frequently Asked Questions
Is the Heart Pattern for Coasters – TUTORIAL beginner-friendly
Yes. Simple appliqué or basic pieced versions are ideal for beginners.
What size should a quilted coaster be
Most coasters measure between 4 and 5 inches square or round.
Can I use leftover fabric scraps
Absolutely. This project is perfect for scrap quilting.
Do I need special batting
Regular cotton batting works well, but insulated batting can add extra heat resistance.
Can I sell handmade quilted coasters
If using a purchased pattern, review the designer’s usage terms before selling finished items.
Conclusion
The Heart Pattern for Coasters – TUTORIAL is a charming and practical quilting project that combines creativity with everyday functionality. With simple materials and thoughtful finishing, you can create beautiful handmade coasters that brighten any table setting.
Whether you’re crafting for yourself, decorating for a special occasion, or making heartfelt gifts, this small quilt project delivers big charm.
Have you tried making quilted coasters before? Share your favorite fabric combinations and quilting styles — your creativity may inspire someone else to stitch their own set of heartfelt designs.

