How to Make a Bunny Pillow – Top 5 Materials to Use is one of the most searched and loved DIY sewing projects among craft enthusiasts, especially for those who enjoy creating cute, functional, and decorative items for their home or as gifts. This project combines creativity, comfort, and personalization, making it perfect for beginners and experienced sewists alike.
Creating a bunny pillow is not just about sewing fabric together—it’s about bringing a charming character to life. With the right materials and techniques, you can craft a soft, durable, and visually appealing pillow that stands out. This guide will walk you through every detail, ensuring your final result looks professional and adorable.
In this complete tutorial, you’ll discover the top materials used in the United States and other leading sewing countries, along with a detailed step-by-step process. Whether you want a pastel nursery decoration or a cozy seasonal pillow, this guide will help you achieve the perfect result using the best How to Make a Bunny Pillow – Top 5 Materials to Use techniques.
1. Top 5 Materials to Use for a Bunny Pillow
Choosing the right materials is essential when learning How to Make a Bunny Pillow – Top 5 Materials to Use. The quality of your materials directly impacts durability, softness, and overall appearance.
The first must-have material is 100% cotton fabric. Cotton is widely used in the United States due to its softness, breathability, and ease of sewing. Quilters prefer high-quality quilting cotton because it holds shape well and is available in countless patterns, especially pastel tones like baby pink, cream, mint green, and light gray.
Another popular option is minky fabric, known for its ultra-soft texture. This material is extremely popular in countries like the U.S., Canada, and Japan. It adds a plush, luxurious feel to your bunny pillow, making it ideal for children or decorative cushions.
The third essential material is polyester fiberfill stuffing. This is the most commonly used filling worldwide due to its affordability, lightweight nature, and ability to maintain shape over time. High-loft fiberfill gives your bunny pillow a full, fluffy appearance.
Fourth, you’ll need felt fabric for details such as eyes, nose, and inner ears. Felt is easy to cut and doesn’t fray, making it perfect for beginners.
Finally, embroidery thread or safety eyes are used to create facial features. Embroidery thread allows for a handmade, delicate finish, while safety eyes provide a polished, professional look.
Using these materials ensures your project aligns with the best practices in How to Make a Bunny Pillow – Top 5 Materials to Use, giving you a high-quality final product.
2. Measurements, Pattern Design, and Preparation
Before starting the sewing process, preparing your pattern correctly is crucial in mastering How to Make a Bunny Pillow – Top 5 Materials to Use.
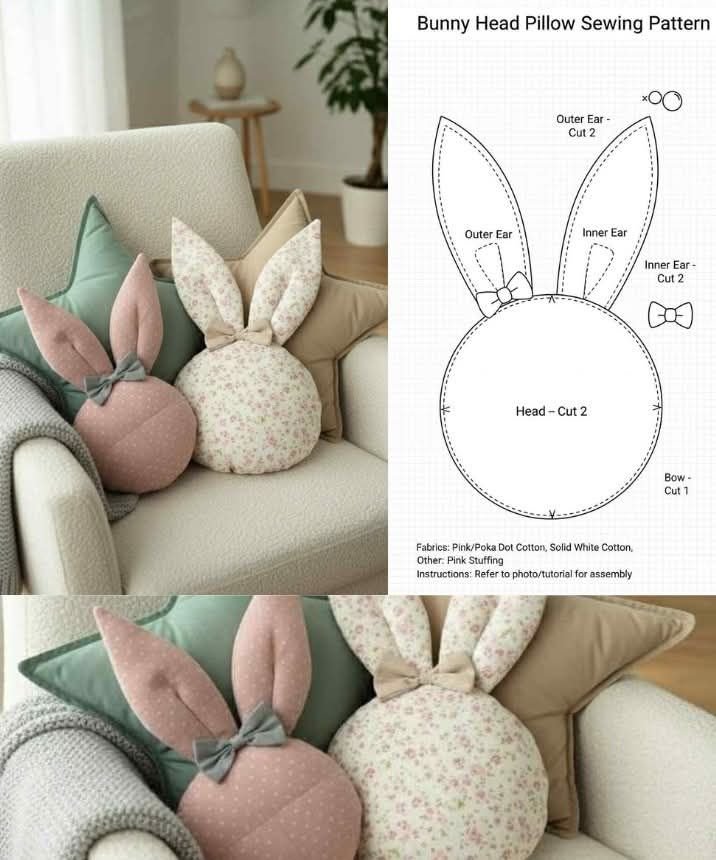
Begin by defining the size of your bunny pillow. A standard size is approximately 40 cm (16 inches) tall and 25 cm (10 inches) wide, ideal for décor and comfort.
Create or print a bunny template including body and ears. The ears should measure around 18 cm (7 inches) in length. Always include a 1 cm seam allowance around all edges.
Fold your fabric with right sides together and cut two identical body pieces. For the ears, cut four pieces. Use contrasting colors for the inner ear to add depth.
Mark the placement of facial features using a washable fabric pencil. Eyes should be about 6 cm apart, slightly above the center, with the nose just below.
Proper preparation ensures accuracy, symmetry, and a smoother sewing process when following How to Make a Bunny Pillow – Top 5 Materials to Use.
3. Step-by-Step Tutorial: How to Make a Bunny Pillow (7 Detailed Stages)
This is the most important part of How to Make a Bunny Pillow – Top 5 Materials to Use. Follow each step carefully, as if you were in a real sewing class.
Step 1: Cutting the Fabric with Precision
Start by placing your fabric on a flat surface. Fold it in half with the right sides facing inward—this ensures both sides of your pillow will be symmetrical. Pin your bunny template securely to prevent shifting.
Use sharp fabric scissors and cut slowly around the pattern. Do not lift the fabric while cutting, as this may distort the shape.
Cut:
- 2 body pieces
- 4 ear pieces
Tip: If you are using minky fabric, place pins closer together because it tends to slip. Precision here will define the final look of your bunny.
Step 2: Sewing the Ears Properly
Take two ear pieces and place them right sides together. Pin along the edges.
Sew around the curved edges using a 1 cm seam allowance, leaving the bottom open.
When sewing curves, go slowly and slightly lift the presser foot (with the needle down) to adjust the fabric if needed.
After sewing, trim excess fabric around the curves (without cutting the seam) to reduce bulk. Turn the ears right side out and gently push the edges using a blunt tool like a pencil.
Lightly press with an iron (if using cotton) to give a clean shape.
Step 3: Creating the Bunny Face (Important Detail Step)
Before assembling the pillow, it’s much easier to add facial features now.
Mark the face lightly:
- Eyes: about 6 cm apart, slightly above center
- Nose: centered, about 2–3 cm below the eyes
If embroidering:
- Use black thread for eyes (small ovals or French knots)
- Use pink thread for the nose (triangle or oval shape)
If using safety eyes, insert them now and secure tightly from the back.
Take your time here—this step gives personality to your bunny.
Step 4: Attaching the Ears in the Correct Position
Place the finished ears on the top edge of the front body piece, about 3–4 cm apart.
The ears should be facing inward (toward the center of the pillow), not outward.
Pin them securely in place. You can sew a temporary stitch (basting stitch) to hold them if needed.
Correct positioning ensures the ears will stand properly once the pillow is turned.
Step 5: Sewing the Body Together
Place the back body piece on top of the front piece, with right sides facing each other. The ears should now be inside between the layers.
Pin all around the edges carefully.
Sew around the entire bunny shape using a 1 cm seam allowance, but leave a 5–7 cm opening at the bottom for turning and stuffing.
Important tip: Reinforce stitching at the beginning and end (backstitch) to prevent seams from opening later.
Step 6: Turning and Stuffing the Bunny Pillow
Turn the pillow right side out through the opening. Take your time and gently pull the ears through first.
Use a blunt tool to shape corners and curves neatly.
Now begin stuffing:
- Start with small amounts of fiberfill
- Push stuffing into the ears first (lightly filled)
- Then fill the body evenly
Avoid overstuffing too quickly. Instead, build volume gradually to avoid lumps.
The body should feel firm but still soft when pressed.
Step 7: Closing the Pillow with a Professional Finish
Fold the raw edges of the opening inward by about 1 cm to match the seam line.
Use a ladder stitch (invisible stitch) to close the opening:
- Insert the needle inside the fold on one side
- Cross to the other side and repeat
- Pull gently to close the seam invisibly
Take your time—this final step makes a huge difference in the professional look of your bunny pillow.
Once closed, fluff and shape your pillow with your hands.
By carefully following these detailed steps, you will master How to Make a Bunny Pillow – Top 5 Materials to Use with confidence and precision.
4. Tips for Professional Results and Creative Variations
To elevate your How to Make a Bunny Pillow – Top 5 Materials to Use project, a few expert tips can make all the difference.
Pre-wash your fabrics to avoid shrinkage later. This ensures long-lasting results.
Use a stitch length of around 2.5 mm for strong seams and durability.
Choose pastel or neutral colors for a modern aesthetic, or bold prints for a playful look.
Personalize your bunny pillow with embroidery, names, or themed fabrics.
Create seasonal variations using holiday prints or textures.
Always double-check alignment before sewing to guarantee symmetry.
FAQ – Frequently Asked Questions
1. Is this project suitable for beginners?
Yes, especially with a detailed guide like this.
2. What fabric works best?
Cotton for structure and minky for softness.
3. How long does it take?
Around 2–3 hours for beginners.
4. Can I wash it?
Yes, preferably hand wash or gentle cycle.
5. Why is my pillow uneven?
Uneven stuffing or cutting inaccuracies are the main causes.
6. Can I sell what I make?
Yes, handmade items are great for selling.
Conclusion
In this complete guide on How to Make a Bunny Pillow – Top 5 Materials to Use, you learned not only the best materials but also a highly detailed, beginner-friendly step-by-step process to create a beautiful bunny pillow.
By focusing on precision, proper techniques, and quality materials, you can achieve a professional and charming result. This project is perfect for decorating your home or creating heartfelt handmade gifts.
PATTERN VIDEO:
Now it’s your turn—start your project today and enjoy the process. Don’t forget to leave your honest opinion and share your ideas or suggestions. Your feedback truly makes a difference!