The How to Make a Cute Zipper Bag tutorial is the perfect sewing project for anyone looking to combine practicality with a touch of handmade charm. Whether you’re organizing makeup, storing school supplies, or gifting something thoughtful, a cute zipper bag is a must-have item in anyone’s collection.
This step-by-step guide walks you through creating your own adorable zippered pouch from start to finish. With a basic understanding of sewing, you’ll be able to make a functional and stylish bag that can be customized with fabrics, patterns, and embellishments to reflect your personality.
From beginners to advanced makers, this tutorial is flexible and fun, making it a great afternoon project or a thoughtful DIY gift. Keep reading to discover just how to make a cute zipper bag that’s both durable and delightful!
1. Why Make Your Own Zipper Bag?
Making your own zipper bag is not only fun, but also incredibly useful. You can create a stylish pouch in any size or shape that meets your personal needs, whether it’s for cosmetics, stationery, travel accessories, or crochet supplies.
SEE OTHER FACE PATTERNS HERE!
The first benefit is customization. When you know how to make a cute zipper bag, you can choose fabrics that match your style, add personalized tags, embroidery, or even iron-on decals. You’re not limited to mass-produced designs—you get something uniquely yours.
Another great reason is cost-effectiveness. A handmade zipper pouch requires only a small amount of fabric and a zipper, making it a great scrap-busting project. It’s also much more affordable than buying designer pouches, especially if you want several.
Sustainability also plays a big role. You can upcycle fabric from old clothes, leftover quilting materials, or even denim jeans. It’s a fantastic way to reduce waste and repurpose materials into something beautiful and useful.
Making a zipper bag also builds your sewing skills. You’ll learn how to sew zippers, line a bag, topstitch, and box corners—all great techniques for future projects.
Lastly, zipper bags make perfect gifts. Whether you’re preparing for the holidays, birthdays, or party favors, a cute handmade pouch shows care, effort, and creativity that store-bought items simply can’t replicate.
2. Materials and Tools You’ll Need
To begin learning how to make a cute zipper bag, gather the following tools and materials. You can choose colors and prints to suit any occasion or recipient.
Basic Materials:
-
Outer fabric – 100% cotton, canvas, or linen (2 pieces)
-
Lining fabric – lighter cotton fabric (2 pieces)
-
Zipper – 8” to 12” (nylon or metal based on your comfort level)
-
Interfacing – fusible (optional for structure)
Tools Required:
-
Sewing machine with zipper foot
-
Fabric scissors or rotary cutter
-
Iron and ironing board
-
Pins or fabric clips
-
Measuring tape or quilting ruler
-
Seam ripper (just in case!)
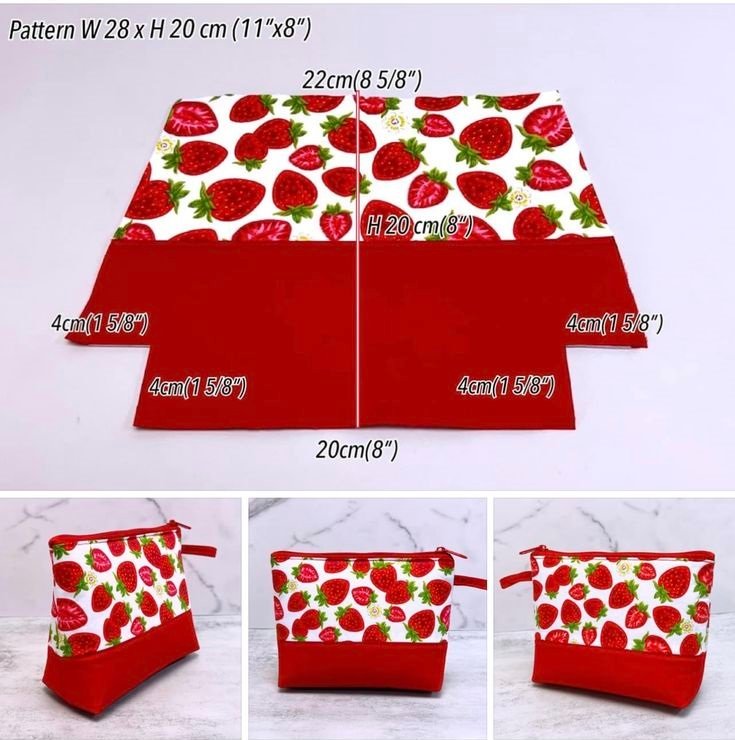
Cutting Instructions:
For a basic pouch (approx. 9” wide x 6” tall):
-
Cut 2 outer fabric pieces: 10” x 7”
-
Cut 2 lining pieces: 10” x 7”
-
Cut 2 interfacing pieces: 10” x 7” (optional)
You can adjust these measurements to create a larger tote-style pouch or a mini coin purse.
Tips:
-
If you’re new to sewing zippers, choose a nylon zipper—they’re easier to work with than metal ones.
-
Prewash and press all fabrics to prevent shrinkage and ensure clean seams.
-
Use coordinating thread or contrasting thread for added visual appeal.
3. Step-by-Step Guide: How to Make a Cute Zipper Bag
Let’s dive into the actual process of making your cute zipper pouch. Once you go through it once, you’ll want to make a dozen more!
Step 1: Prepare the fabric and zipper
Iron interfacing to the wrong side of your outer fabric if you’re using it. This will give your pouch more structure and durability. Lay out your pieces: two outer, two lining, and your zipper.
Step 2: Attach the zipper
Place the zipper face-down on the right side of one outer fabric piece. Layer a lining piece on top, right side down, sandwiching the zipper. Clip or pin in place. Sew along the zipper edge with a zipper foot.
Repeat this process for the other side of the zipper with the remaining fabric pieces. Once both sides are sewn, open and press the fabric away from the zipper, then topstitch along each side of the zipper for a professional finish.
Step 3: Sew the pouch body
Open the zipper halfway (this is very important!). Match the two outer fabric pieces right sides together and do the same with the lining pieces. Pin around the edges.
Sew all around the rectangle with a 1/4″ seam allowance, leaving a 3″ gap at the bottom of the lining side. This will be used to turn the bag inside out later.
Step 4: Box the corners (optional)
For a flat-bottomed bag, box the corners by pinching each corner so the side seam and bottom seam align, forming a triangle. Measure about 1” from the tip, mark, and sew across. Trim off the triangle tips.
Repeat for all four corners (two outer, two lining). This step adds depth and a more finished shape to your pouch.
Step 5: Turn and finish
Turn the pouch right-side out through the gap in the lining. Push out all corners and shape the bag gently. Tuck in the edges of the lining gap and stitch it closed by machine or hand.
Push the lining into the bag, zip it up, and give it one final press. Your cute zipper bag is now ready to use!
4. Design Ideas and Personal Touches
Now that you know how to make a cute zipper bag, here are some creative ways to make your project truly stand out.
Add embroidery or appliqué:
Stitch a name, flower, or monogram on the outer fabric before assembling. It’s a great way to personalize gifts or showcase your embroidery skills.
Use patterned fabric for fun themes:
Choose cat prints, florals, geometric shapes, or cartoon characters for themed pouches that match someone’s interests.
Include an inner pocket:
Add a small pocket inside by sewing a 4” x 5” piece of fabric folded in half and stitched to the lining before assembling the bag.
Make it reversible:
Use coordinating fabrics on the lining and outer layers, and leave out interfacing to make a soft, reversible pouch.
Add a wrist strap:
Insert a small fabric loop at the side seam before sewing, then attach a key ring or wristlet strap for easy carrying.
Create a set:
Make coordinating bags in different sizes for makeup, pencils, or tech accessories. Stack and tie with a ribbon for a thoughtful gift bundle.
These ideas will help your zipper bag go from simple to stunning—and give you endless options for gifts, sales, or personal use.
🌟Join our exclusive Quilt broadcast list on Messenger! Receive the best patterns, tips, and updates directly in your inbox. Our team is ready to send you delightful content that will inspire your projects. Don’t miss this opportunity to stay updated and create amazing pieces. Join now and be part of this passionate quilt community!✨📩
FAQ – How to Make a Cute Zipper Bag
Is sewing a zipper bag hard for beginners?
Not at all! With some basic sewing skills and a zipper foot, it’s a beginner-friendly project. Practice on scrap fabric if you’re nervous about sewing the zipper.
What type of fabric is best?
Cotton is ideal—easy to work with, washable, and comes in countless prints. Canvas is also great for structure.
Do I need a special zipper?
A standard nylon zipper works fine. For beginners, avoid metal zippers as they can be tricky to sew over.
Can I wash the finished pouch?
Yes—just use washable fabrics and line-dry to preserve the shape. Avoid machine drying if you’ve used interfacing.
How long does it take to make one?
Most zipper bags can be made in under an hour once you get the hang of it.
Can I sell bags made from this tutorial?
Absolutely! Handmade zipper pouches are popular at craft fairs, Etsy, and local markets. Just be sure to use your own photos and style when listing them.
Conclusion
Learning how to make a cute zipper bag is both fun and fulfilling. With just a few pieces of fabric, a zipper, and some creativity, you can produce a functional, fashionable accessory that makes life a little more organized—and a lot more colorful.
Whether you’re making your first pouch or your fiftieth, there’s always room to personalize, experiment, and enjoy the satisfaction of sewing something with your own hands. These bags make amazing gifts, thoughtful handmade products, and can be customized to match any style or occasion.
TUTORIAL VIDEO:
Have you tried making your own zipper bag? Share your experiences, ideas, or suggestions in the comments below. We’d love to see your versions and hear what creative touches you’ve added! ✂️🧵💼


