How to make an Easter bunny placemat – Tutorial is a delightful and creative way to bring charm and personality to your Easter table. Whether you enjoy sewing, quilting, or crafting decorative items for seasonal celebrations, this project is a perfect opportunity to create something both beautiful and functional. An Easter bunny placemat not only protects your table but also adds a handmade touch that guests and family members will appreciate.
Learning How to make an Easter bunny placemat – Tutorial is also an excellent beginner-friendly project for people who enjoy sewing and quilting. With simple materials and a little creativity, you can transform fabric scraps into a festive decoration that highlights the joy of Easter. The bunny design instantly brings warmth, playfulness, and a welcoming atmosphere to your dining space.
In this complete How to make an Easter bunny placemat – Tutorial, you will learn the materials needed, the step-by-step construction process, design tips, and creative ways to personalize your placemat. By the end of this guide, you will be able to create a charming seasonal decoration that can be used year after year or even gifted to friends and family.
1. Materials Needed for the Easter Bunny Placemat
Before starting How to make an Easter bunny placemat – Tutorial, gathering the right materials will make the crafting process smoother and more enjoyable. Most of the supplies required are easy to find and often already available in a sewing or quilting workspace.
DISCOVER MORE FREE PATTERNS HERE!
The main material you will need is cotton fabric. Cotton is ideal because it is durable, easy to sew, and available in many patterns and colors. Pastel tones such as pink, yellow, mint green, and light blue work beautifully for Easter-themed projects.
You will also need batting or lightweight quilt batting. Batting adds thickness and softness to the placemat, making it more durable and comfortable to use on the table.
A piece of fabric for the back of the placemat is also necessary. This backing fabric can match the front or provide a fun contrast. Many crafters choose floral or polka-dot prints to complement the Easter theme.
Basic sewing tools are essential for completing How to make an Easter bunny placemat – Tutorial. These include scissors, pins, a sewing machine or needle and thread, measuring tape, and fabric chalk or a washable marker for marking cutting lines.
Fusible interfacing is optional but highly recommended. It helps stabilize the bunny applique pieces, making them easier to attach neatly to the placemat base.
Finally, decorative elements such as embroidery thread, buttons, or ribbon can be added to personalize the bunny face or tail. These details help transform a simple placemat into a unique handmade decoration.
2. Preparing the Bunny Design and Fabric Pieces
The next step in How to make an Easter bunny placemat – Tutorial is preparing the design and cutting the fabric pieces. This stage allows you to plan the layout and ensure that all elements fit together correctly.
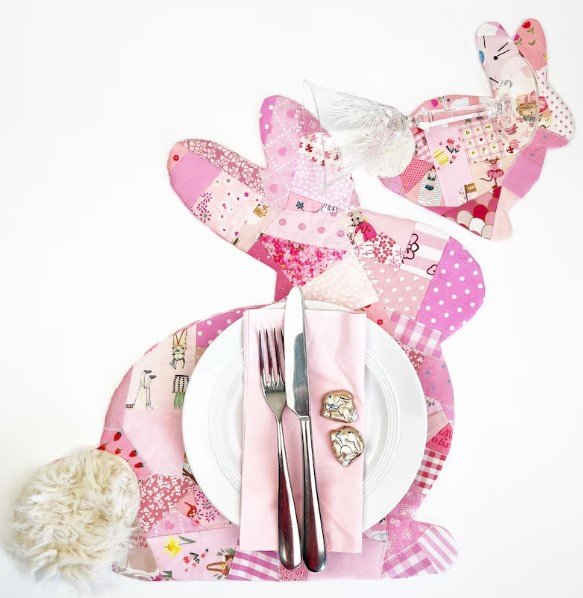
Start by sketching or printing a simple bunny silhouette. The bunny design typically includes the head, ears, and sometimes a fluffy tail. The shape should be large enough to be clearly visible but still leave space around the edges of the placemat.
Once you have the bunny template, place it over your chosen fabric and trace the shape using fabric chalk. This traced outline will guide your cutting and help maintain accuracy.
Next, cut the main placemat rectangle from your primary fabric. A common size for placemats is approximately 12 by 18 inches, but you can adjust the dimensions based on your table settings.
After cutting the top fabric, cut the batting and backing fabric to the same size. These three layers will form the structure of the placemat.
For the bunny applique, cut the shape from a contrasting fabric. Soft white, cream, or pastel shades work especially well for bunny designs and maintain the festive look of Easter decor.
Before attaching the bunny to the placemat, iron fusible interfacing onto the back of the bunny fabric. This step helps keep the edges crisp and prevents the fabric from fraying while sewing.
3. Sewing and Assembling the Placemat
Now comes the most exciting stage of How to make an Easter bunny placemat – Tutorial—assembling and sewing the placemat together. This step transforms individual fabric pieces into a complete decorative item.
Begin by positioning the bunny applique on the top placemat fabric. Place it slightly off-center or in the lower corner for a modern design look. Pin the bunny in place to prevent shifting while sewing.
Using a zigzag stitch or decorative stitch, carefully sew around the edges of the bunny shape. This method secures the applique and adds a professional decorative touch.
If you want extra personality, embroider simple facial features such as eyes or whiskers onto the bunny. You can also attach a small pom-pom or fabric circle as the bunny tail.
Once the applique is complete, layer the placemat pieces. Place the backing fabric face down, then the batting, and finally the top fabric with the bunny facing up.
Pin the layers together evenly to prevent movement during sewing. Smooth out any wrinkles to ensure the placemat lies flat.
Sew around the edges of the placemat, leaving a small opening so you can turn the piece right side out. After turning, gently push out the corners and press the placemat with an iron. Finally, topstitch around the border to close the opening and give the placemat a finished look.
4. Creative Customization and Finishing Touches
One of the most enjoyable aspects of How to make an Easter bunny placemat – Tutorial is adding creative touches that make each piece unique. Small details can transform a simple craft project into a charming centerpiece for your Easter table.
Consider quilting simple lines across the placemat surface. Straight or diagonal quilting stitches add texture and help secure the layers together.
You can also experiment with different bunny fabrics. Floral prints, polka dots, or pastel gingham patterns give each placemat its own personality.
Another creative idea is to add embroidered names to each placemat. Personalized placemats make wonderful table settings for family gatherings and Easter brunch.
Decorative borders are another great option. Binding the edges with colorful fabric strips adds a polished finish and enhances the visual appeal of the placemat.
If you enjoy crafting with children, this project can become a fun family activity. Kids can help choose fabrics, draw bunny faces, or glue decorative elements.
Finally, consider making a complete set of placemats along with matching napkins or table runners. Coordinated table decor creates a beautiful and welcoming Easter dining experience.
FAQ – How to Make an Easter Bunny Placemat
Is this project suitable for beginners?
Yes. The How to make an Easter bunny placemat – Tutorial is beginner-friendly. Basic sewing knowledge such as straight stitching and simple applique techniques is usually enough to complete the project successfully.
What size should an Easter bunny placemat be?
Most placemats measure about 12 by 18 inches, but you can adjust the size depending on your table and plate settings.
Can I sew the placemat by hand instead of using a sewing machine?
Absolutely. Although a sewing machine makes the process faster, hand sewing can work well, especially for the applique details.
What type of fabric works best for this project?
Cotton fabric is generally the best choice. It is durable, easy to sew, and widely available in patterns that match Easter themes.
How do I wash the placemat after using it?
Machine washing on a gentle cycle with mild detergent is usually safe if cotton fabrics are used. Air drying or low heat drying helps preserve the shape and stitching.
Can I use this tutorial to create other seasonal placemats?
Yes. The same method used in How to make an Easter bunny placemat – Tutorial can be adapted to create placemats with pumpkins, hearts, stars, or other seasonal shapes.
Conclusion
In this guide on How to make an Easter bunny placemat – Tutorial, you learned how to transform simple materials into a charming handmade decoration. We covered the essential supplies, how to prepare the bunny design, the sewing and assembly process, and several creative ways to customize the final placemat.
This project is not only practical but also a wonderful opportunity to express creativity and celebrate the spirit of Easter through handmade decor. A set of bunny placemats can brighten your table, impress guests, and become part of your seasonal traditions for years to come.
If you enjoyed this tutorial, consider trying different colors, fabrics, or bunny designs to create your own unique version. And if you have already made your placemat, feel free to share your honest opinion, ideas, and suggestions. Your feedback helps inspire new creative projects and tutorials for everyone who loves crafting.

