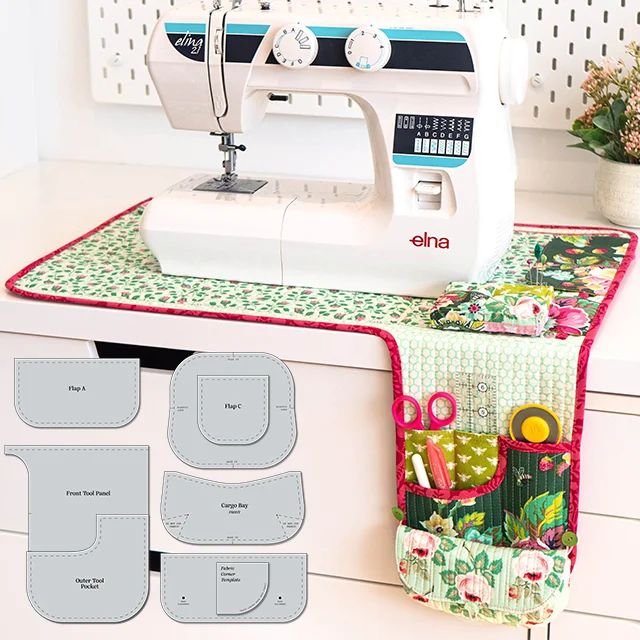
If your sewing space is anything like most creative studios, you probably have tools scattered across your table — scissors, rotary cutters, rulers, seam rippers, marking pens, clips, and more. The How To Make an Under-the-Table Sewing Tool Caddy – TUTORIAL is the perfect solution to reclaim your workspace without sacrificing accessibility.
This practical and space-saving project is ideal for quilters who want a more organized sewing area. Designed to attach underneath your sewing table, this tool caddy keeps essentials within arm’s reach while freeing up valuable surface space. It’s functional, customizable, and surprisingly simple to make.
Whether you are a beginner looking for a useful project or an experienced quilter who enjoys sewing organizational accessories, this tutorial will guide you step by step through fabric choices, measurements, construction, and finishing techniques.
1. Why You Need an Under-the-Table Sewing Tool Caddy
A cluttered sewing table can slow down your workflow and reduce your enjoyment of quilting. The How To Make an Under-the-Table Sewing Tool Caddy – TUTORIAL helps solve this common issue by utilizing often-unused space beneath your table.
DISCOVER MORE FREE PATTERNS HERE!
Benefits of an under-table caddy:
Keeps tools organized and easy to reach
Frees up sewing surface space
Prevents tools from falling or getting lost
Reduces distractions while working
Customizable to fit your exact needs
Unlike tabletop organizers, this caddy remains hidden yet accessible. It can include multiple pockets sized for scissors, rotary cutters, small rulers, thread spools, and even a pincushion.
This project is also an excellent scrap-buster. You can use leftover quilting cotton, denim, canvas, or even quilted panels to create a durable organizer.
Before starting, measure the underside of your sewing table to determine the maximum width and depth available. Planning your dimensions carefully ensures a snug and secure fit.
2. Choosing Materials and Planning Your Design
Selecting the right materials is essential for durability and functionality. Since the caddy will hold tools of varying weight, it should be sturdy enough to handle daily use.
Recommended fabrics:
Heavy quilting cotton with interfacing
Canvas or duck cloth
Denim
Quilted fabric with batting for structure
To reinforce the organizer, consider adding:
Fusible interfacing for structure
Fusible fleece for softness and padding
Extra stitching at stress points
Binding for clean and strong edges
Design Planning Tips:
Divide pockets by tool type
Create deeper pockets for larger scissors
Add elastic strips to hold rotary cutters securely
Include a narrow pocket for marking tools
Consider adding a zippered section for small notions
Sketch your layout before cutting fabric. Decide how many compartments you want and measure each based on your tools.
Attachment Methods:
Velcro strips for easy removal
Snaps for secure closure
Screws with fabric loops
Adjustable straps with buckles
Choose an attachment method that suits your table type and allows easy removal if needed.
3. Step-by-Step Construction Guide
The How To Make an Under-the-Table Sewing Tool Caddy – TUTORIAL is straightforward and beginner-friendly, especially if you break it into manageable steps.
Step 1: Measure and Cut
Measure the underside of your table. Cut a main backing panel to fit within that space, leaving slight margin for attachment hardware. Cut pocket panels according to your planned layout.
Step 2: Add Interfacing
Fuse interfacing or fleece to the backing panel and pocket pieces for added durability.
Step 3: Prepare the Pockets
Hem the top edge of each pocket piece. Fold and press neatly before stitching. If adding elastic, sew it across the pocket front before attaching to the backing.
Step 4: Attach Pockets to Backing
Place pockets on the backing panel according to your layout. Sew vertical lines to divide compartments. Reinforce pocket corners with backstitching.
Step 5: Add Attachment Straps
Sew fabric loops, Velcro strips, or strap pieces along the top edge of the backing panel. Ensure they are evenly spaced and securely stitched.
Step 6: Finish the Edges
Bind or fold under raw edges for a clean, professional finish.
Step 7: Install Under the Table
Attach the caddy securely to the underside of your sewing table using your chosen method.
Once installed, test each pocket by inserting your tools. Make any small adjustments if necessary.
This project can usually be completed in a single afternoon, making it a satisfying and highly practical addition to your sewing space.
4. Customization Ideas and Quilting Enhancements
One of the best aspects of the How To Make an Under-the-Table Sewing Tool Caddy – TUTORIAL is how customizable it is. You can adapt it to match your sewing room décor or coordinate with your current quilting projects.
Creative Customization Ideas:
Use patchwork for the backing panel
Add quilted texture for extra durability
Incorporate decorative topstitching
Embroider labels on each pocket
Add a built-in pincushion section
Include a small detachable mini pouch
You can even create themed organizers — floral prints for a cozy feel, modern geometrics for a contemporary studio, or neutral tones for a minimalist space.
For advanced quilters, consider:
Adding foam stabilizer for extra structure
Creating fold-down compartments
Incorporating clear vinyl pockets for visibility
Designing a modular system with removable sections
The more you personalize it, the more enjoyable and efficient your sewing process becomes.
A well-organized sewing station not only improves productivity but also enhances creativity. When your tools are easy to access, your focus stays on your quilt — not on searching for supplies.
Frequently Asked Questions (FAQ)
Is this project suitable for beginners?
Yes. Basic sewing skills such as straight stitching and measuring are all you need.
What size should I make the caddy?
It depends on the dimensions of your table and the number of tools you want to store. Always measure first.
Can I wash the caddy?
If attached with Velcro or removable straps, yes. Use sturdy fabrics and pre-wash materials before construction.
How do I make it extra sturdy?
Use heavy fabric, add interfacing or fleece, and reinforce pocket seams.
Will it damage my sewing table?
Not if you use removable attachment methods like Velcro or straps. Avoid permanent hardware if you prefer flexibility.
Conclusion
The How To Make an Under-the-Table Sewing Tool Caddy – TUTORIAL is a practical, creative solution for organizing your quilting workspace. It transforms unused space into a functional storage system that keeps your tools accessible and your table clutter-free.
With simple materials, customizable design options, and straightforward construction, this project is both rewarding and useful. Once you experience the convenience of an organized sewing area, you may wonder how you ever worked without it.
PATTERN HERE:
Have you created a sewing organizer before? Share your ideas and favorite storage tips in the comments. Your creativity might inspire another quilter to organize their workspace today.

