Creating a cozy and comfortable spot for your furry friend is a wonderful way to show love and care. In this How to Make Beds for Your Pets – TUTORIAL, you’ll learn how to design and sew a beautiful quilted bed that not only adds warmth and comfort for your pet but also enhances the aesthetic of your home. Whether you have a cat, dog, or even a rabbit, this easy-to-follow guide will help you craft a custom bed that perfectly suits your pet’s needs.
A handmade bed offers more than comfort — it’s an opportunity to express creativity and ensure your pet has a unique, one-of-a-kind resting place. Using simple quilting techniques and fabrics you already have at home, you can create a durable, washable, and stylish bed. The process is beginner-friendly and doesn’t require expensive materials, making it accessible for everyone who loves both quilting and animals.
Throughout this How to Make Beds for Your Pets – TUTORIAL, we’ll go over how to choose the right fabrics, how to assemble and quilt the layers, and how to finish your project with a professional touch. By the end, you’ll have a handmade bed your pet will absolutely adore — and you might even be inspired to make one for every pet in your household.
1. Choosing the Right Materials for Your Pet Bed
The first step in this How to Make Beds for Your Pets – TUTORIAL is selecting fabrics and fillings that are safe, comfortable, and easy to maintain. Cotton and canvas are great choices since they are durable, breathable, and machine washable. For the filling, polyester fiberfill or foam padding provides a plush and supportive base that keeps its shape after multiple washes.
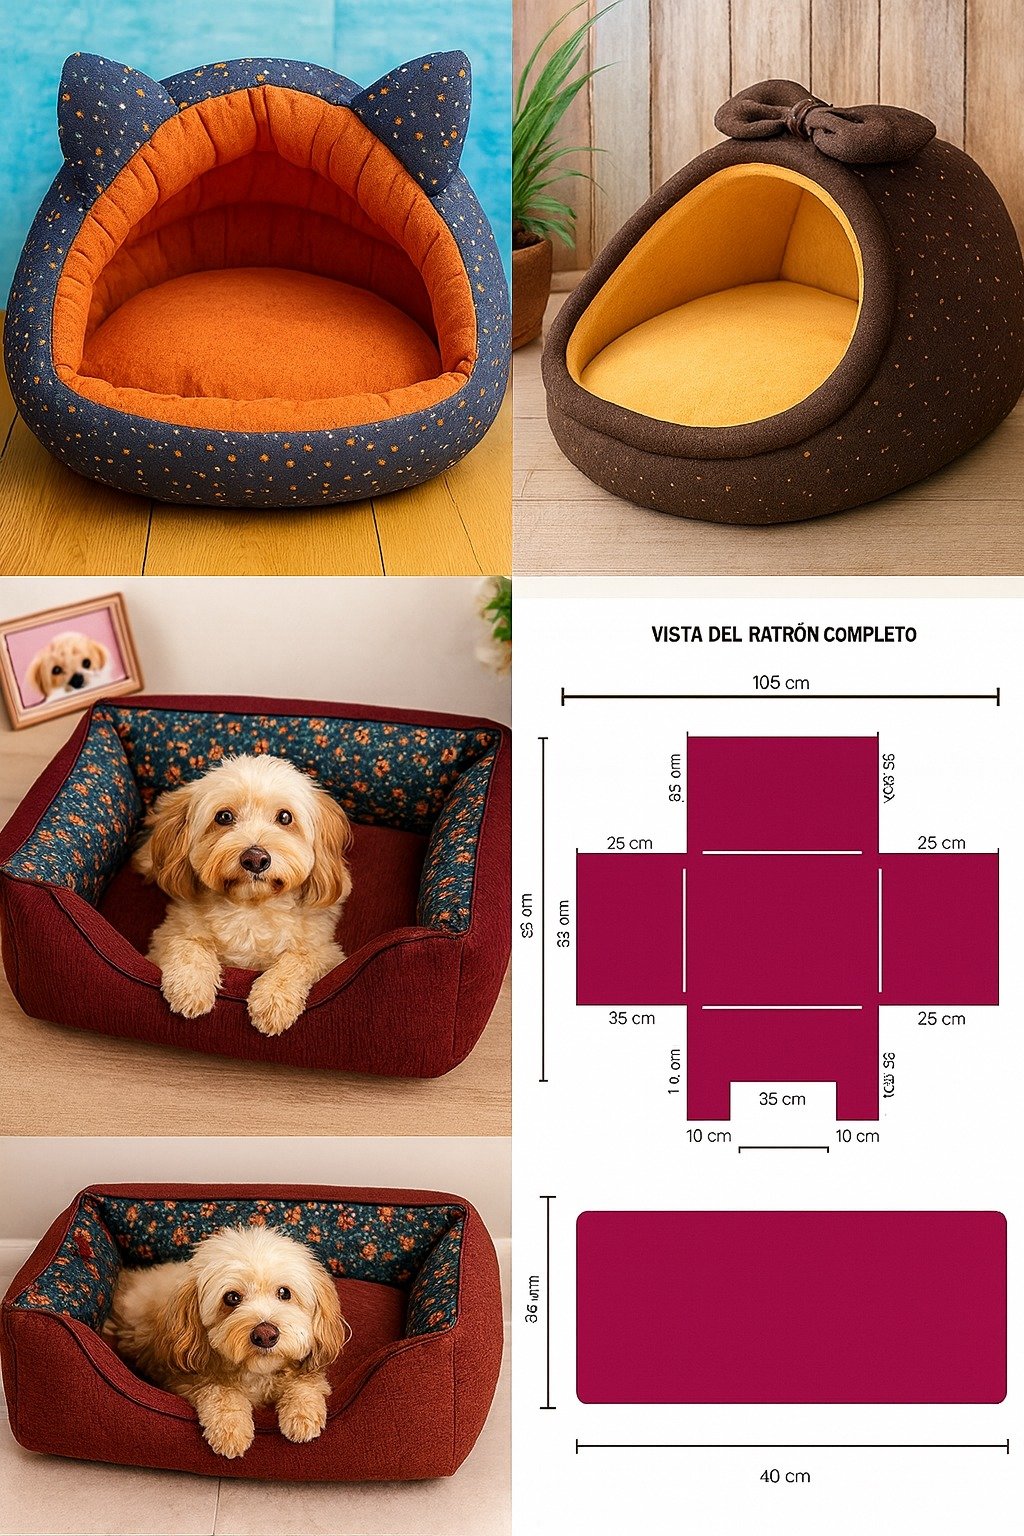
SEE OTHER FACE PATTERNS HERE!
When choosing colors and prints, consider your pet’s fur and the space where the bed will be placed. Light fabrics look lovely but may show fur easily, while darker fabrics hide shedding. You can also get creative by using leftover quilt scraps, allowing you to repurpose materials while adding a charming patchwork look to the bed.
It’s also important to prewash your fabrics before sewing. This step prevents shrinking later and removes any chemicals from the fabric, ensuring it’s safe for your pet. If you’re making the bed for a small animal, like a cat or rabbit, softer flannel or fleece fabrics may add extra comfort.
Another great tip is to make the cover removable. Sewing a hidden zipper or Velcro closure allows you to take out the filling for easy cleaning. Your pet’s bed will always look fresh, smell clean, and feel inviting.
By choosing high-quality, pet-safe materials, you’re creating a bed that will last for years and provide endless cozy moments. Taking the time to pick the right fabrics now will ensure both beauty and functionality in your finished project.
2. Cutting and Quilting the Base Layers
Once you’ve gathered your materials, the next step in this How to Make Beds for Your Pets – TUTORIAL is cutting and preparing your fabric pieces. Measure your pet to determine the ideal size — small pets may need a 20×20 inch square, while larger dogs might need 36×48 inches or more.
Cut two identical fabric pieces for the top and bottom layers. If you’re adding a quilted design, cut an extra piece of batting to sandwich between them. This not only gives the bed structure but also enhances comfort. Use a rotary cutter for clean, straight edges and pin the layers together before sewing.
When quilting the layers, you can use simple straight-line stitching or decorative free-motion designs. The quilting holds everything in place, preventing the batting from shifting during washing or daily use. You can also add an extra border for stability and visual appeal.
For those who want a thicker or firmer bed, try layering two or three batting pieces. Stitch through all layers evenly to avoid clumping. Don’t forget to leave an opening for inserting the filling if you plan to stuff it later.
Once the base is quilted, trim any loose threads and check your seams. A tidy finish ensures your pet’s comfort and prevents any threads from becoming a chewing hazard. This quilted base forms the foundation of a soft, supportive, and beautiful handmade pet bed.
3. Assembling and Stuffing the Pet Bed
Now that your quilted base is ready, it’s time to bring everything together. In this How to Make Beds for Your Pets – TUTORIAL, this is where your bed truly starts to take shape. Place your quilted fabric pieces with right sides facing each other, then sew around the edges, leaving an opening large enough to insert the filling.
Turn the bed cover right side out, ensuring the corners are neatly pushed out. Then, fill the bed with your chosen stuffing — fiberfill, shredded foam, or even an old pillow can work well. The goal is to achieve a soft but firm surface that supports your pet comfortably without flattening too quickly.
Distribute the filling evenly to avoid lumps. Once satisfied with the texture, close the opening securely using a ladder stitch for a seamless finish or by machine if you prefer. Reinforcing the seams will ensure the bed can handle daily wear and playful pets.
If you opted for a removable cover, insert the inner cushion now and close the zipper or Velcro. You can also experiment with shapes like circles, ovals, or rectangles depending on your pet’s sleeping style and your design preference.
Adding extra quilted details, like small stitched paw prints or your pet’s name, gives a personal touch and makes the bed even more special. This is where creativity meets functionality in a delightful way.
Finally, fluff the bed and let your pet test it out — they’ll likely claim it as their new favorite spot instantly!
4. Personalizing and Maintaining Your Pet Bed
In this final section of the How to Make Beds for Your Pets – TUTORIAL, you’ll learn how to add finishing touches that make the bed both practical and stylish. You can embellish it with appliqué, embroidery, or fabric patches to match your home’s décor. Adding your pet’s name or a fun design gives the bed a custom, heartfelt look.
To make cleaning easier, use washable fabrics and pre-treated materials to resist stains and odors. Regular washing keeps the bed hygienic and prolongs its life. A monthly wash with mild detergent is usually enough to keep it fresh and inviting.
If you want to make the bed outdoor-friendly, consider using waterproof or water-resistant fabrics for the bottom layer. This prevents moisture from seeping in, especially if your pet likes spending time in the yard or patio.
Repurposing old jeans or blankets can also add durability while keeping the project eco-friendly. Not only will you save money, but you’ll also reduce fabric waste — an important step toward sustainable crafting.
Adding small handles on the sides makes the bed portable, perfect for travel or moving around the house. Your pet will always have a familiar, comfortable place wherever you go.
With creativity, care, and the tips from this guide, you can craft a pet bed that’s not only functional but also full of love and style.
FAQ
1. What materials are best for making a pet bed?
Durable cotton, canvas, or denim are great for the outer cover, while polyester fiberfill or foam makes excellent stuffing.
2. Can I wash my pet bed in the washing machine?
Yes! Just make sure to use washable fabrics and remove the filling if it’s not machine-safe.
3. How can I make the bed more durable for large dogs?
Use strong fabrics like canvas or denim, double-stitch seams, and add reinforced corners.
4. What size should I make the bed for my pet?
Measure your pet while sleeping and add at least 6 inches around for comfort.
5. Can I make a quilted pet bed without a sewing machine?
Yes, hand stitching works too — just make sure to use sturdy thread and even stitches.
Conclusion
In this How to Make Beds for Your Pets – TUTORIAL, you learned how to design, quilt, and assemble a cozy handmade bed for your furry friend. From choosing safe, comfortable fabrics to personalizing the final touches, every step helps create a unique and love-filled project. Whether for a cat, dog, or small pet, this DIY bed combines creativity, care, and craftsmanship.
PATTERN VIDEO:
Try it today, and don’t forget to share your thoughts or suggestions — your feedback helps inspire even more creative quilt tutorials for fellow makers!

