HOW TO MAKE Free Chicken Quilt Pattern offers a fun, whimsical way to bring farmyard charm into your home with this adorable quilting project. This HOW TO MAKE Free Chicken Quilt Pattern tutorial provides a complete, beginner-friendly guide to creating a scrappy or coordinated chicken-themed quilt using simple patchwork techniques and free block ideas inspired by popular designs. Whether you’re making a throw for a cozy couch, a wall hanging, or a gift for a chicken lover, this project combines creativity with practical sewing skills.
Quilts featuring chickens have surged in popularity thanks to their playful personality and rustic appeal, perfect for farmhouse, country, or modern rustic decor styles. The free chicken quilt pattern allows endless customization with scraps from your stash, making it an economical and eco-friendly choice while celebrating barnyard friends in fabric form.
In this detailed HOW TO MAKE Free Chicken Quilt Pattern guide, you’ll discover how to select fabrics, cut accurate pieces, assemble charming chicken blocks, arrange them into a full quilt top, and finish with classic quilting steps. No advanced skills required—just basic rotary cutting, straight-line sewing, and a love for cute motifs. Let’s start piecing your very own chicken quilt today!
1. Gathering Your Materials for the Chicken Quilt
Cotton quilting fabrics in farm-fresh colors form the foundation of any free chicken quilt pattern, with neutrals, reds, yellows, browns, and whites creating realistic chicken details. Fat quarters or scraps work wonderfully to achieve that scrappy, charming look without buying large yardage.
DISCOVER MORE FREE PATTERNS HERE!
A rotary cutter, self-healing mat, and clear acrylic rulers ensure precise cuts for consistent block sizes in your chicken quilt. Standard 6.5-inch and 12.5-inch rulers handle most pieces needed for chicken bodies, wings, beaks, and combs.
Basic sewing tools like pins, seam ripper, iron, and thread in neutral shades keep everything running smoothly. Quarter-inch presser foot on your machine helps maintain accurate seams throughout the HOW TO MAKE Free Chicken Quilt Pattern process.
Batting, backing fabric, and binding strips complete the quilt sandwich once blocks are assembled. Choose low-loft batting for a lightweight throw or cotton batting for traditional drape in your finished chicken quilt.
Gather templates or printed patterns for chicken elements if using foundation paper piecing or appliqué methods. Many free chicken quilt pattern resources provide simple shapes you can trace onto freezer paper or cardstock.
Finally, prepare a design wall or large floor space to audition fabric placements and block arrangements. Visualizing the layout early prevents surprises when sewing your free chicken quilt pattern together.
2. Cutting and Preparing the Chicken Block Pieces
Start by cutting background squares or rectangles in a light neutral tone to serve as the base for each chicken block. Common sizes range from 6-inch to 12-inch finished blocks depending on your desired quilt scale in the free chicken quilt pattern.
Cut body pieces from white, cream, or light tan fabrics, wings from contrasting shades, and beaks/wattles from bright yellow or red scraps. Accuracy here ensures your chickens look cute and recognizable once assembled.
Use half-square triangles (HSTs) for tails, combs, and feet by sewing two squares right sides together and cutting diagonally. This quick technique adds dimension without complicated piecing in the HOW TO MAKE Free Chicken Quilt Pattern.
Prepare any appliqué shapes by fusing lightweight interfacing or fusible web to wrong sides of fabric before cutting. Raw-edge or turned-edge appliqué both work well for adding details like eyes and legs to your chicken quilt blocks.
Label and organize cut pieces into stacks or baggies per block to stay efficient. This simple organization tip makes assembling multiple identical or varied chicken blocks much less overwhelming.
Press all seams open or to one side as you go, using starch if needed for crisp edges. Well-pressed pieces lead to flatter, more professional results in your final free chicken quilt pattern top.
3. Assembling the Individual Chicken Blocks
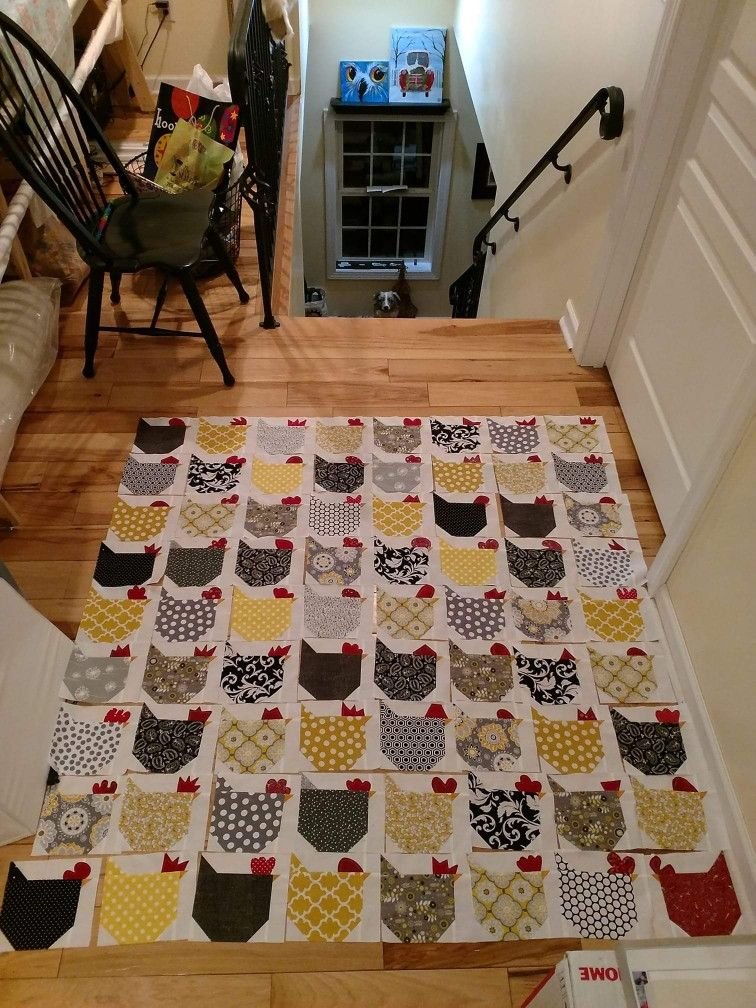
Lay out pieces for one chicken block following a basic layout: body in center, wings on sides, head at top with comb, and tail at back. Many free chicken quilt pattern versions use simple patchwork assembly rather than complex curves.
Sew smaller units first, such as attaching beak to head or wings to body, then join larger sections. Chain piecing speeds up the process when making multiple blocks for your chicken quilt.
Add appliqué elements last using a zigzag or straight stitch around raw edges for durability and charm. Embroidery stitches create fun eyes, giving each chicken personality in the HOW TO MAKE Free Chicken Quilt Pattern.
Trim blocks to uniform size after sewing, squaring them up with your ruler. Consistent block measurements ensure smooth joining later in the quilt assembly stage.
Experiment with orientation—some chickens facing left, others right—for added interest across the quilt top. This variation brings life and movement to your free chicken quilt pattern design.
Press completed blocks carefully and set them aside. Making a few test blocks first helps refine technique before committing to the full set in your chicken quilt project.
4. Constructing and Finishing the Full Quilt Top
Arrange finished chicken blocks in rows or columns, adding sashing strips or plain alternate blocks for spacing and contrast. A grid layout of 6×9 or similar creates a generous throw size in most free chicken quilt pattern variations.
Sew blocks into rows, pressing seams in alternating directions for easy nesting when joining rows. Accurate ¼-inch seams prevent puckering in the completed chicken quilt top.
Add inner borders if desired to frame the chicken motifs, then attach outer borders for balance. Borders can be pieced or solid, depending on fabric availability in your HOW TO MAKE Free Chicken Quilt Pattern.
Layer quilt top, batting, and backing; baste securely with pins or spray adhesive before quilting. Simple straight-line or free-motion quilting around chickens enhances texture without overwhelming the design.
Bind the edges with double-fold strips, mitering corners for a clean finish. Hand or machine stitching the binding down completes your handmade chicken quilt beautifully.
Label the back with date, maker, and care instructions for a thoughtful personal touch on your finished free chicken quilt pattern creation.
FAQ
What is the easiest way to start a free chicken quilt pattern for beginners? Begin with a simple block design using basic patchwork or fusible appliqué. Many online tutorials offer 6-inch or 12-inch chicken blocks that require only straight seams and minimal pieces, making them perfect for first-time quilters.
How many blocks do I need for a throw-size chicken quilt? A typical throw measures around 60×78 inches with 54 blocks (6 columns by 9 rows) plus sashing. Adjust based on block size—fewer larger blocks or more smaller ones work equally well in a free chicken quilt pattern.
Can I use scraps for the entire chicken quilt? Yes! Scrappy versions look charming and use up leftover fabrics. Stick to a cohesive color palette for backgrounds and accents to keep the chicken quilt looking intentional rather than chaotic.
What quilting stitches work best on a chicken-themed quilt? Straight-line quilting in the ditch or gentle loops around each chicken preserve the cute motifs. Avoid dense quilting over appliqué areas to prevent stiffness in your finished free chicken quilt pattern.
Is paper piecing recommended for chicken blocks? Paper piecing excels for sharp points like beaks and combs, ensuring precision. Many free chicken quilt pattern resources include paper-pieced options if you enjoy that technique.
How do I make the chickens look more realistic or whimsical? Add embroidered details like eyes, tiny legs, or patterned fabrics for feathers. Vary expressions and poses across blocks to give personality to every chicken in your chicken quilt.
What size should the finished quilt be for a bed or wall hanging? Throw size (about 60×70 inches) suits couches or laps, while twin or larger works for beds. Scale blocks and add borders accordingly in your HOW TO MAKE Free Chicken Quilt Pattern.
How long does it take to complete a chicken quilt? With moderate experience, expect 20-40 hours total, spread over days or weeks. Breaking it into stages—cutting, blocking, assembly, quilting—makes the project enjoyable and manageable.
In this HOW TO MAKE Free Chicken Quilt Pattern tutorial, we covered essential steps from gathering farm-inspired fabrics and cutting precise pieces to assembling playful chicken blocks, constructing the full top, and adding final quilting and binding touches. You now have the confidence to create a delightful, handmade quilt that celebrates chickens in cozy fabric form, perfect for any home or gift occasion.
PATTERN VIDEO:
Try the project yourself and share your honest feedback in the comments. Did the blocks come together easily? What fabrics or variations would you recommend? Your insights help improve this guide and inspire other quilters. Happy piecing and enjoy your charming new chicken quilt!

