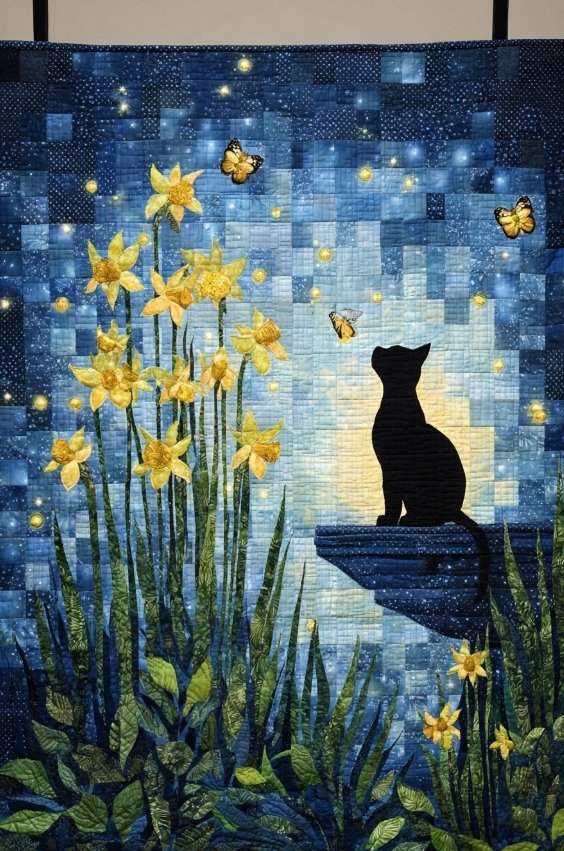
Moonlit Whiskers – TUTORIAL brings a touch of magic and whimsy to your quilting projects with this enchanting cat silhouette quilt block bathed in soft moonlight hues. This Moonlit Whiskers tutorial guides you step by step through creating a striking cat profile block featuring delicate whiskers, pointed ears, and a crescent moon accent—perfect for cat lovers, night-themed quilts, nursery decor, or cozy throw blankets.
Quilt blocks with stylized animals like this one capture personality and storytelling in fabric, turning simple shapes into expressive designs that feel both modern and timeless. The Moonlit Whiskers block uses clean lines, negative space, and subtle color gradients to evoke a quiet, starry night scene with a curious feline gazing upward.
In this beginner-to-intermediate Moonlit Whiskers tutorial, you’ll learn how to select dreamy fabrics, cut precise pieces using templates or measurements, assemble the cat silhouette with foundation paper piecing or traditional piecing options, add the moon detail, square up the block, and explore layout ideas to turn individual blocks into a full moonlit masterpiece. Grab your rotary cutter and let’s bring some nighttime magic to your quilt!
1. Gathering Your Materials for Moonlit Whiskers
Cotton quilting fabrics in midnight blues, deep purples, soft grays, and creamy whites create the dreamy nocturnal palette essential for Moonlit Whiskers. Choose a dark solid or subtle tonal print for the cat silhouette and lighter values for the moon and background sky.
DISCOVER MORE FREE PATTERNS HERE!
A rotary cutter, self-healing mat, and clear rulers (6.5-inch square minimum) ensure accurate cuts for sharp ears and whisker points. For the most precise curves and angles, many quilters prefer adding freezer-paper templates or printable foundation paper.
Basic tools—pins, seam ripper, iron, starch, neutral thread, and a quarter-inch foot—keep seams crisp and consistent throughout the Moonlit Whiskers tutorial. Removable fabric marker or chalk helps transfer any fine details if needed.
Optional metallic or glow-in-the-dark thread for subtle whisker embroidery, or silver/gold fabric for a shimmering moon accent. These small touches elevate the mystical feel of your finished Moonlit Whiskers block.
Prepare freezer paper, cardstock, or printable foundation paper if using templates or paper piecing for the cat shape. Many Moonlit Whiskers variations include downloadable templates for perfect symmetry.
Finally, set up a design wall or large floor space to audition fabric values and test block arrangements. Seeing the contrast between cat and sky early helps refine your nighttime mood in every Moonlit Whiskers block.
2. Cutting and Preparing the Cat Silhouette Pieces
Cut a large background rectangle or square in your chosen night-sky fabric—this becomes the base that the cat silhouette overlays. For a 12-inch finished block, start with a 13-inch square to allow trimming later.
Prepare the cat body as one large shape or break it into manageable sections: head, ears, neck/shoulders, and tail curve. Use freezer-paper templates ironed to the wrong side of dark fabric, then cut ¼ inch beyond the edge for seam allowance.
Cut small accent pieces for the crescent moon from pale yellow, ivory, or silver-toned fabric. A gentle curve or simple half-circle shape adds just the right celestial touch to Moonlit Whiskers.
If using foundation paper piecing, print or trace the block pattern onto lightweight paper and cut apart the numbered sections. This method guarantees razor-sharp points on ears and perfect whisker placement.
Mark any whisker lines lightly on the cat face piece with a removable pen or chalk if planning to embroider or appliqué them later. These guides disappear after quilting or washing your finished Moonlit Whiskers block.
Double-check all fabric values against each other in natural light—strong contrast between cat and sky makes the silhouette pop dramatically in every Moonlit Whiskers creation.
3. Assembling the Moonlit Whiskers Block
If using traditional piecing, appliqué the cat silhouette onto the background using fusible web for raw-edge or needle-turn for turned-edge appliqué. Stitch close to the edge with matching or monofilament thread for an almost invisible finish.
For foundation paper piecing enthusiasts, sew each numbered section in order, trimming seam allowances as you go. Join completed sections following the block diagram for flawless alignment of ears, face, and tail in Moonlit Whiskers.
Add the crescent moon by appliquéing or piecing it into the upper corner or behind the cat’s head. A tiny star or two using small circles or Y-seams adds extra nighttime sparkle if desired.
Embroider or satin-stitch delicate whiskers using 2–3 strands of white or light gray floss. Three to four fine lines per side give just enough detail without overpowering the clean silhouette style of Moonlit Whiskers.
Press all appliqué and seams carefully toward the darker fabric or open where bulk accumulates. Well-pressed units prevent shadowing and keep the block flat for accurate squaring.
Trim the completed block to its unfinished size (usually 12.5 inches square for a 12-inch finished block) using a large square ruler. Centering the cat face ensures balanced composition in your Moonlit Whiskers quilt.
4. Finishing and Arranging Moonlit Whiskers Blocks
Audition multiple Moonlit Whiskers blocks on a design wall, rotating some cats to face left or right for conversational groupings. Alternating with plain night-sky squares or star blocks creates secondary patterns and breathing room.
Add narrow sashing in deep indigo or black to frame each cat like its own little moonlit portrait window. Cornerstones with tiny silver moons or stars tie the design together beautifully.
Layer quilt top, batting, and backing; quilt around the cat outline (echo quilting) or use gentle swirls and loops to suggest a starry sky. Avoid dense quilting over the silhouette to keep it crisp and graphic.
Bind with a midnight blue or starry print fabric, mitering corners neatly. A hanging sleeve on the back turns your finished quilt into wall art perfect for cozy reading nooks.
Label the quilt back with date, maker, and perhaps a short note about the inspiration—cats under moonlight make especially meaningful gifts.
Display your Moonlit Whiskers quilt proudly or gift it to a fellow cat enthusiast. The quiet magic of this block brings comfort and wonder to any space it graces.
FAQ
What block size works best for Moonlit Whiskers? A 12-inch finished block offers good detail for whiskers and moon while remaining manageable. Smaller 8-inch blocks suit baby quilts; larger 16-inch blocks make bold wall hangings.
Do I need templates or can I free-hand the cat shape? Templates or foundation paper give the cleanest, most consistent silhouettes. Free-hand appliqué works for a more organic, folk-art feel if you’re comfortable with curves.
What fabrics make the cat silhouette stand out most? Very dark (almost black) cat fabric against medium-dark night-sky prints creates maximum contrast. Avoid low-contrast combinations so whiskers and ears remain sharp.
Can I make this block entirely with patchwork instead of appliqué? Yes—segment the cat into angled strips or use freezer-paper piecing for inset seams. It requires more pieces but eliminates appliqué stitching.
How do I get smooth curves on the cat’s back and tail? Clip inner curves lightly and ease outer curves when appliquéing. Foundation paper piecing naturally handles complex shapes with precision.
Is this block suitable for beginners? Intermediate quilters find it most comfortable due to appliqué or paper piecing. Beginners can start with fusible raw-edge appliqué and practice on a single block first.
How many blocks do I need for a lap quilt? A generous lap size (50×70 inches) uses about 20–24 blocks (4×5 or 4×6 layout) plus borders. Fewer blocks with wider sashing create a more open, gallery-like design.
What quilting design complements Moonlit Whiskers best? Echo quilting around the cat and moon, plus meandering stars or gentle swirls in the background, keeps focus on the silhouettes while suggesting a dreamy night sky.
In this Moonlit Whiskers tutorial, we explored choosing nocturnal fabrics, cutting and preparing the elegant cat silhouette, assembling with appliqué or paper piecing, adding moon and whisker details, and planning layouts for full quilts that capture quiet nighttime wonder. You now have the skills to create magical, expressive blocks that celebrate curiosity, grace, and the beauty of moonlit moments.
Try making a Moonlit Whiskers block (or several!) and share your honest thoughts in the comments. Did the silhouette come out sharp? What colors or extras would you add? Your experiences inspire other quilters and help this tutorial grow. Happy stitching and may your quilts always have a little moonlight magic!

