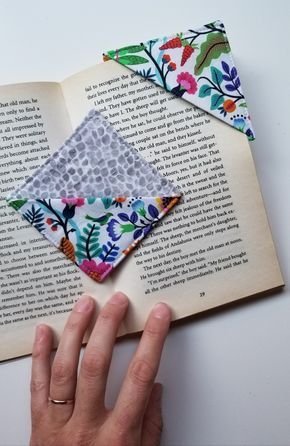
Looking for a simple and creative sewing project that uses your fabric scraps and adds charm to your reading time? In this How To Make Quick & Easy Fabric Book Marks – TUTORIAL, you’ll learn how to make delightful bookmarks using just a few pieces of fabric, a sewing machine, and your imagination.
This fun and fast project is perfect for beginners, kids, or experienced sewists looking to make heartfelt handmade gifts. Plus, fabric bookmarks are durable, customizable, and a great way to showcase your favorite prints.
In this tutorial, we’ll walk you through the step-by-step process of making your own fabric book marks, provide material suggestions, offer customization ideas, and answer the most common questions people ask online.
1. Why You Should Make Fabric Book Marks
There are countless reasons why this How To Make Quick & Easy Fabric Book Marks – TUTORIAL is a favorite among crafters, readers, and gift-givers alike.
SEE OTHER FACE PATTERNS HERE!
First, it’s fast. You can make one in 10 minutes or less, making it a great project for busy days or spontaneous crafting moments.
Second, it’s scrap-friendly. You only need small fabric pieces, which makes it perfect for using up those leftovers from other quilting or sewing projects.
Third, it’s beginner-friendly. If you’re learning to sew, this is a low-pressure way to practice straight stitching, pressing, and fabric handling.
Fourth, it’s functional. Everyone needs a bookmark, whether for novels, notebooks, cookbooks, or planners.
Fifth, it’s personal. Handmade bookmarks make fantastic gifts for teachers, students, book club friends, or yourself.
Sixth, it’s eco-friendly. Unlike paper or plastic bookmarks, fabric bookmarks can last for years—and you’re keeping scraps out of the landfill.
Making quick and easy fabric book marks is not just a creative act—it’s a thoughtful and sustainable one, too.
2. Materials and Tools You’ll Need
To start your How To Make Quick & Easy Fabric Book Marks – TUTORIAL, you’ll need only a few basic materials. Here’s your supply list:
Fabric:
-
Scraps of cotton fabric (quilting cotton works best)
-
Two pieces per bookmark: front and back, about 2.5” x 7.5” each
-
Optional: third piece of lightweight interfacing or batting for extra stiffness
Other Materials:
-
Thread in a coordinating or contrasting color
-
Ribbon or twine (for decorative tabs)
-
Scissors or rotary cutter
-
Iron and ironing board
-
Sewing machine
-
Pins or clips
You can use seasonal fabrics, novelty prints, florals, or solids—anything that matches your personality or theme. Using batik or linen adds a textured, elevated feel.
3. Step-by-Step Instructions for Fabric Bookmarks
Let’s begin making your own quick and easy fabric book marks. Follow these simple steps for a polished, professional finish.
Step 1: Cut Your Fabric
-
Cut two rectangles measuring 2.5″ x 7.5″ from your chosen fabrics (front and back).
-
If using interfacing or batting, cut one piece the same size.
Step 2: Assemble the Layers
-
Place the front and back fabric pieces right sides together.
-
If using interfacing, lay it on the wrong side of one fabric. If using batting, sandwich it between the two fabrics.
Step 3: Add Ribbon (Optional)
-
Cut a 2–3″ piece of ribbon and fold it into a loop.
-
Insert it between the two fabric pieces at one short end, with raw edges aligned and the loop tucked inside. Pin in place.
Step 4: Sew Around the Edges
-
Using a ¼” seam allowance, sew around all four edges, leaving a 1.5″ gap on one long side for turning.
-
Backstitch at the beginning and end.
Step 5: Trim and Turn
-
Clip corners to reduce bulk (do not cut through the stitches).
-
Turn the bookmark right side out through the gap. Use a chopstick or knitting needle to push out corners.
Step 6: Press and Topstitch
-
Press flat with an iron, folding the open edge neatly inward.
-
Topstitch around the entire edge, about ⅛” from the edge. This closes the gap and adds a decorative touch.
That’s it—your fabric book mark is complete! Repeat with different fabrics for a whole collection or a handmade gift set.
4. Customization Ideas for Your Fabric Book Marks
Once you’ve mastered the basics of this How To Make Quick & Easy Fabric Book Marks – TUTORIAL, it’s time to get creative! Here are some fun ways to make your bookmarks one-of-a-kind:
Embroider a Name or Quote
Use hand stitching or an embroidery machine to add a name, favorite word, or quote to personalize the bookmark.
Use Decorative Stitches
Explore your sewing machine’s fancy stitches—add stars, zigzags, or hearts around the edges for flair.
Add Appliqué or Iron-On Vinyl
Sew on shapes or use heat-transfer vinyl to decorate with motifs like hearts, stars, animals, or initials.
Make It Reversible
Choose two beautiful fabrics for the front and back, so your bookmark looks great from any angle.
Experiment with Shapes
Instead of rectangles, try rounded corners, angled ends, or even shaped bookmarks like hearts or leaves.
Add Tassels or Beads
Attach a yarn tassel or small beads to the ribbon tab for extra texture and movement.
With just a few tweaks, this simple fabric book mark becomes a creative, useful piece of art.
FAQ – How To Make Quick & Easy Fabric Book Marks
What type of fabric is best for bookmarks?
Quilting cotton is ideal—it’s easy to work with, lightweight, and comes in endless prints. You can also use canvas, linen, or denim for a sturdier bookmark.
Can I hand sew these bookmarks?
Yes! While a sewing machine makes the process faster, you can absolutely sew them by hand using a backstitch for durability.
How many bookmarks can I make from a fat quarter?
A single fat quarter can yield about 4 to 6 bookmarks, depending on how you cut it and the size you prefer.
Do I have to use interfacing?
Not at all. Interfacing adds stiffness, but it’s optional. You can use batting, felt, or even leave it out for a floppier, softer feel.
Are fabric bookmarks washable?
Yes! If you’ve used cotton fabric and standard thread, you can wash them gently and press with an iron as needed.
Can I sell bookmarks made with this pattern?
Yes! Handmade fabric bookmarks are popular at craft fairs, on Etsy, and in local bookshops. Just be sure to credit the tutorial if required.
Conclusion
We hope this How To Make Quick & Easy Fabric Book Marks – TUTORIAL inspired you to get sewing! Whether you’re making one for yourself, a classroom, or as thoughtful gifts, these bookmarks are a rewarding and easy project for crafters of all levels.
They allow you to use up scraps, express your creativity, and bring joy to others—what more could you ask for from a tiny piece of fabric?
Have you tried making fabric book marks? We’d love to hear your experience! Leave a comment with your favorite fabrics, techniques, or ideas you’d love to try next. 💬📚🧵


