If you’re looking to add a polished, professional finish to your quilting projects, this guide on How To Make Rounded Quilt Corners is exactly what you need. While square corners are traditional, rounded quilt corners offer a soft, modern twist that elevates the overall design of your quilt.
Learning how to make rounded quilt corners is simpler than you might think. With the right tools and a few careful steps, you can achieve beautifully smooth curves that enhance both the appearance and function of your quilt. Rounded edges are especially ideal for baby quilts, lap blankets, and wall hangings where gentle contours are preferred.
In this step-by-step tutorial, we’ll walk you through everything you need to know. From marking and cutting the perfect curve to bias binding your edges with confidence, mastering how to make rounded quilt corners will soon become one of your favorite finishing touches.
1. Why Choose Rounded Quilt Corners?
Rounded corners aren’t just about aesthetics—they also offer practical advantages that many quilters appreciate.
SEE OTHER FACE PATTERNS HERE!
First, they eliminate the tricky 90-degree miters, which can be challenging to bind cleanly, especially for beginners. With rounded corners, your binding flows continuously, making the process smoother and more enjoyable.
Second, rounded quilt corners reduce wear and tear over time. Sharp corners tend to fray faster, while rounded ones distribute tension more evenly, leading to a longer-lasting quilt.
Additionally, these curves give quilts a softer, more organic look. They are particularly appealing for projects like baby quilts, children’s blankets, or any piece where a gentle finish is more fitting.
Rounded corners also allow your quilt to lay flatter when folded or draped, which can make them more practical for everyday use and display.
Another great reason to learn how to make rounded quilt corners is versatility. This technique can be applied to many projects—pillows, table runners, even quilted jackets.
Whether you’re quilting for fun or for function, rounded corners add both charm and value to your work.
2. Tools You Need for Rounded Corners
Before you begin, gathering the right tools will ensure clean and consistent results as you learn how to make rounded quilt corners.
Start with a large circular object to trace your curves. A dinner plate, bowl, or quilting template works perfectly for this. Make sure it’s smooth and even all the way around to avoid lopsided curves.
You’ll also need a fabric marking tool. This could be a water-soluble pen, chalk pencil, or disappearing ink marker—whatever works best with your fabric.
Sharp fabric scissors or a rotary cutter is essential for cutting the curved corners smoothly. If you’re using a rotary cutter, work on a self-healing cutting mat for safety and accuracy.
Bias binding is crucial for this method. Unlike straight-grain binding, bias strips have the flexibility to bend around curves without puckering. You can either make your own bias tape or purchase pre-made binding.
Other helpful supplies include sewing pins or clips, an iron for pressing, and your sewing machine equipped with a walking foot (optional but helpful for smooth stitching over curves).
Having these tools ready before you start makes the process of learning how to make rounded quilt corners both simple and satisfying.
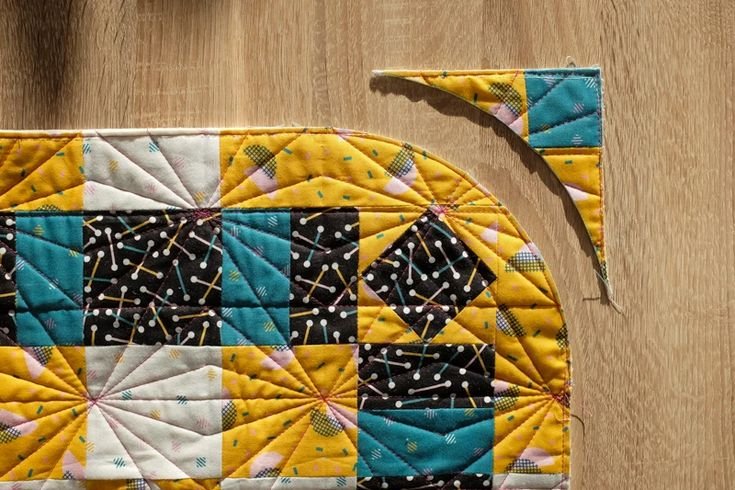
3. How To Cut and Prepare Rounded Corners
Cutting the curves is a simple step, but it’s important to do it carefully to maintain symmetry and achieve smooth edges. Here’s how to begin making rounded quilt corners correctly.
Lay your quilt top, batting, and backing layers together as you normally would before quilting. Make sure everything is trimmed and squared as needed.
Choose your circular object—like a plate—and align it with one corner of the quilt. The curve should be centered on the corner, touching both the side and bottom edges.
Use your marking tool to trace around the curve. Make sure the mark is clearly visible and that it blends smoothly into the straight edges.
Repeat this process for each corner, taking care to place the curve in the same position to ensure consistency.
Once all corners are marked, cut along the curved lines using your scissors or rotary cutter. If you’re working with thick layers, go slowly to ensure a smooth cut.
Now your quilt is ready for binding. These rounded edges are gentle and even, setting the stage for a beautifully finished project.
Taking your time during this phase is key to achieving professional results when learning how to make rounded quilt corners.
4. Binding Rounded Corners Like a Pro
Binding curved edges requires a bit of technique, but once you learn the basics, it becomes an enjoyable part of how to make rounded quilt corners.
First, make sure you are using bias binding—this is non-negotiable for curves. The flexibility of bias-cut strips allows the binding to wrap smoothly around the quilt without wrinkles or folds.
Begin by folding and pressing your bias binding in half lengthwise, wrong sides together. Open up the strip and fold the short edge under by 1/4 inch to create a clean starting point.
Pin or clip the binding to the edge of your quilt, aligning the raw edge of the binding with the quilt edge. Start in the middle of one side, not at a corner, to make joining easier later.
When you reach a corner, gently stretch the bias binding to follow the curve. Avoid pulling too hard—just enough tension to smooth it around the bend.
Sew slowly around each curve, keeping the stitch line consistent with the seam allowance (usually 1/4 inch). Use a walking foot if needed for better control.
After sewing, fold the binding over the edge and clip it to the back. Then hand-stitch or machine-stitch it down to finish. Your rounded quilt corners will look soft, clean, and beautifully finished.
🌟Join our exclusive Quilt broadcast list on Messenger! Receive the best patterns, tips, and updates directly in your inbox. Our team is ready to send you delightful content that will inspire your projects. Don’t miss this opportunity to stay updated and create amazing pieces. Join now and be part of this passionate quilt community!✨📩
FAQ – How To Make Rounded Quilt Corners
Why use bias binding instead of straight binding?
Bias binding stretches, allowing it to follow the curves without puckering. Straight binding doesn’t have the same flexibility and can result in uneven or wrinkled edges.
Can I round the corners after quilting?
Yes, it’s actually recommended. Square and quilt your layers first, then round the corners to ensure the shape is preserved throughout the quilt sandwich.
What’s the best tool for tracing curves?
A large dinner plate, bowl, or quilting circle template works perfectly. The key is a smooth, symmetrical curve.
Is binding curved corners harder than square ones?
It can be at first, but with bias binding and a little patience, curved binding becomes quite straightforward and often easier than mitering sharp corners.
Can I machine bind a quilt with rounded corners?
Absolutely. Many quilters prefer machine binding for speed and durability. Just go slowly around curves and use plenty of pins or clips to keep everything in place.
What types of quilts look best with rounded corners?
Baby quilts, lap quilts, wall hangings, and decorative throws are ideal candidates. Rounded corners give them a gentle, elegant finish.
Conclusion
Now that you know how to make rounded quilt corners, you can take your quilting to a whole new level of polish and creativity. Rounded corners add a soft, modern flair and can simplify the binding process when done correctly.
From selecting the right tools and cutting perfect curves to sewing smooth, bias-bound edges, each step offers a valuable skill to add to your quilting toolbox.
If you enjoyed this tutorial, we’d love to hear your thoughts! Leave a comment with your honest opinion and let us know if you have any questions or ideas for future quilting topics. Happy quilting! 🧵✨


