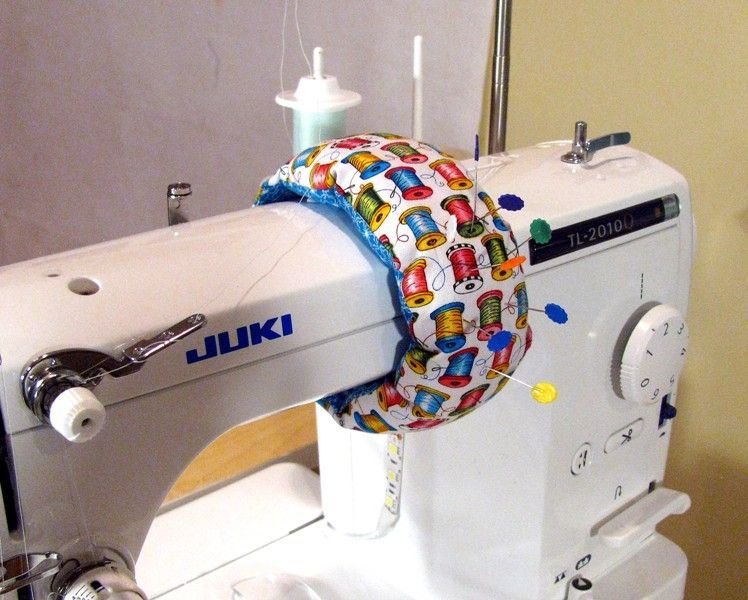
How to make Wrap-around pincushion for the sewing machine – TUTORIAL is a clever and practical quilting project designed to make sewing sessions more efficient and organized. The Wrap-around pincushion for the sewing machine is a small yet incredibly useful accessory that wraps around the arm of your sewing machine, keeping pins and needles within easy reach while you work on quilting or sewing projects.
For quilters and sewing enthusiasts, staying organized while working is essential. The Wrap-around pincushion for the sewing machine – TUTORIAL offers a smart solution by turning unused space on the machine into a convenient storage spot for pins. Instead of searching for a pincushion or placing pins on your worktable, you can keep them directly on your machine.
In this article, you will learn how to make Wrap-around pincushion for the sewing machine – TUTORIAL, including the inspiration behind this project, the materials needed, the step-by-step sewing process, and helpful customization ideas. This simple yet effective quilting accessory is perfect for beginners and experienced sewists alike.
1. The Purpose and Benefits of a Wrap-around Pincushion for the Sewing Machine
The Wrap-around pincushion for the sewing machine – TUTORIAL was created to solve a common problem faced by many quilters: keeping pins close at hand while sewing.
DISCOVER MORE FREE PATTERNS HERE!
During quilting or garment sewing, pins are used constantly. Having them stored on a traditional pincushion placed on the table often means reaching away from the machine repeatedly.
A Wrap-around pincushion for the sewing machine eliminates this inconvenience by positioning the pins directly on the sewing machine arm. This keeps everything within arm’s reach.
Another advantage of this project is that it helps maintain an organized sewing workspace. When pins have a dedicated spot, they are less likely to scatter across the table or fall onto the floor.
Safety is also an important benefit. By keeping pins secured in the pincushion, you reduce the chances of accidentally dropping or losing them while sewing.
Many quilters also enjoy making these pincushions as small scrap-fabric projects. They are quick to sew and perfect for using leftover fabric pieces.
Overall, the Wrap-around pincushion for the sewing machine combines practicality with creativity, making it a popular accessory among sewing enthusiasts.
2. Materials Needed for the Wrap-around Pincushion Project
Before starting how to make Wrap-around pincushion for the sewing machine – TUTORIAL, gathering the right materials will make the project easier and more enjoyable.
The primary material required is fabric. Quilting cotton is an excellent choice because it is durable, easy to sew, and available in countless patterns and colors.
Many makers prefer using fabric scraps from previous quilting projects to give their Wrap-around pincushion for the sewing machine a unique and personal touch.
Batting or stuffing material is also needed to create the cushion that will hold the pins. Polyester fiberfill, cotton stuffing, or leftover quilt batting can work perfectly.
You will also need basic sewing tools such as scissors, pins, thread, and a sewing machine.
Elastic or fabric straps are typically used to help the pincushion wrap securely around the sewing machine arm.
Some sewists also add decorative elements such as patchwork blocks, embroidery, or quilting stitches to enhance the appearance of the pincushion.
Having these materials ready before starting will ensure a smooth sewing process and help you complete your Wrap-around pincushion for the sewing machine efficiently.
3. Step-by-Step Process to Sew the Wrap-around Pincushion
The most exciting part of how to make Wrap-around pincushion for the sewing machine – TUTORIAL is the construction process.
Start by cutting two pieces of fabric for the top and bottom of the pincushion. These pieces should be large enough to create a comfortable cushion area for pins.
Next, cut additional fabric strips that will form the wrap-around band that fits around the sewing machine arm.
Place the main fabric pieces right sides together and sew around the edges, leaving a small opening for turning the piece right side out.
After turning the fabric, fill the cushion with stuffing until it feels firm but still soft enough to insert pins easily.
Once the cushion is filled, sew the opening closed with a neat seam.
Attach the wrap-around band to the pincushion so that it comfortably fits around the sewing machine arm. Elastic can be added for flexibility and a secure fit.
This step-by-step method transforms simple fabric pieces into a functional and stylish Wrap-around pincushion for the sewing machine.
4. Creative Customization Ideas for Your Pincushion
One of the most enjoyable aspects of how to make Wrap-around pincushion for the sewing machine – TUTORIAL is the opportunity for customization.
Many quilters enjoy turning this simple project into a decorative piece that matches their sewing room style.
Patchwork designs are a popular option. Small quilt blocks or scrap fabric squares can be combined to create a colorful pincushion top.
Another creative idea is to add quilting stitches to the fabric before assembling the pincushion. This adds texture and visual interest.
Embroidery or applique designs can also personalize the pincushion with initials, floral patterns, or sewing-themed motifs.
Some makers include additional small pockets for storing extra needles or small sewing tools.
Using themed fabrics or coordinating colors allows the Wrap-around pincushion for the sewing machine to complement other handmade accessories in the sewing space.
These customization ideas help transform a practical sewing tool into a charming handmade accessory.
FAQ – Wrap-around Pincushion for the Sewing Machine – TUTORIAL
What is a wrap-around pincushion for the sewing machine?
It is a small fabric pincushion designed to wrap around the arm of a sewing machine, allowing easy access to pins while sewing.
Is this project suitable for beginners?
Yes, the Wrap-around pincushion for the sewing machine – TUTORIAL is a beginner-friendly sewing project that requires only basic sewing skills.
What type of fabric works best for this project?
Quilting cotton is highly recommended because it is durable, easy to handle, and holds its shape well.
Can I make this pincushion using fabric scraps?
Absolutely. Many quilters use leftover fabric pieces from previous projects to create unique pincushion designs.
How do I attach the pincushion to my sewing machine?
Most designs include a wrap-around fabric band or elastic strap that fits snugly around the machine arm.
Can I add extra features to the pincushion?
Yes, you can add pockets, decorative quilting, embroidery, or patchwork designs to customize your pincushion.
Conclusion
Learning how to make Wrap-around pincushion for the sewing machine – TUTORIAL is a wonderful way to create a practical sewing accessory while using up fabric scraps. This project is simple, quick, and incredibly useful for keeping pins organized during quilting or sewing sessions.
Throughout this article, we explored the purpose of the Wrap-around pincushion for the sewing machine, the materials needed for the project, the step-by-step sewing process, and several creative ways to customize the design.
By making your own Wrap-around pincushion for the sewing machine, you can improve your sewing workspace while adding a handmade touch to your craft area.
Now we would love to hear from you. Have you tried making this project? Do you have creative ideas or improvements for this pincushion design?
Leave your honest opinion and share your suggestions. Your feedback helps inspire more creative sewing and quilting tutorials for the entire crafting community.

