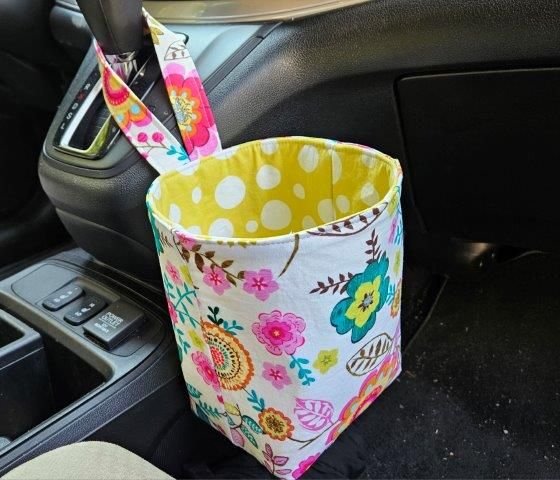
Keeping your car clean can feel like a constant challenge, especially if you travel frequently, have kids, or enjoy road trips. Wrappers, receipts, tissues, and small bits of trash quickly pile up. That’s why learning How to Sew a Fabric Trash Bag for Your Car is such a practical and satisfying quilting project.
This tutorial-style article will guide you through everything you need to know to create a reusable, washable, and stylish car trash bag. It’s a functional sewing project that blends organization with creativity — perfect for beginners and experienced quilters alike.
If you love useful handmade items that make everyday life easier, this is a must-try project.
1. Why You Should Sew a Fabric Trash Bag for Your Car
When you understand How to Sew a Fabric Trash Bag for Your Car, you’re not just making a simple organizer — you’re creating a sustainable solution.
DISCOVER MORE FREE PATTERNS HERE!
Disposable plastic bags are often used as temporary trash holders in vehicles, but they tear easily and don’t look very appealing. A reusable fabric trash bag solves this problem in a stylish and eco-friendly way.
This project is especially useful for:
Daily commuters
Families with children
Road trip enthusiasts
Ride-share drivers
Anyone who likes a tidy vehicle
Beyond functionality, it’s also a fantastic beginner-friendly sewing project. It involves straight seams, simple construction, and basic quilting techniques. Even if you are new to sewing, you can complete this confidently.
Another major advantage is customization. You can match the fabric to your car interior, choose fun prints, or create themed designs for gifts. Handmade car accessories also sell well at craft fairs because they are practical and affordable.
2. Materials and Preparation
Before starting How to Sew a Fabric Trash Bag for Your Car, gather all necessary materials. Choosing durable fabrics will ensure your trash bag lasts a long time.
You will need:
Cotton fabric for the exterior
Cotton fabric or waterproof fabric for the lining
Batting or interfacing (optional for structure)
Coordinating thread
Sewing machine
Scissors or rotary cutter
Ruler and cutting mat
Pins or clips
Velcro, snap, or strap for hanging
If you want extra durability and easy cleaning, consider using laminated cotton or adding a waterproof lining such as PUL fabric. This makes wiping the inside much easier.
Choosing the Right Size
A common finished size is approximately 9 to 12 inches wide and 12 to 15 inches tall. However, you can adjust measurements depending on where you plan to hang it.
Popular placement options include:
Behind the headrest
On the back of a seat
Attached to the center console
Measure your intended location before cutting fabric to ensure a perfect fit.
Cutting the Fabric
Cut:
Two rectangles for the outer fabric
Two rectangles for the lining
One strip for the hanging strap
If adding structure, cut batting or interfacing the same size as the outer pieces.
Press your fabric before sewing to ensure accurate seams and professional results.
3. Step-by-Step Tutorial: How to Sew a Fabric Trash Bag for Your Car
Now let’s walk through the construction process step by step.
Step 1: Assemble the Exterior
If you are using batting, layer it behind each outer fabric piece. Quilt simple straight lines to secure the layers. This step is optional but adds durability and a polished look.
Place the two outer pieces right sides together and sew along the sides and bottom using a ¼-inch seam allowance. Leave the top open.
Turn right side out and press.
Step 2: Prepare the Lining
Place the two lining pieces right sides together and sew the sides and bottom. Leave a small opening at the bottom for turning later.
Keep the top open.
Step 3: Create the Strap
Fold the strap piece lengthwise with right sides together. Sew along the long edge, then turn it right side out. Press flat.
You can attach Velcro or snaps at the ends, or leave it as a simple loop depending on your preferred hanging method.
Step 4: Attach the Strap
Pin the strap to the right side of the exterior bag at the top edge, aligning the raw edges. Make sure the strap faces downward inside the bag before sewing.
Step 5: Join Exterior and Lining
Insert the exterior bag into the lining bag so that right sides are facing each other. Align the top raw edges and clip or pin in place.
Sew all the way around the top edge.
Step 6: Turn and Finish
Pull the bag through the opening in the lining. Push out the corners carefully.
Close the lining opening with a topstitch or hand stitch.
Tuck the lining inside the exterior and press the top edge neatly. Topstitch around the entire top edge for a clean finish and extra durability.
Congratulations — you now know How to Sew a Fabric Trash Bag for Your Car.
4. Customization Ideas and Practical Enhancements
Once you master the basic version, you can elevate your project in creative ways.
Add a Weighted Bottom
Sew a small pocket inside the base and insert a flat weight to keep the bag from swinging while driving.
Create a Flip-Top Closure
Add a flap with Velcro or magnetic snaps to keep trash concealed and prevent odors from escaping.
Make It Reversible
Use coordinating fabrics for both sides and skip quilting for a lightweight, reversible option.
Add Pockets
Include a small outer pocket for hand sanitizer, tissues, or wipes. This transforms your trash bag into a mini car organizer.
Personalize It
Monogram the bag with initials or use novelty fabrics featuring florals, geometric patterns, animals, or seasonal prints.
Handmade car accessories make thoughtful gifts for:
New drivers
Parents
Teachers
Friends who love organization
This project is also ideal for selling in handmade marketplaces, especially when paired with coordinating car organizers.
Frequently Asked Questions (FAQ)
Is this project beginner-friendly?
Yes. How to Sew a Fabric Trash Bag for Your Car is a simple project that uses straight seams and basic sewing skills.
What fabric works best?
Quilting cotton works well for the exterior. For the lining, waterproof or laminated fabric makes cleaning easier.
How do I clean the fabric trash bag?
If made with cotton, it can usually be machine washed and air dried. Waterproof linings can be wiped clean with a damp cloth.
How do I attach it securely in the car?
You can use a strap around the headrest, Velcro loops, snap closures, or adjustable webbing straps.
Can I sell trash bags made from this pattern?
Yes, handmade practical items like this are popular at craft fairs and online shops. Always ensure your design is original if selling commercially.
Conclusion
Learning How to Sew a Fabric Trash Bag for Your Car is a simple yet incredibly useful skill. This project combines practicality with creativity, helping you keep your vehicle organized while showcasing your personal style.
With just a few materials and basic sewing techniques, you can create a reusable, washable, and eco-friendly solution that replaces disposable plastic bags. Once you make one, you’ll likely want to create several more — for yourself, your family, or even to sell.
If you enjoyed this tutorial and love discovering creative quilt and sewing projects, share your thoughts and tell me what fabric you would choose for your car trash bag. Your next handmade creation might be the most practical one yet.

