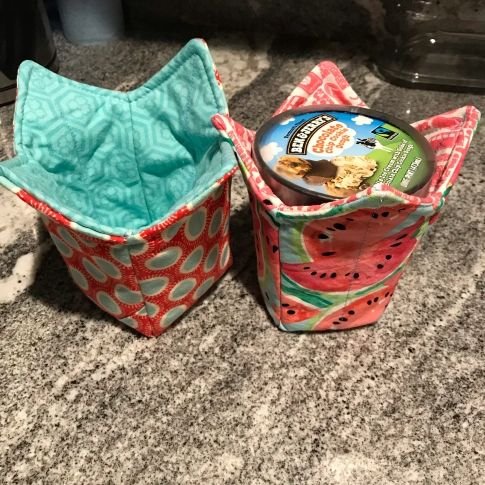
The Ice Cream Pint Cozy – TUTORIAL is the perfect small quilting project for anyone who loves practical handmade creations with a fun twist. Designed to wrap snugly around a standard ice cream pint, this cozy keeps your hands warm while you enjoy your favorite frozen treat — and adds a charming, personalized touch to dessert time.
Quick, beginner-friendly, and highly giftable, this project is ideal for using fabric scraps, testing quilting designs, or creating thoughtful handmade presents. Whether you’re sewing for yourself, your family, or preparing items for craft fairs, the Ice Cream Pint Cozy – TUTORIAL is both functional and adorable.
In this guide, you’ll learn how to select the right materials, measure accurately, construct the cozy step by step, and customize it with creative details.
1. Why Make an Ice Cream Pint Cozy?
Holding a frozen ice cream container can be uncomfortable — and condensation often leaves your hands wet and cold. The Ice Cream Pint Cozy – TUTORIAL solves both problems while adding a layer of charm.
DISCOVER MORE FREE PATTERNS HERE!
Benefits of making your own pint cozy:
Keeps hands warm while holding ice cream
Reduces condensation mess
Reusable and eco-friendly
Perfect scrap-busting project
Great for gifting
This small quilted sleeve wraps around the pint container and typically fastens with Velcro, snaps, or elastic, allowing easy removal when empty.
It’s also an excellent beginner quilting project because:
It uses straight seams
Requires minimal fabric
Offers practice with quilting layers
Can be completed in an afternoon
Plus, it’s a creative way to experiment with bold prints, novelty fabrics, or themed designs — from summer vibes to holiday treats.
2. Choosing Fabrics and Materials
Because this cozy will be exposed to moisture and cold temperatures, selecting the right materials is important. The Ice Cream Pint Cozy – TUTORIAL works best with absorbent and washable fabrics.
Recommended materials:
Quilting cotton for the outer layer
Absorbent cotton or flannel lining
Cotton batting for insulation
Fusible fleece (optional for extra thickness)
Supplies needed:
Rotary cutter and ruler
Sewing machine
Pins or clips
Velcro, snaps, or elastic for closure
Coordinating thread
Fabric Ideas:
Fun food-themed prints
Bright summer patterns
Holiday novelty fabrics
Minimalist modern solids
Scrappy patchwork combinations
Since the project is small, it’s perfect for using leftover quilt blocks or small patchwork panels. You can even quilt the outer layer before assembling to add texture and visual interest.
Before cutting, measure a standard ice cream pint. Most are similar in size, but checking ensures a snug fit.
3. Step-by-Step Construction Guide
The Ice Cream Pint Cozy – TUTORIAL is simple and satisfying. Follow these general steps for a polished finish.
Step 1: Measure and Cut
Measure the height and circumference of your ice cream pint. Cut a rectangle of outer fabric, batting, and lining slightly larger than needed to allow for seam allowances.
Step 2: Create the Quilted Panel
Layer outer fabric, batting, and lining. Quilt as desired using straight lines, diagonal lines, or simple free-motion patterns. Trim the panel to final size after quilting.
Step 3: Finish the Short Edges
Fold and hem or bind the two shorter vertical edges for a clean look.
Step 4: Add Closure
Attach Velcro strips, snaps, or elastic to one side of the cozy. Make sure the closure aligns properly when wrapped around the pint.
Step 5: Test the Fit
Wrap the cozy around the pint and secure it. Adjust closure placement if necessary before final stitching.
Step 6: Final Press
Give the cozy a light press, avoiding direct heat on Velcro if used.
That’s it — your cozy is ready to use.
This project can easily be scaled for other container sizes, such as soup pints or frozen yogurt tubs.
4. Creative Customization and Gift Ideas
One of the most enjoyable aspects of the Ice Cream Pint Cozy – TUTORIAL is how customizable it is.
Creative variations include:
Adding appliqué shapes (like ice cream cones)
Personalizing with embroidered names
Using patchwork panels
Adding decorative binding
Creating reversible designs
You can even make seasonal collections:
Summer tropical themes
Fall pumpkin spice prints
Winter holiday fabrics
Valentine’s Day hearts
For gifting, consider pairing the cozy with:
A pint of gourmet ice cream
A gift card to a local creamery
A handmade spoon wrap
A dessert-themed gift basket
Because the cozy is reusable and washable, it’s an eco-friendly alternative to disposable sleeves or paper towels.
This small project is also perfect for craft fairs. It’s affordable to make, quick to sew, and universally appealing.
Frequently Asked Questions (FAQ)
Is this project beginner-friendly?
Yes. Basic sewing skills and straight stitching are all you need.
Can I wash the cozy?
Yes, if made with washable cotton fabrics. Air dry for best results.
What batting works best?
Cotton batting is ideal because it absorbs condensation and provides insulation.
How do I ensure a snug fit?
Measure your pint carefully and test before attaching the final closure.
Can I make it reversible?
Absolutely. Use coordinating fabrics and skip visible closures for a two-sided design.
Conclusion
The Ice Cream Pint Cozy – TUTORIAL is a small project with big charm. It combines quilting skills with practical everyday use, making dessert time more comfortable and stylish.
Perfect for beginners, scrap-busters, and gift-makers alike, this cozy is quick to sew and endlessly customizable. Once you make one, you’ll likely want to create more for friends and family.
Have you tried sewing functional quilted accessories before? Share your ideas and experiences in the comments — your creativity might inspire another maker to start their next fun project today.

