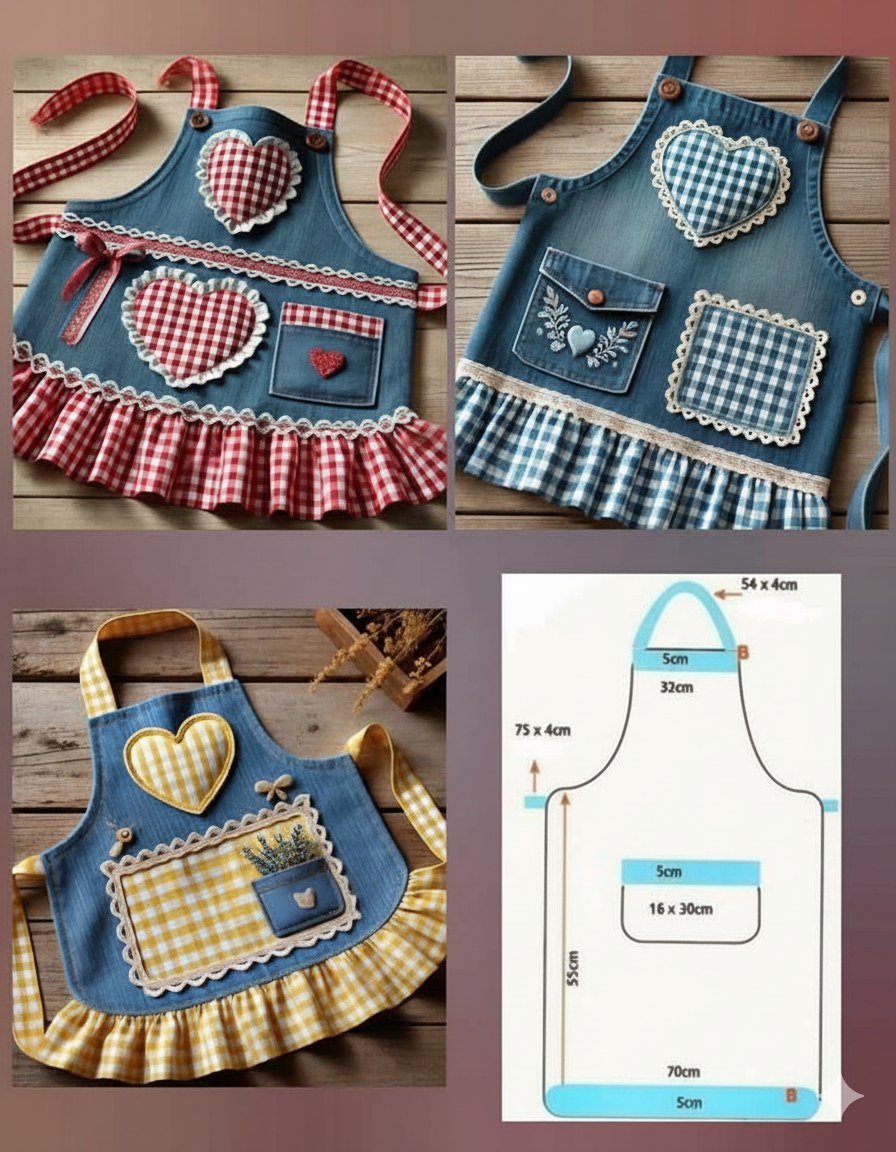
The Jeans Apron – TUTORIAL is the perfect project for quilters and sewing enthusiasts who love combining creativity, sustainability, and practicality. Made from recycled denim and quilted details, this apron transforms old jeans into a durable and stylish everyday essential.
Whether you’re cooking, gardening, crafting, or working in your sewing studio, a denim apron offers both protection and personality. With its sturdy texture and timeless appeal, denim provides structure, while quilt-inspired piecing techniques add charm and originality.
In this complete guide, you’ll learn how to plan, cut, assemble, quilt, and finish your own Jeans Apron, along with customization ideas to make it uniquely yours.
1. Understanding the Jeans Apron Design
The beauty of the Jeans Apron – TUTORIAL lies in its versatility. You can keep it simple and rustic or elevate it with patchwork and quilting details.
DISCOVER MORE FREE PATTERNS HERE!
Common design elements include:
Recycled denim base
Patchwork pockets
Quilted front panel
Adjustable neck strap
Waist ties
Decorative topstitching
Denim is thicker than regular quilting cotton, so construction requires slightly stronger needles and careful seam management. However, the payoff is a highly durable apron that can last for years.
You can choose from several apron styles:
Full bib apron (covers chest and waist)
Half waist apron (waist-down coverage)
Cross-back apron (no neck strain)
Utility apron with multiple tool pockets
Adding quilted elements — like patchwork pockets or a pieced front panel — blends traditional quilting techniques with garment construction.
2. Materials and Fabric Preparation
Before beginning your Jeans Apron – TUTORIAL, gather all necessary materials.
Materials Needed
Old jeans (1–2 pairs depending on size)
Cotton fabric scraps (optional for patchwork)
Quilting cotton for lining (optional)
Rotary cutter and cutting mat
Denim or heavy-duty sewing needle
Strong thread (polyester recommended)
Scissors
Pins or clips
Iron and pressing surface
Choosing Denim
Mid-weight denim is easiest to work with.
Avoid extremely thick seams from heavy-duty work jeans.
Stretch denim can be used but may require stabilizing.
Preparing Old Jeans
Wash and dry the denim thoroughly.
Remove seams using a seam ripper.
Cut flat panels from the legs and back.
Save back pockets — they can be reused as ready-made apron pockets.
If using patchwork details, choose cotton scraps that contrast nicely with blue denim. Florals, stripes, and small prints add character.
3. Step-by-Step Construction of the Jeans Apron
Step 1: Create the Apron Pattern
Measure desired length (chest to knee for full apron).
Determine width (hip-to-hip plus seam allowance).
Sketch or use an existing apron template.
A common bib apron size is approximately 28 inches long by 26 inches wide, but adjust based on personal preference.
Step 2: Cut the Denim Base
Lay denim flat.
Position pattern pieces carefully to avoid thick seam areas.
Cut the main body and bib section if separate.
If you want a single-piece apron, cut a continuous shape with curved arm openings.
Step 3: Add Patchwork or Quilted Panel (Optional)
Piece together scrap fabrics into a rectangular panel.
Press seams flat.
Attach panel to the lower front of apron.
For a quilted effect:
Add a thin layer of batting behind the patchwork.
Quilt using straight lines or simple grid stitching.
This adds both visual interest and extra durability.
Step 4: Attach Pockets
Reuse original jean pockets or create new patchwork pockets.
Position pockets on the front.
Pin securely.
Topstitch around edges using reinforced stitching.
Double stitching ensures strength for heavy use.
Step 5: Add Straps and Ties
Cut denim strips or use cotton webbing for straps.
Neck Strap:
Attach to top corners of bib.
Add adjustable slider or button for customization.
Waist Ties:
Sew long strips.
Attach securely to side seams.
Reinforce strap attachment points with square stitching or X-shaped reinforcement.
Step 6: Finish Edges
Fold raw edges inward twice for clean hems.
Topstitch around entire apron.
Denim looks beautiful with visible topstitching in contrasting thread, such as golden or cream.
4. Creative Variations and Styling Ideas
The Jeans Apron – TUTORIAL offers endless opportunities for personalization.
Creative Additions
Embroidery on pockets
Fabric labels with your name
Decorative buttons
Appliqué shapes
Contrast binding along edges
Style Variations
Minimalist modern apron with solid denim
Boho patchwork apron with colorful scraps
Rustic farmhouse look with neutral tones
Studio utility apron with multiple compartments
You can also add:
Towel loop on the side
Tool holders for scissors or paintbrushes
Hidden inside pocket
This apron makes a thoughtful handmade gift for:
Home cooks
Gardeners
Artists
Quilters
DIY enthusiasts
Because it’s made from recycled denim, it’s also an eco-conscious project that reduces textile waste.
FAQ – Jeans Apron
Is denim difficult to sew?
Denim requires a strong needle and steady stitching, but it is manageable with a standard home sewing machine.
Can beginners make this apron?
Yes. Basic straight seams and hemming skills are enough for a simple version.
How do I prevent bulky seams?
Trim seam allowances and avoid layering too many thick denim sections.
Can I wash the apron normally?
Yes. Wash in cold water and air dry to preserve shape and stitching.
How long does it take to complete?
Most aprons can be finished in one afternoon or weekend project session.
Conclusion
The Jeans Apron – TUTORIAL is a rewarding blend of quilting creativity and functional sewing. By repurposing old denim and incorporating patchwork elements, you create a durable, stylish, and meaningful handmade piece.
This project is perfect for reducing fabric waste while exploring texture, structure, and design. With thoughtful details and careful construction, your jeans apron will become a practical staple in your kitchen, garden, or craft room.
If you enjoyed this tutorial, share your finished apron, leave your feedback, and tell us how you customized your design. Your handmade creativity can inspire others to turn everyday materials into something truly special.

