If you love quilting or crochet blocks that offer both elegance and versatility, this Jewel Box Block – Pattern is an absolute must-try. Known for its striking geometric design and gemstone-like appearance, the Jewel Box Block is perfect for quilts, afghans, wall art, and more.
This pattern brings together symmetry, rich color contrasts, and sharp lines that resemble the facets of a cut jewel—hence the name. Whether you’re a beginner looking for your next challenge or an experienced maker hoping to refine your technique, this pattern offers both beauty and skill development.
In this detailed tutorial, you’ll learn how to make your own Jewel Box Block, the best materials to use, personalization ideas, and how to assemble multiple blocks into a cohesive and eye-catching final piece.
1. Materials and Tools for the Jewel Box Block
Before you begin this Jewel Box Block – Pattern, gather your materials to ensure a smooth and satisfying creative process. Having the right tools on hand makes all the difference in quality and efficiency.
DISCOVER MORE FREE PATTERNS HERE!
Start by choosing your yarn or fabric. For crochet, worsted-weight yarn (category 4) is ideal, especially when using multiple colors to emphasize the geometric contrast. For quilters, select high-quality cotton fabrics in at least three to four complementary shades.
Use a 5.0 mm crochet hook if you’re crocheting, or a standard sewing machine with sharp quilting needles for the fabric version. Always test your hook or needle with a swatch before beginning the actual block.
You’ll also need a yarn needle or sewing needle for weaving in ends or joining pieces. This step is crucial for giving your project a polished, seamless look.
Keep scissors close for cutting fabric or yarn cleanly. Precision matters when working with the crisp edges and angles required by the Jewel Box Block.
Optional, but helpful tools include stitch markers, a cutting mat (for quilting), a rotary cutter, and a ruler to keep all your lines clean and uniform.
Lastly, have your Jewel Box Block – Pattern instructions or digital chart ready. If you’re following a crochet graph, consider printing it or using a digital highlighter to track your progress.
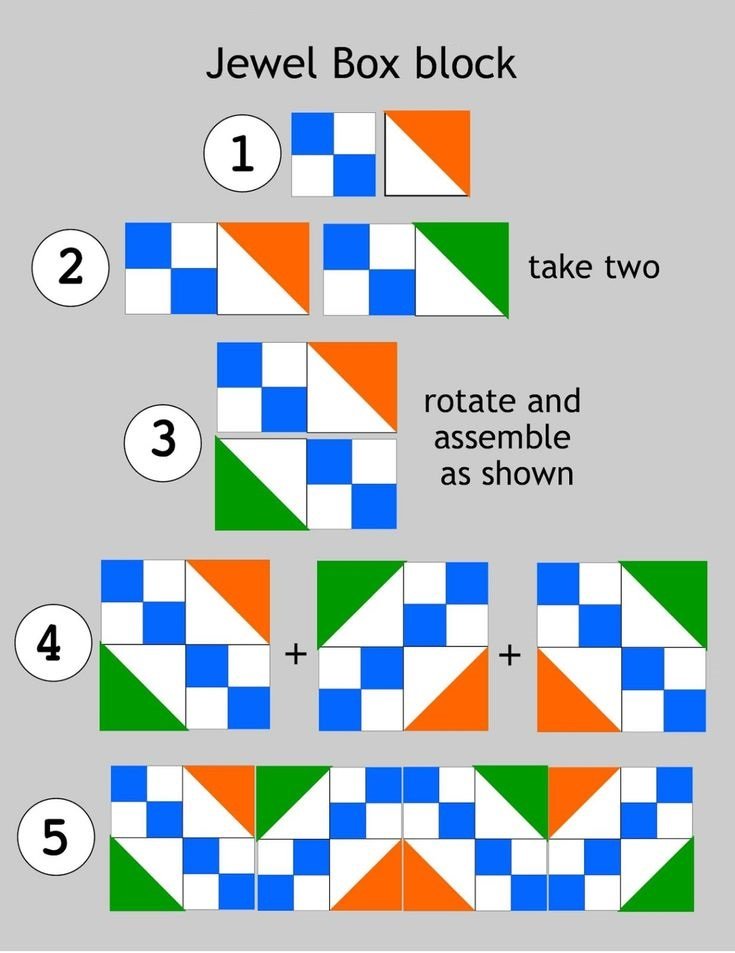
2. Step-by-Step Instructions to Make the Jewel Box Block
The Jewel Box Block – Pattern may look complex, but it can be broken down into manageable steps. Follow this guide carefully, and you’ll have a finished block you’ll be proud to show off.
Start by creating the base of the block. In crochet, this usually involves chaining a foundation and working in rounds or rows to build out from the center. For quilters, cut your squares and triangles precisely before assembly.
The main structure of the Jewel Box Block features a combination of smaller squares and half-square triangles (HSTs) arranged in a specific layout to create the illusion of depth and dimension.
In crochet, use stitches such as single crochet (sc), half double crochet (hdc), and double crochet (dc) to build the different segments. Follow a color-coded chart to mimic the traditional quilt-style design.
For quilters, begin piecing your small squares together, pairing dark and light fabrics for contrast. Join half-square triangles carefully, pressing seams flat to reduce bulk.
Once all units are prepared, lay them out according to the Jewel Box Block diagram. This visual check helps ensure the correct orientation before you begin stitching them together.
Assemble the block row by row, then sew rows together to complete the square. Be sure to measure and block your finished piece so all your blocks will be consistent in size when joined later.
3. Personalizing Your Jewel Box Block with Color and Style
The real magic of the Jewel Box Block – Pattern is how easily it can be personalized. From vibrant color palettes to custom motifs, this pattern allows for limitless creativity.
For a classic jewel-inspired look, use bold, rich colors like ruby red, sapphire blue, emerald green, and amethyst purple. These shades truly bring out the “jewel” element of the block.
If you prefer a modern aesthetic, use a monochrome or minimalist palette—think black, white, and grey or various shades of a single hue. This approach creates a sleek, contemporary design.
Try using variegated yarns or batik fabrics to give your blocks a textured, watercolor-like appearance. These materials add depth without requiring complex stitch changes.
Personalize the size of your block by adjusting stitch counts or fabric square sizes. Larger blocks are perfect for throw blankets, while smaller ones make great wall hangings or cushions.
Add embellishments to your Jewel Box Block—crocheters can add surface embroidery or beads, while quilters might use applique or decorative stitching for extra flair.
Don’t be afraid to mix materials. Some crafters use fabric and yarn together, incorporating crochet borders around fabric quilt blocks for a unique hybrid design.
4. Turning Your Blocks Into a Finished Project
Once you’ve mastered your first few Jewel Box Blocks, it’s time to think about how to use them in a larger project. This pattern is incredibly versatile and lends itself to a wide range of creative applications.
If you’re quilting, layout is key. Arrange your blocks on a design wall or large table to determine the final look. Try alternating block orientations or combining them with solid-colored blocks to create visual breaks.
For crochet projects, join blocks using whipstitch, mattress stitch, or slip stitch. The joining method can affect both the aesthetics and flexibility of the final piece.
Consider using sashing—fabric or crochet strips between blocks—to separate each Jewel Box Block and highlight its shape. This gives your project a cleaner, framed appearance.
Your finished blocks can be turned into bedspreads, table runners, scarves, tote bags, pillowcases, or even clothing panels. The versatility of the block opens the door to endless DIY opportunities.
Always finish your project with a border or binding. For quilts, this might be a double-fold bias binding. For crochet, consider a scalloped or shell stitch edging to tie everything together.
Label your finished piece, especially if it’s a gift or heirloom. Adding your name and date can make your Jewel Box Block creation even more meaningful and memorable.
FAQ – Frequently Asked Questions About the Jewel Box Block
Q1: What size is the standard Jewel Box Block?
Most Jewel Box Blocks measure 12 x 12 inches, but they can be resized depending on your project and materials.
Q2: Is this pattern suitable for beginners?
Yes! While the design looks advanced, it’s made of simple units like squares and triangles, making it great for adventurous beginners and up.
Q3: How many blocks do I need for a full-size blanket?
It depends on your block size, but for 12-inch blocks, a typical throw-sized blanket would use 20–25 blocks.
Q4: Can I mix crochet and quilting techniques?
Absolutely. Many crafters are blending fiber arts by adding crochet borders to quilt blocks or sewing fabric into crochet projects.
Q5: What’s the best way to keep blocks the same size?
For quilts, use precise cutting and consistent seam allowances. For crochet, maintain even tension and block each square after finishing.
Q6: Can I sell items made with the Jewel Box Block Pattern?
Most designers allow the sale of finished items, but it’s best to credit the original pattern and avoid reselling the pattern itself.
Conclusion
The Jewel Box Block – Pattern is a timeless and rewarding project that blends art and precision. Whether you’re quilting or crocheting, this block offers endless design opportunities with stunning visual impact.
From material selection to color planning, from mastering clean joins to assembling your final project, each step builds your skill and creativity. We hope this tutorial helped guide your journey through the Jewel Box Block experience.
We’d love to hear your honest thoughts and suggestions in the comments below. Your feedback helps us bring you more in-depth and inspiring craft tutorials. Happy crafting!


