The Tutorial: Kids’ Boxy Pencil Case is a fun and practical quilting project designed to create a sturdy and adorable storage solution for school supplies. In this Kids’ Boxy Pencil Case Tutorial, quilters can learn how to sew a structured pencil case that is perfect for storing pencils, pens, markers, and other small items. This project combines simple quilting techniques with functional design, making it a wonderful project for beginners and experienced crafters alike.
Handmade school accessories have become increasingly popular because they add personality and creativity to everyday items. The Kids’ Boxy Pencil Case is especially appealing because it offers both durability and charm. With its structured box shape and colorful fabrics, this pencil case can easily become a favorite accessory for children.
This complete Tutorial: Kids’ Boxy Pencil Case will guide you through the inspiration behind the project, the materials needed to get started, the step-by-step process for constructing the pencil case, and the finishing details that give it a professional look.
1. Inspiration Behind the Kids’ Boxy Pencil Case
The Tutorial: Kids’ Boxy Pencil Case was inspired by the need for durable and creative storage solutions for school supplies. Many children carry pencils, crayons, and markers daily, and a strong pencil case helps keep these items organized and protected.
DISCOVER MORE FREE PATTERNS HERE!
Unlike flat pouches, the Kids’ Boxy Pencil Case features a three-dimensional structure that provides extra space for supplies. The boxy shape also makes it easier to open and access items inside.
Quilters often enjoy creating projects that are both decorative and practical. The Kids’ Boxy Pencil Case Tutorial allows crafters to experiment with colorful fabrics, playful prints, and creative quilting textures.
This project is also a wonderful way to use fabric scraps from previous quilting projects. Bright patterns, cartoon prints, or themed fabrics can transform the pencil case into a fun accessory that children love using.
The Kids’ Boxy Pencil Case is not only useful for school but can also be used to store craft tools, art supplies, or small travel items.
Through this tutorial, quilters can create a practical handmade item that combines organization with creativity.
2. Materials and Tools Needed
Before beginning the Tutorial: Kids’ Boxy Pencil Case, gathering the necessary materials will help ensure a smooth sewing process.
Cotton quilting fabric is the most common choice for this project because it is durable and easy to work with.
You will need fabric for the exterior of the pencil case as well as fabric for the lining.
Light batting or interfacing is often used to give the Kids’ Boxy Pencil Case its structured shape and soft padding.
A zipper is an essential component that allows the case to open and close securely.
Basic sewing supplies such as thread, scissors, pins, and a sewing machine are also required.
A rotary cutter, ruler, and cutting mat can make fabric cutting more precise and efficient.
Once these materials are prepared, you are ready to start assembling the Kids’ Boxy Pencil Case.
3. Step-by-Step Construction of the Pencil Case
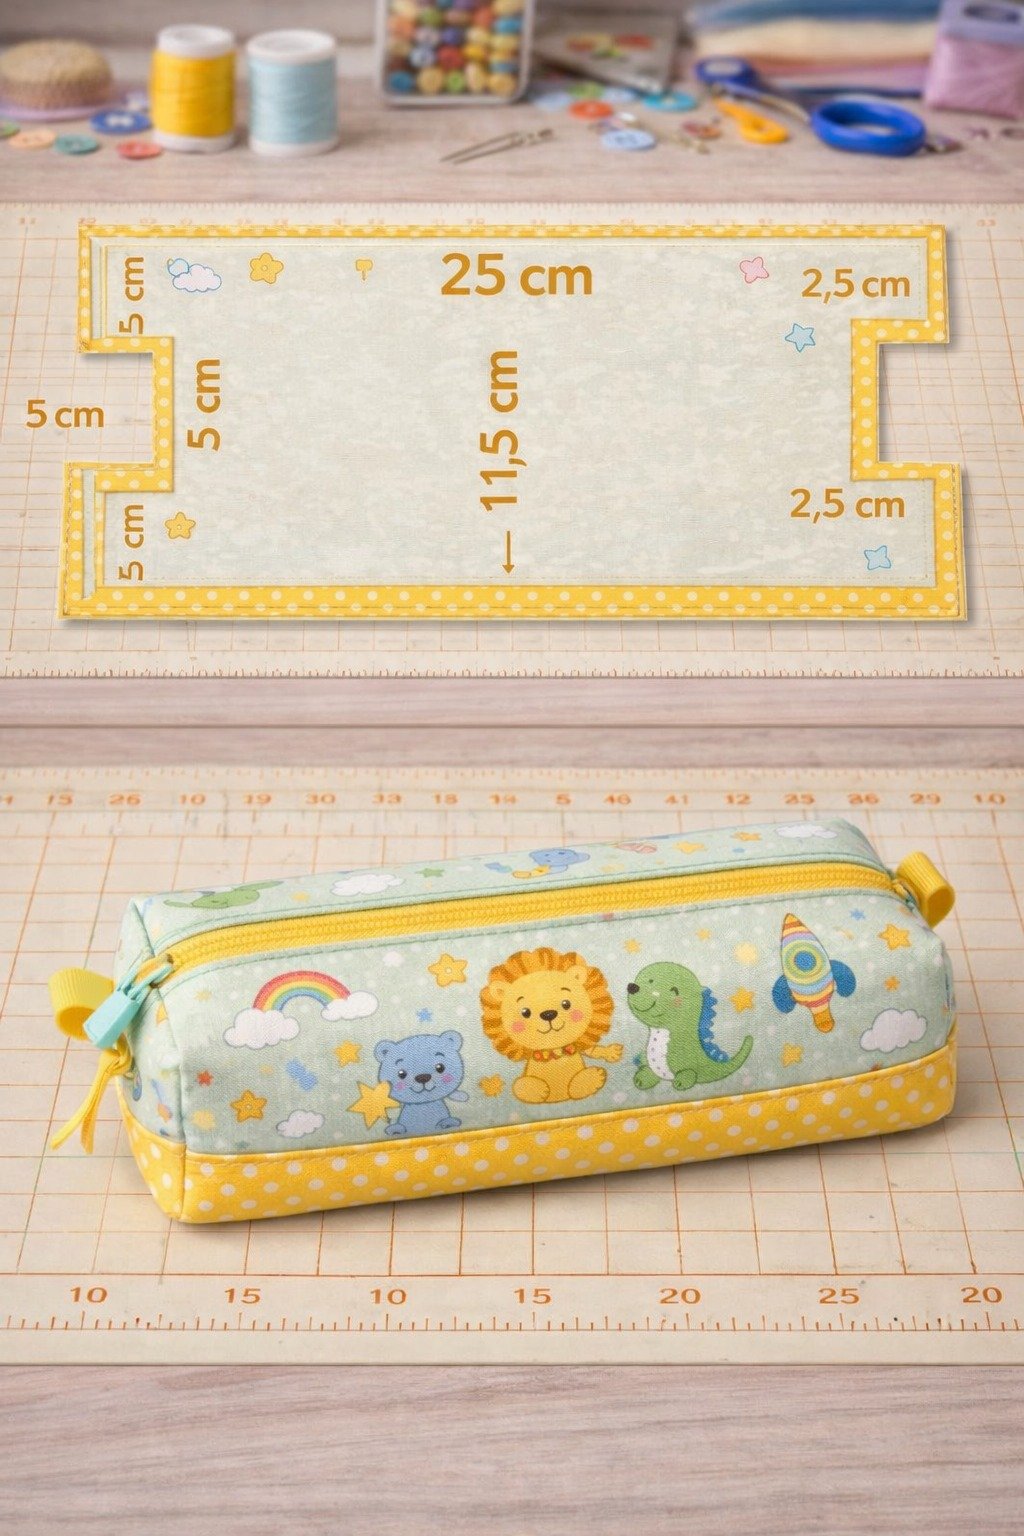
The construction process for the Tutorial: Kids’ Boxy Pencil Case begins with cutting the fabric pieces for the outer panel, lining, and batting.
The exterior fabric is often quilted together with the batting to create texture and additional durability. Simple quilting lines or decorative stitching can add visual interest to the design.
After quilting the exterior piece, the zipper is sewn along the top edges of the fabric panels. This step requires careful alignment to ensure the zipper opens smoothly.
Once the zipper is attached, the fabric pieces are sewn together to form the body of the pencil case.
The signature boxy shape of the Kids’ Boxy Pencil Case is created by sewing small boxed corners at the bottom of the pouch. This technique adds depth and allows the case to stand upright.
After stitching the corners, the case is turned right side out and the lining is adjusted neatly inside.
Following the steps in the Kids’ Boxy Pencil Case Tutorial results in a sturdy and attractive pencil pouch ready for everyday use.
4. Finishing Touches and Creative Variations
The final stage of the Tutorial: Kids’ Boxy Pencil Case focuses on finishing details that enhance both durability and style.
Loose threads should be trimmed and seams checked to ensure the case is strong and secure.
Some quilters like to add decorative elements such as fabric labels, embroidery, or appliqué designs to personalize the pencil case.
Colorful zipper pulls or decorative zipper tabs can also add a playful touch to the Kids’ Boxy Pencil Case.
Different fabric combinations can completely transform the look of the case. Bright prints are great for children, while neutral fabrics create a more modern style.
This project can also be adapted into other storage solutions such as makeup pouches, craft organizers, or travel accessories.
With these creative touches, the Kids’ Boxy Pencil Case becomes a beautiful and useful handmade item.
FAQ – Kids’ Boxy Pencil Case
Is the Kids’ Boxy Pencil Case suitable for beginners?
Yes. The Tutorial: Kids’ Boxy Pencil Case uses simple sewing techniques and is considered a beginner-friendly quilting project.
What type of fabric works best for this project?
Cotton quilting fabric is the most common choice because it is durable and easy to sew.
Do I need batting or interfacing?
Using batting or interfacing helps give the Kids’ Boxy Pencil Case structure and a slightly padded feel.
Can I make the pencil case larger?
Yes. The size can easily be adjusted by cutting larger fabric pieces.
Is this project good for gifts?
Absolutely. A handmade Kids’ Boxy Pencil Case makes a thoughtful and practical gift for students or artists.
Can this pattern be used for other pouches?
Yes. The same boxy design can be adapted to create cosmetic bags, travel organizers, or craft storage pouches.
Conclusion
The Tutorial: Kids’ Boxy Pencil Case is a fun and functional quilting project that combines creativity with everyday practicality. By following this guide, quilters can create a sturdy and colorful pencil case that keeps school supplies organized while showcasing beautiful handmade craftsmanship.
Throughout this tutorial, we explored the inspiration behind the project, the materials required to begin, the steps involved in constructing the pencil case, and the finishing touches that make the design unique.
Making a Kids’ Boxy Pencil Case is a rewarding way to practice quilting skills while creating something useful for daily life.
Now we would love to hear from you. What did you think about the Tutorial: Kids’ Boxy Pencil Case? Share your honest opinion and any suggestions you may have. Your feedback helps inspire new ideas and strengthens the quilting community.

