If you’ve ever admired cozy handmade décor, then Learn to make fabric house decorations step by step! is the perfect project to spark your creativity. These charming little fabric houses are the ideal combination of homey, whimsical, and personalized style. Whether used as ornaments, pincushions, shelf décor, or even gifts, fabric house decorations are a fun way to bring a handmade touch into your home.
Creating your own fabric house allows you to repurpose fabric scraps, experiment with textures, and add meaningful details — like embroidered doors or window shapes that resemble your own home. And because the design is easy to customize, it’s a great craft for both beginners and experienced makers.
In this guide, you’ll learn to make fabric house decorations step by step! We’ll cover everything from material selection to assembly, with creative tips along the way. Whether you’re stitching one house or building a whole handmade village, this tutorial is sure to inspire.
1. Gathering Materials and Tools for Your Fabric House
Before diving into the crafting process, it’s essential to gather the materials needed to make fabric house decorations step by step. Choosing the right supplies will not only improve the quality of your finished pieces but also make the process smoother.
SEE OTHER FACE PATTERNS HERE!
You’ll need a selection of cotton fabric — solids, florals, stripes, or any prints that complement your theme. Using quilting cotton or linen provides structure and is easy to sew by machine or hand.
In addition to fabric, you’ll need fusible interfacing or batting to give the house body a firmer feel. This ensures the walls of your fabric house don’t collapse after stuffing.
Stuffing material such as polyester fiberfill, crushed walnut shells (for weight), or fabric scraps can be used to give shape to your house. The choice depends on the final use — pincushions need stability, while hanging ornaments can be lighter.
Basic sewing tools include needle and thread (or a sewing machine), fabric scissors, pins, fabric glue, and an iron. A ruler or template is helpful for precise cutting, especially when making multiple houses.
Decorative extras add personality to each creation. Think buttons for doorknobs, felt for roof tiles, lace for window curtains, and embroidery floss for stitched details.
Finally, prepare a work surface that’s well-lit and organized. Having your tools within reach will make the creative process more enjoyable and efficient.
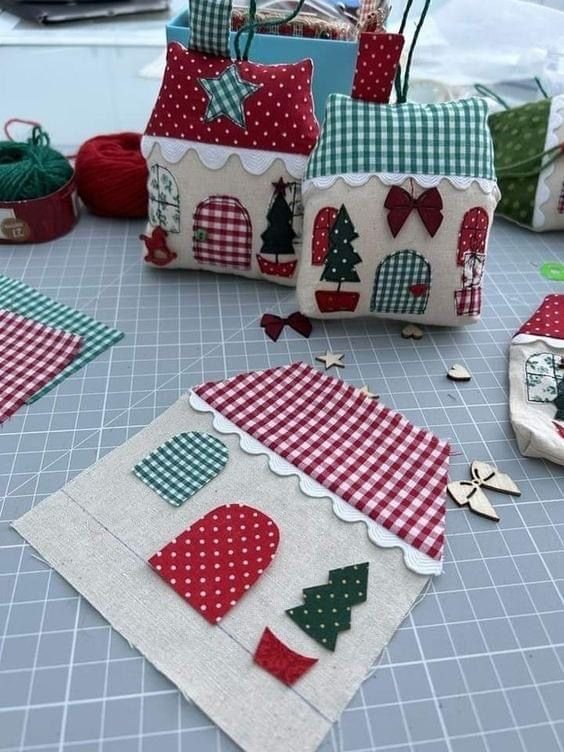
2. Cutting and Preparing the Fabric House Pieces
Now that your materials are ready, it’s time to start the process of cutting and shaping your design. The key to a beautiful final piece is accurate measuring and preparation in this stage.
Begin by choosing the size of your house. Most fabric houses are small enough to fit in your hand, but you can scale the template up or down as needed. Use a basic shape with a rectangular body and a triangular or trapezoidal roof.
Trace and cut your house body from fabric — you’ll need two identical pieces for the front and back. If using interfacing, cut it slightly smaller and iron it onto the wrong side of each fabric piece.
Cut additional pieces for the roof, which can be made from a contrasting fabric. Use curved edges for a whimsical look or keep it clean and geometric for a minimalist style.
To add doors and windows, cut tiny fabric shapes or felt pieces and attach them using appliqué, glue, or hand-stitching. This is where creativity shines — embroidery can be used for windowpanes, plants, or even house numbers.
Optional embellishments like ribbons, beads, lace, or trims can be sewn onto the body at this point. It’s easier to decorate before assembling the house than after it’s stuffed.
Lastly, consider adding a loop or ribbon to the top if you plan to hang your house as an ornament. Sew it securely into the top seam when assembling the front and back panels.
3. Sewing and Assembling Your Fabric House Decoration
With your pieces prepared, it’s time to bring your fabric house to life. This step involves sewing the body, adding the roof, and stuffing the house with care and precision.
Place the front and back panels right sides together and pin them in place. Sew around the edges using a 1/4″ seam allowance, leaving a small opening at the bottom or side to turn the piece right side out.
After sewing, clip the corners and carefully turn the house right side out. Use a blunt tool, like a chopstick or the end of a pencil, to push out the corners and shape the roof peak.
Stuff the house with polyfill or your chosen filling, making sure it’s firm but not overly tight. Distribute the stuffing evenly to maintain the house’s shape without distorting the seams.
Once stuffed, hand-sew the opening closed using a ladder stitch or invisible seam technique. Make sure the closure is secure and neat for a polished finish.
Attach the roof piece if it hasn’t been integrated yet. This can be sewn or glued on top, depending on your desired aesthetic. You can quilt the roof for extra texture or add felt shingles for a cottage look.
Give your finished house a final press with an iron (if safe for your materials), and inspect for loose threads or uneven edges. Small touches like embroidery or miniature buttons can be added even after assembly.
4. Decorating, Displaying, and Gifting Your Fabric Houses
Now that your fabric house is complete, it’s time to have fun decorating and deciding how you want to display or share your work. This is where your creativity can shine brightest.
Use your fabric houses as ornaments by attaching them to a holiday tree, a wall hanging, or a garland. Their soft shape and cheerful look add charm to any corner of the home.
You can also display them on shelves or mantels as part of seasonal décor. Combine multiple houses of varying sizes to create a cozy handmade village.
Another popular use is as a pincushion. The soft yet structured body is ideal for storing pins and needles, and the house shape makes it a delightful tool for your sewing space.
Fabric houses make thoughtful handmade gifts for housewarmings, baby showers, or birthdays. Personalize the design with initials, birth dates, or a door that matches the recipient’s actual home.
Get creative and use them as sachet holders by adding dried lavender or scented pellets before closing the seam. These make beautiful additions to linen drawers or closets.
For kids, fabric houses can become part of imaginative play. Add small animal or doll figures to turn the soft houses into props for storytelling and fun.
🌟Join our exclusive Quilt broadcast list on Messenger! Receive the best patterns, tips, and updates directly in your inbox. Our team is ready to send you delightful content that will inspire your projects. Don’t miss this opportunity to stay updated and create amazing pieces. Join now and be part of this passionate quilt community!✨📩
Frequently Asked Questions (FAQ)
Can beginners make fabric house decorations?
Yes! This is a great beginner project. Basic sewing skills, such as straight stitching and simple appliqué, are all you need. Even hand-sewing works well if you don’t use a machine.
What kind of fabric is best for this project?
Quilting cotton or linen is ideal due to its structure and ease of sewing. However, you can experiment with felt, canvas, or even denim for different textures.
Do I need a sewing machine to make these houses?
No. While a machine speeds up the process, you can hand-sew all the components with a needle and thread. This gives a charming handmade look.
Can I wash fabric house decorations?
If they are made with washable materials and sewn securely, yes. However, decorative embellishments or scented fillings like lavender may not hold up well to washing.
What sizes work best for these decorations?
Small to medium sizes are ideal — anywhere from 4″ to 8″ tall. You can scale the pattern up or down based on use, from ornaments to soft toys or shelf accents.
Are fabric houses safe for children?
Yes, if made without small parts like beads or buttons that can be a choking hazard. Embroidered features are safer alternatives for kids’ items.
Conclusion
We hope you’ve enjoyed this complete guide on how to learn to make fabric house decorations step by step! From choosing your fabrics to stitching charming details, this project offers a perfect mix of creativity and function. Whether you’re making one house or building a whole handmade neighborhood, the possibilities are endless.
These decorations bring warmth to your home and joy to those who receive them. So grab your fabric scraps, thread your needle, and let your imagination build something beautiful.
If this tutorial helped you, please share your honest opinion and let us know how your own fabric house project turned out — we’d love your suggestions and feedback!


