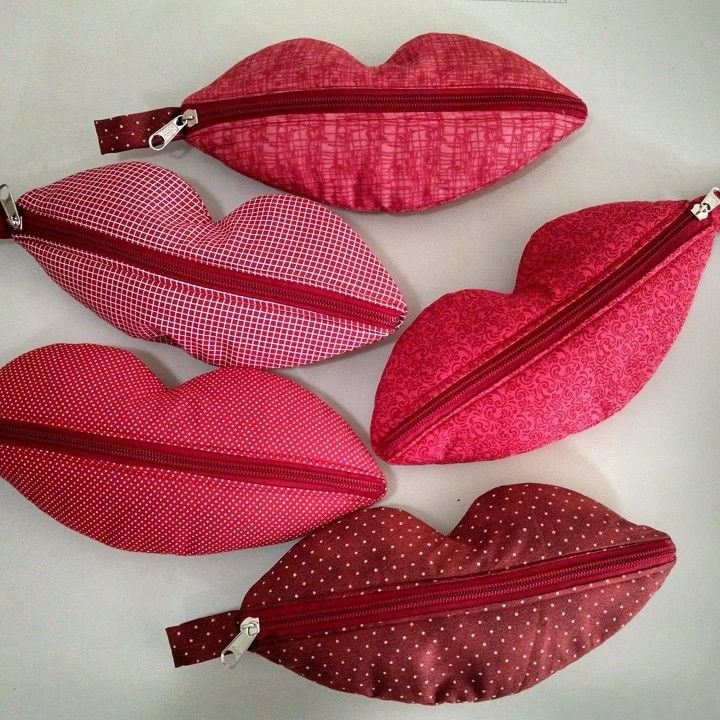
The MAKEUP BAG in the Shape of a MOUTH – TUTORIAL is a creative and playful quilting project that combines function and humor in one unique design. This bag, shaped like a smiling mouth, is perfect for storing makeup, beauty tools, or even small accessories. Whether you love sewing, quilting, or simply enjoy handmade crafts, this tutorial offers an exciting way to bring personality and creativity into your daily routine. With its fun design and practical purpose, it’s the perfect gift idea or a delightful project for yourself.
What makes this project truly special is how it merges quilting techniques with modern sewing creativity. The MAKEUP BAG in the Shape of a MOUTH stands out with its bold design, making it an instant conversation piece wherever you go. You can use bright reds for a classic lipstick look or experiment with patterned fabrics to give your bag a quirky, customized flair. It’s also a great way to use up fabric scraps from previous quilting projects, turning leftover materials into something fashionable and functional.
Handcrafted items like this not only express individuality but also promote sustainability. By making your own MAKEUP BAG in the Shape of a MOUTH, you reduce waste and create something made to last. Plus, the process of quilting and sewing this playful piece is relaxing and rewarding—a perfect balance of creativity and practicality.
1. Materials and Preparation for the Makeup Bag
Before starting your MAKEUP BAG in the Shape of a MOUTH – TUTORIAL, make sure you have all your materials ready. You’ll need cotton fabric for the outer layer, coordinating fabric for the lining, quilt batting for structure, a zipper, matching thread, and basic sewing tools like pins, scissors, and an iron.
SEE OTHER FACE PATTERNS HERE!
Choose high-quality quilting cotton for durability and ease of sewing. The fabric’s stiffness helps the bag hold its shape, especially when combined with batting or interfacing. For the inside lining, you can use a soft or waterproof fabric to make the bag easy to clean.
When selecting colors, think about the overall design. Red or pink fabric will give the “mouth” a realistic appearance, while white or cream fabric can represent teeth. You can even use black fabric around the edges to make the lips stand out more. For a more playful look, mix textures or add prints that represent personality—such as polka dots, florals, or metallic accents.
Cut two main fabric pieces for the lips, one for the top and one for the bottom. Then, cut matching batting and lining pieces. If you’d like to add an embroidered smile line or teeth, mark the design on your top piece before quilting.
Make sure to press your fabrics well before assembling. A wrinkle-free surface ensures accurate stitching and neat results. Organizing your workspace with all materials at hand will make the quilting and sewing process much smoother.
2. Quilting and Assembling the Lip-Shaped Panels
To start your MAKEUP BAG in the Shape of a MOUTH, layer your outer fabric, batting, and lining fabric together, forming a quilt sandwich. Pin or clip the edges to keep the layers from shifting.
You can choose to quilt the outer fabric using simple lines or follow the natural curves of the lip shape for a more realistic texture. Free-motion quilting works beautifully for this design, allowing you to trace organic lines and shapes that mimic the contours of lips.
Once the quilting is done, trim the excess batting and lining to match the outer layer. Make sure the edges are clean and even. If you’re adding decorative stitching or embroidery details, now is the best time to do so. You might outline the lips, add a small highlight line, or even stitch in a fun phrase like “Kiss & Makeup.”
Next, attach the zipper between the upper and lower lip panels. Place the zipper face down on the right side of one fabric piece, align it properly, and sew it in place. Repeat with the other lip piece. Once the zipper is attached, press the fabric away from the zipper teeth to keep the area flat.
After installing the zipper, place the lip panels right sides together and sew around the outer edge, leaving the zipper partially open. This will allow you to turn the bag inside out once sewing is complete. Clip the curves carefully to help the bag maintain its rounded lip shape.
Turn the bag right side out and press it gently. You’ll see your unique MAKEUP BAG in the Shape of a MOUTH starting to come to life, with its playful lip outline taking shape beautifully.
3. Adding Details and Finishing Touches
At this stage, your MAKEUP BAG in the Shape of a MOUTH is almost complete. The fun part now is adding finishing details that bring character and polish to your creation.
Start by topstitching around the zipper to give it a clean and professional finish. This not only enhances the appearance but also strengthens the seam. If your bag looks slightly flat, you can add light quilting around the lip edges to emphasize the contours.
For extra flair, consider adding embellishments. You can sew on beads, sequins, or embroidery to create the illusion of shiny lip gloss or to highlight the lip lines. A small tassel or charm on the zipper pull can also make the bag look elegant and easy to open.
If you want your bag to stand on its own, you can insert a lightweight stabilizer or fusible interfacing between the layers. This will give your MAKEUP BAG in the Shape of a MOUTH a firm structure, ideal for holding makeup brushes, lipsticks, and other essentials.
After completing all details, give your bag a final press with a warm iron, being careful around the zipper area. This step helps define the shape and smooth out any creases.
When finished, step back and admire your work. Each stitch represents creativity, care, and joy—your quilted lip-shaped makeup bag is not just a functional accessory but also a piece of art that reflects your personality.
4. Creative Uses and Gift Ideas for the Lip-Shaped Makeup Bag
The MAKEUP BAG in the Shape of a MOUTH is not only stylish but also incredibly versatile. You can use it to store your makeup, jewelry, sewing tools, or other small items. It’s perfect for travel, fitting neatly into handbags or suitcases.
If you enjoy making handmade gifts, this bag is a fun and thoughtful option. You can create one in classic red for a friend who loves makeup or choose bold patterns for someone with a quirky fashion sense. Add a personalized touch by stitching their name or initials on the back.
You can also experiment with different fabrics to change the theme. Use metallic or velvet fabrics for a glamorous look, denim for a casual vibe, or even patchwork pieces for an artistic twist. Each variation tells its own story and makes the project even more enjoyable.
Another creative idea is to pair this lip-shaped bag with other handmade beauty accessories, such as a small mirror pouch or a mini brush holder, all quilted in matching fabrics. This turns your sewing project into a complete, cohesive gift set.
Selling handmade lip-shaped makeup bags at craft fairs or online platforms is also a great way to share your creativity with others. They’re eye-catching, unique, and practical—qualities that make them popular among handmade buyers.
Above all, crafting this project is about expressing joy and individuality. Each MAKEUP BAG in the Shape of a MOUTH you make becomes a symbol of artistry and humor—a reminder that handmade crafts can be both practical and playful.
FAQ
Q: Is the MAKEUP BAG in the Shape of a MOUTH suitable for beginners?
A: Yes! The tutorial is simple enough for beginners, especially those familiar with basic sewing and quilting techniques.
Q: What type of fabric is best for this project?
A: Quilting cotton works great, but you can also use velvet, satin, or denim for different textures.
Q: How do I ensure the bag keeps its shape?
A: Use fusible interfacing or quilt batting to give the bag more structure and stability.
Q: Can I wash the bag?
A: Yes, hand wash gently with cold water and let it air dry to maintain its shape.
Q: Can I resize the pattern?
A: Absolutely. You can adjust the size of the template to make smaller pouches or larger storage bags.
Conclusion
The MAKEUP BAG in the Shape of a MOUTH – TUTORIAL is a delightful way to mix creativity, quilting, and practical design. From selecting the perfect fabrics to adding the final decorative stitches, each step invites you to express your artistic side.
PATTERN HERE:
This fun and functional project not only results in a beautiful handmade accessory but also offers the joy of creating something unique with your own hands. Try making one today, share your experience, and don’t forget to leave a comment with your thoughts and suggestions!

