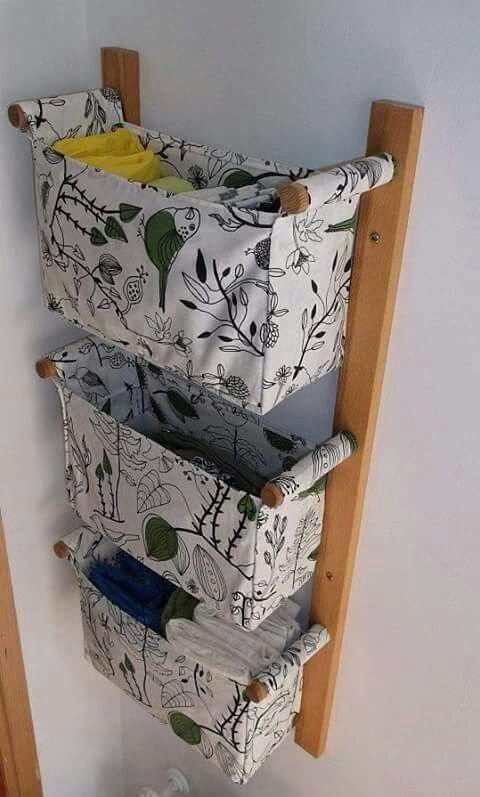
Multipurpose Wall Organizer – TUTORIAL is a practical and creative quilting project designed to help you keep your space organized while adding a decorative handmade touch to your home. By following the Multipurpose Wall Organizer – TUTORIAL, you can create a functional piece that stores everyday items in an efficient and visually appealing way.
One of the biggest advantages of the Multipurpose Wall Organizer – TUTORIAL is its adaptability. You can customize the size, layout, and number of pockets to suit your needs, whether it’s for storing mail, sewing tools, accessories, or office supplies. This makes it a versatile project for any room in the house.
In this complete Multipurpose Wall Organizer – TUTORIAL, you will learn how to select materials, prepare and cut fabric, assemble the organizer, and add final details. This project is suitable for beginners and experienced quilters alike, offering both functionality and creative expression.
1. Materials Needed for Multipurpose Wall Organizer
The first step in the Multipurpose Wall Organizer – TUTORIAL is gathering all the necessary materials to ensure a smooth workflow.
DISCOVER MORE FREE PATTERNS HERE!
Cotton fabric is a popular choice because it is easy to sew and available in many patterns.
Heavier fabrics like canvas can be used for added durability and structure.
Batting or interfacing is essential in the Multipurpose Wall Organizer – TUTORIAL to provide support and help the organizer maintain its shape.
Basic tools such as scissors, pins, thread, and a sewing machine are required.
A ruler or measuring tape ensures accurate dimensions and alignment.
An iron is important for pressing seams and achieving a polished finish.
2. Cutting and Preparing the Fabric
Preparation plays a crucial role in the success of the Multipurpose Wall Organizer – TUTORIAL, ensuring all components are ready for assembly.
Start by determining the desired size based on where you plan to hang the organizer.
Cut the main panel fabric according to your measurements.
Prepare separate pieces for pockets, making sure they are evenly sized.
In the Multipurpose Wall Organizer – TUTORIAL, consistent cutting leads to a cleaner final result.
Press all fabric pieces to remove wrinkles and create crisp edges.
Mark the placement of pockets on the main panel before sewing.
3. Assembling and Sewing the Organizer
The next step in the Multipurpose Wall Organizer – TUTORIAL is assembling all the elements into a functional piece.
Begin by hemming the edges of each pocket to give them a finished look.
Position the pockets on the main panel according to your design.
Secure the pockets with pins to keep them in place while sewing.
In the Multipurpose Wall Organizer – TUTORIAL, strong stitching is important for durability.
Sew the pockets onto the panel, reinforcing stress points such as corners.
Add a hanging system, such as loops, ties, or a rod sleeve at the top.
4. Finishing and Customizing Your Organizer
The final stage of the Multipurpose Wall Organizer – TUTORIAL focuses on finishing touches and personalization.
Trim excess threads and press the entire organizer for a neat appearance.
Topstitch around the edges to strengthen the structure and enhance durability.
You can decorate the organizer with embroidery, appliqué, or labels.
In the Multipurpose Wall Organizer – TUTORIAL, customization allows you to match your home décor.
Consider adding pockets of different sizes for better organization.
Once completed, your wall organizer is ready to use.
FAQ – Multipurpose Wall Organizer – TUTORIAL
Is this project suitable for beginners?
Yes, the Multipurpose Wall Organizer – TUTORIAL is beginner-friendly and uses basic sewing techniques.
What fabric is best?
Cotton or canvas fabric works well for durability and ease of handling.
Can I change the size?
Yes, the organizer can be customized to fit any space.
How long does it take to complete?
Most organizers can be finished within a few hours.
Do I need interfacing?
Interfacing is recommended to provide structure and stability.
Can I add more pockets?
Absolutely, you can design the organizer with as many pockets as needed.
Conclusion
The Multipurpose Wall Organizer – TUTORIAL is a highly practical and rewarding quilting project that helps keep your space tidy while adding a handmade decorative element. It is perfect for organizing daily essentials in a stylish and efficient way.
In this tutorial, you learned how to choose materials, prepare and cut fabric, assemble the organizer, and add finishing details. Each step contributes to creating a durable and functional piece.
Projects like the Multipurpose Wall Organizer – TUTORIAL demonstrate how quilting can go beyond decoration and provide real-life solutions for organization and storage.
PATTERN HERE:
If you enjoyed this tutorial, feel free to leave your honest opinion and share your suggestions. Your feedback helps inspire more creative quilting and sewing ideas.