The Pascal the Pup – PATTERN is a delightful quilt project that blends creativity, charm, and accessible techniques to create an adorable dog-themed block or full quilt layout. Whether you are an experienced quilter or someone discovering the beauty of textile art, this pattern offers an enjoyable opportunity to craft something expressive and heartwarming. The playful design inspired by Pascal the Pup makes any quilt stand out, especially when used for baby quilts, decorative pillows, wall hangings, or themed blankets.
Starting the Pascal the Pup – PATTERN opens the door to experimenting with fabric textures, color contrasts, and patchwork precision. Its friendly appearance adds joy to any quilt project, making it ideal for pet lovers and anyone who enjoys whimsical sewing projects. The combination of straight seams and simple angles makes the construction achievable for beginners, while experienced quilters can enhance it with creative embellishments or advanced stitching.
One of the most appealing aspects of the Pascal the Pup – PATTERN is its versatility. You can adapt the design to different sizes, expand it into a larger quilt, or make small single blocks for accessories. The joyful pup design can be customized through fabric choices, eye details, and even added embroidery. It is a pattern that encourages creativity, making each finished Pascal truly unique and full of personal character.
1. Understanding the Pascal the Pup – PATTERN
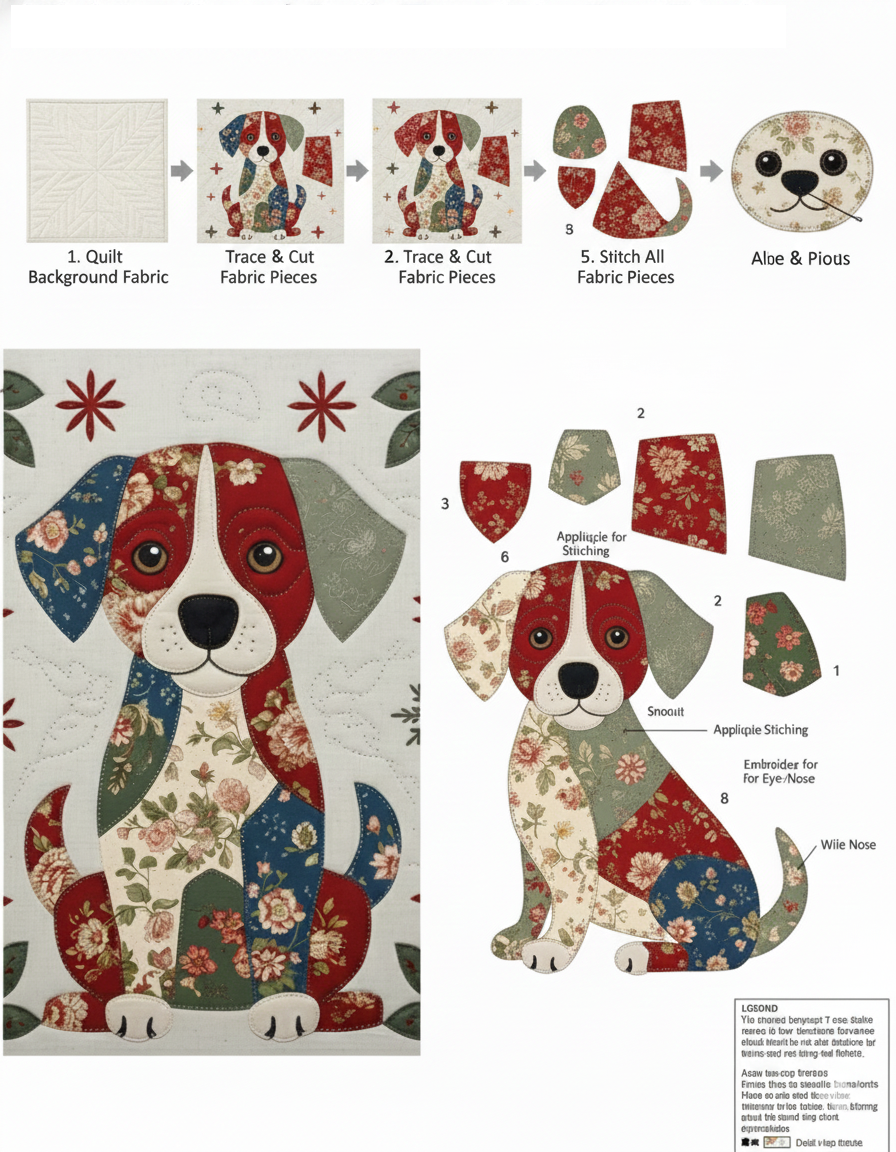
The Pascal the Pup – PATTERN is structured to help quilters build an expressive puppy motif through well-planned patchwork sections. The design typically begins with a series of square and rectangular pieces that come together to form Pascal’s face, ears, snout, and body. This block-based assembly approach makes the project perfect for quilters who enjoy organized, step-by-step building.
SEE OTHER FACE PATTERNS HERE!
One highlight of this pattern is the use of contrast fabrics. The combination of a main fabric with lighter or darker tones helps accentuate Pascal’s features, giving greater depth to the face and making the pup appear more animated. Selecting fabrics with subtle textures can also enrich the final look, giving the impression of fur or shading.
Even though the pattern is approachable, precise cutting is important. Quilters are encouraged to use a rotary cutter, cutting mat, and clear ruler to ensure crisp, accurate fabric pieces. This attention to detail helps each element align perfectly, ensuring Pascal’s face looks balanced and expressive.
Color customization is one of the creative freedoms of this pattern. From classic brown and tan puppy tones to bold, colorful interpretations, Pascal can take on many personalities. You can even use scrap fabrics for a patchwork look, making the pup block lively and unique.
The block can be completed as a single feature piece or repeated multiple times to build a dog-themed quilt. Many quilters enjoy combining different color variations of Pascal into a joyful collection of playful pups. This versatility is one of the reasons the pattern is beloved.
Finally, the Pascal the Pup – PATTERN teaches important quilting skills such as edge alignment, pressing for precision, and clean seam construction. These techniques not only enhance the final look but also build confidence for future quilting projects.
2. Materials Needed for the Pascal the Pup – PATTERN
Creating the Pascal the Pup – PATTERN requires a selection of fabrics that allow the pup’s features to stand out clearly. Quilters typically choose three to five coordinating fabrics: one for the main face and body, one for the ears or accents, one for the background, and optional pieces for details like the nose or inner ears. Pre-cut fabrics such as fat quarters are often sufficient for crafting several blocks.
Using high-quality cotton fabric ensures smooth piecing, durability, and crisp seams. Cotton also presses well, which is essential for assembling the different sections of Pascal’s face. Choose fabrics with subtle prints if you want a textured look without overwhelming the design.
Basic quilting tools are necessary for the project. A rotary cutter ensures clean and precise cuts, while a cutting mat provides stability during preparation. A clear acrylic ruler helps measure and align each fabric piece exactly as the pattern specifies.
A sewing machine is recommended for efficient construction, but hand-sewing enthusiasts can also complete the project at a slower pace. Use a standard 1/4-inch quilting seam allowance for consistency throughout the block. A seam guide or presser foot designed for quilting can make the process easier.
You will also need an iron and ironing board. Pressing your seams after each step keeps the block flat and well-aligned. This prevents warping or uneven edges and helps Pascal’s facial features stay proportional.
For finishing touches, small embellishments can be added, such as embroidered eyes, appliqué details, or decorative quilting stitches. These optional materials are not required but add personality and charm to the final piece.
3. Step-by-Step Guide to Making the Pascal the Pup – PATTERN
To begin building the Pascal the Pup – PATTERN, start by cutting all fabric pieces according to the measurements provided in the design instructions. Organize your pieces into piles such as ears, background, snout, body, and facial accents to make the process easier and more enjoyable. Clear organization helps maintain accuracy during assembly.
The block is typically assembled from the top down, beginning with Pascal’s ears. These pieces often include corner triangles or simple half-square triangles. Precise alignment in this stage helps create the recognizable shape of Pascal’s adorable puppy ears.
Next, you will work on the face section. This is where the puppy’s personality truly begins to emerge. Small squares and rectangles come together to form the eyes, snout, and top of the head. Careful pressing between each seam ensures that the face stays neat and symmetrical.
The snout is usually assembled separately and then attached to the face block. This small detail adds depth and gives Pascal a sweet, expressive appearance. Use a slightly darker or lighter fabric for the snout to create contrast and enhance the facial structure.
After completing the face and ears, you will join these sections together with the background fabric. This helps frame the pup and allows it to stand out clearly once added to a larger quilt or decorative item. Keep your seams straight and press gently to avoid distorting the block.
The final step involves assembling the lower body or neck section depending on the version of the Pascal the Pup – PATTERN you are using. Once all sections are joined, square the block using a ruler to ensure it is the appropriate size. A clean, squared block is essential for quilting accuracy.
Once Pascal’s block is finished, you can incorporate it into various projects. Whether added to a baby quilt, pillow cover, wall hanging, or tote bag, the finished design adds warmth and charm to any handmade creation.
4. Creative Ideas to Personalize the Pascal the Pup – PATTERN
One of the great joys of working with the Pascal the Pup – PATTERN is the endless opportunity for customization. By selecting unique fabrics, you can completely change Pascal’s appearance, giving the puppy block a personality that reflects your creativity and style. Playful polka dots, subtle textures, or even bold prints can make each Pascal look delightfully different.
Adding embroidery is a popular way to enhance the block. You can stitch whiskers, eyebrows, or even add highlights to the eyes. These small details bring the character to life and give it a more expressive look.
If you enjoy appliqué, you can supplement the patchwork design with small fabric pieces such as a collar, a bow, or a tiny bandana. These added elements make the quilt block even more fun and help create themed versions of Pascal for different occasions.
For quilters who love color, consider making multiple Pascal blocks in different shades. A quilt filled with multicolored pups is cheerful, lively, and perfect for gifting. It’s also a great way to use leftover scrap fabrics in a meaningful way.
Background fabrics also offer room for experimentation. A soft pastel background gives the design a cozy look, while a dark or patterned background can create dramatic contrast. Matching the background to your intended project helps the block blend seamlessly into the full design.
Finally, your quilting style can personalize the block even further. Free-motion quilting, echo stitching, or simple straight-line quilting all add texture that enhances Pascal’s features. Each technique creates a unique finish, making your project stand out.
FAQ – Pascal the Pup – PATTERN
1. Is the Pascal the Pup – PATTERN suitable for beginners?
Yes, this pattern is very beginner-friendly, especially because it uses basic patchwork techniques.
2. How long does it take to finish one block?
Most quilters can complete a block in 1 to 2 hours depending on experience.
3. Do I need a sewing machine?
A sewing machine makes the process faster, but hand-sewing is also possible with patience.
4. What fabric is best for this pattern?
100% cotton quilting fabric provides durability and crisp seams.
5. Can I use scraps instead of full fabric pieces?
Absolutely. This pattern works beautifully with scraps and leftover fabric.
6. Can I resize the block?
Yes, you can enlarge or reduce the block by adjusting the cutting measurements proportionally.
7. Is this pattern good for children’s quilts?
Yes, the playful puppy motif is ideal for baby quilts and kids’ bedroom décor.
Conclusion
The Pascal the Pup – PATTERN is a charming, versatile, and rewarding quilting project that brings warmth and creativity into every stitch. In this article, you learned how to choose materials, assemble the block step-by-step, and personalize your design with fun variations.
Whether you’re making a small decorative piece or building a full quilt, Pascal adds personality and joy to your craft. If this guide was helpful, please share your honest thoughts and let me know what other patterns you’d like to explore in future tutorials.