The Patchwork Cat Pillow – TUTORIAL is a wonderful sewing project that brings charm, comfort, and creativity into any home décor. Whether you’re a seasoned quilter or someone exploring the joy of fabric art for the first time, this tutorial offers an accessible and enjoyable way to create a decorative pillow shaped like an adorable cat. The combination of patchwork techniques and soft cushion assembly makes the Patchwork Cat Pillow – TUTORIAL both fun and rewarding for crafters of all levels.
Making your own patchwork pillow is more than just a sewing exercise—it’s a way to transform scraps of fabric into something meaningful. The cat-shaped design adds personality while allowing you to experiment with prints, textures, and colors. This project offers endless customization opportunities, making the Patchwork Cat Pillow – TUTORIAL perfect for gifts, nursery décor, pet-themed rooms, or simply a cozy addition to your couch or bed.
In this guide, you will learn every essential step: choosing fabrics, assembling patchwork blocks, shaping the cat outline, sewing the pillow body, and adding finishing touches like whiskers, eyes, and a tail. The Patchwork Cat Pillow – TUTORIAL is beginner-friendly, yet detailed enough to satisfy more experienced quilters. Let’s explore how you can create your very own patchwork cat pillow from start to finish.
1. Understanding the Patchwork Cat Pillow – TUTORIAL
A Patchwork Cat Pillow – TUTORIAL combines classic patchwork techniques with whimsical pillow design. The final result is a soft, cat-shaped cushion made from small squares or strips of fabric stitched together. It is a delightful craft project that blends artistry and comfort, making it popular among people who enjoy handmade home décor.
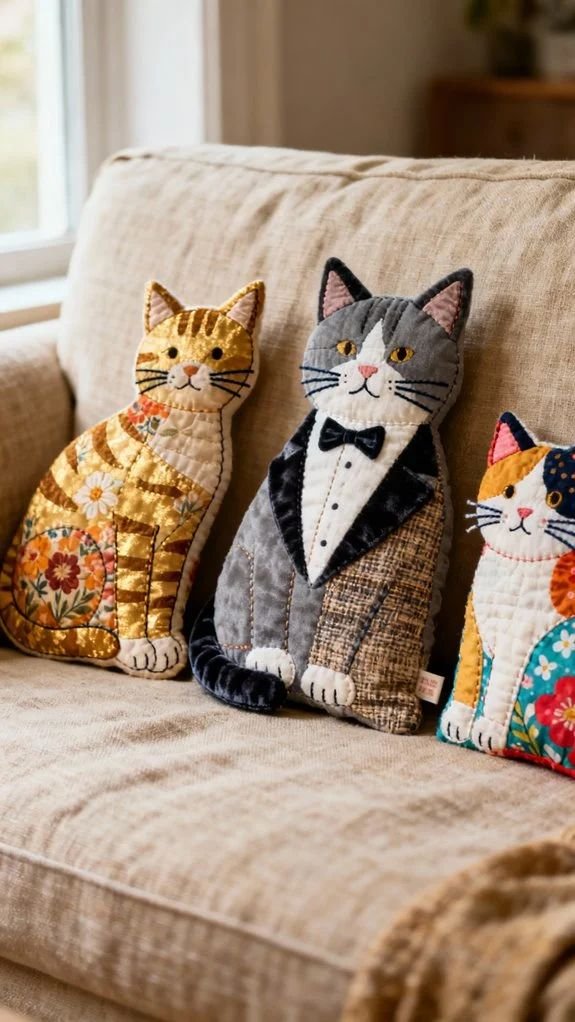
SEE OTHER FACE PATTERNS HERE!
The pillow typically features a cat silhouette, which can be simple or slightly detailed depending on your preference. Patchwork pieces are arranged to form the main body, while fabric additions or embroidery bring the facial features to life. The Patchwork Cat Pillow – TUTORIAL encourages creativity because each pillow looks unique based on fabric choices.
One significant aspect of this project is the personal connection it creates. Many sewists use fabrics that hold sentimental value—leftover pieces from previous quilts, children’s clothing, or special prints they’ve collected. This makes each pillow a keepsake.
Because the design is based on patchwork, this project helps improve your quilting skills. You practice cutting precise shapes, sewing accurate seam allowances, and combining colors effectively. The Patchwork Cat Pillow – TUTORIAL is also manageable in size, making it less overwhelming compared to large quilts.
This project is also great for home decoration. Cat-shaped pillows instantly add charm and appeal to any room. They work well in kids’ bedrooms, living rooms, reading nooks, or sewing studios. Their playful appearance makes them conversation starters.
Whether you want to relax with a soft handmade project or create a thoughtful gift for a cat lover, this pillow is an excellent choice. The Patchwork Cat Pillow – TUTORIAL teaches essential crafting skills while leaving room for personalization.
2. Materials Needed for the Patchwork Cat Pillow – TUTORIAL
Before starting the Patchwork Cat Pillow – TUTORIAL, gather all the necessary materials. You will need fabric in various prints and colors. Cotton quilting fabric is the most recommended due to its durability, crispness, and ease of handling. You can choose a color palette that matches your home décor, or go bold with vibrant patterns.
You will need a cutting mat, rotary cutter, and quilting ruler to achieve clean, precise cuts. Since patchwork relies on accuracy, these tools ensure your squares or strips align perfectly. Scissors are also essential for shaping curves and trimming threads.
Batting or fusible interfacing may be needed depending on how structured you want your pillow to be. Light batting adds softness and dimension, while interfacing stabilizes thin fabrics. Both materials contribute to the professional look of the finished pillow in the Patchwork Cat Pillow – TUTORIAL.
Pillow stuffing is a must. Polyester fiberfill is the most common choice because it is lightweight, hypoallergenic, and easy to shape. You can adjust the firmness of your pillow by adding more or less stuffing.
A sewing machine makes the project much faster, but it is possible to sew the pillow by hand. You will also need thread, pins or clips, and optionally embroidery floss for decorating your cat’s face.
Finally, print or draw a cat-shaped template for the pillow outline. Templates can be simple or detailed, depending on your preferred style. This shape will guide you as you assemble the Patchwork Cat Pillow – TUTORIAL.
3. Step-by-Step Guide to the Patchwork Cat Pillow – TUTORIAL
Start by cutting your fabric pieces into squares or strips according to the desired size of your pillow. Most patchwork cat pillows use uniform 2-inch or 2.5-inch squares, but you can adjust based on the final dimensions. Arrange your pieces in a pleasing layout before sewing so that your color placement looks intentional.
Sew your pieces together row by row, pressing seams as you go. Neat seams are essential to give your patchwork a smooth, professional finish. The base of your Patchwork Cat Pillow – TUTORIAL is created by assembling these blocks into a larger panel that will later take the shape of the cat.
Once your patchwork panel is ready, place your cat template over it and trace the outline. Cut carefully along the traced lines, making sure not to disturb the seams. This step transforms your square or rectangular patchwork fabric into a charming cat shape.
Cut a second piece of fabric for the back of the pillow using the same template. This ensures that both sides fit together perfectly. You may choose a solid fabric for the back, or continue the patchwork theme.
Pin the front and back pieces together with right sides facing in. Sew around the edges, leaving a small opening for stuffing. Carefully clip curves and corners so that the pillow lays smoothly when turned right side out.
Turn the pillow right side out and begin stuffing it evenly. The amount of stuffing determines how plush your Patchwork Cat Pillow – TUTORIAL feels. Once satisfied, sew the opening closed using a ladder stitch for an invisible finish. Add embroidered or appliqué features to give your cat personality.
4. Personalizing Your Patchwork Cat Pillow – TUTORIAL
Customization is one of the most enjoyable parts of the Patchwork Cat Pillow – TUTORIAL. You can create a pillow that reflects your personal taste or that of someone you are gifting it to. Each design can look completely different with minimal changes.
One way to personalize your pillow is through fabric selection. Choose floral prints for a whimsical look, geometric designs for a modern touch, or pastel colors for a soft and cozy feel. Cat lovers especially appreciate pillows made with themed prints like fishbones or paw patterns.
You can also customize the cat’s facial features. Embroider sleepy eyes, add button eyes, or use felt for a cute nose and whiskers. These small details give character and charm to your pillow.
Adding a tail is another fun option. Sew a small stuffed tail and attach it to the side or back of the pillow. This adds dimension and personality to the Patchwork Cat Pillow – TUTORIAL.
Consider adding accessories like bows, scarves, or tiny patches. These additions help the pillow match seasonal themes or interior décor styles. Accessories can be sewn or glued depending on your preference.
You can also scale the pattern up or down to create pillows of different sizes. Small versions are great for children or pets, while larger versions make lovely couch accents. The versatility of the Patchwork Cat Pillow – TUTORIAL means you can create a whole family of patchwork cats.
Finally, personalize the pillow by adding a name tag or embroidered initials. This makes the pillow extra special as a gift.
FAQ – Patchwork Cat Pillow – TUTORIAL
1. Is the Patchwork Cat Pillow beginner-friendly?
Yes. The project uses simple patchwork techniques suitable for beginners.
2. Can I use fabric scraps?
Absolutely. This pillow is perfect for using leftover fabric pieces.
3. What type of filling works best?
Polyester fiberfill is ideal for a soft and durable result.
4. Can I sew the pillow by hand?
Yes, although a sewing machine makes the process quicker.
5. How do I make the pillow more structured?
Use interfacing or add light batting to the patchwork panel.
6. Can I wash the finished pillow?
Yes, but wash gently and avoid harsh spinning cycles.
Conclusion
The Patchwork Cat Pillow – TUTORIAL is a fun and rewarding quilting project that brings creativity and comfort together in the most adorable way.
You learned how to choose fabrics, assemble patchwork, shape the pillow, and personalize every detail. I hope this guide inspires you to make your own patchwork cat pillow. Please leave your honest opinion and suggestions—I truly appreciate your feedback!

