The Patchwork Egg Holder Chicken – Tutorial is a creative quilting and sewing project that combines functionality with rustic charm. In this Patchwork Egg Holder Chicken – Tutorial, crafters learn how to create a chicken-shaped fabric holder designed to store and display eggs in a decorative and practical way.
Many quilters enjoy projects that serve both decorative and useful purposes. The Patchwork Egg Holder Chicken – Tutorial is a wonderful example of this, turning simple patchwork fabric pieces into a charming kitchen accessory. Whether placed on a kitchen counter, dining table, or farmhouse-style shelf, this project adds warmth and personality to the space.
Another reason the Patchwork Egg Holder Chicken – Tutorial is so popular is that it allows for endless creativity. Different fabric colors, prints, and patchwork combinations can transform each chicken into a unique handmade piece.
1. Understanding the Patchwork Egg Holder Chicken – Tutorial
The Patchwork Egg Holder Chicken – Tutorial is designed to guide quilters through the process of creating a chicken-shaped fabric structure with small pockets or sections for holding eggs.
DISCOVER MORE FREE PATTERNS HERE!
One of the most appealing aspects of the Patchwork Egg Holder Chicken – Tutorial is its farmhouse-inspired style. Chicken-themed décor is commonly associated with cozy kitchens and rustic country homes, making this project perfect for those who love that aesthetic.
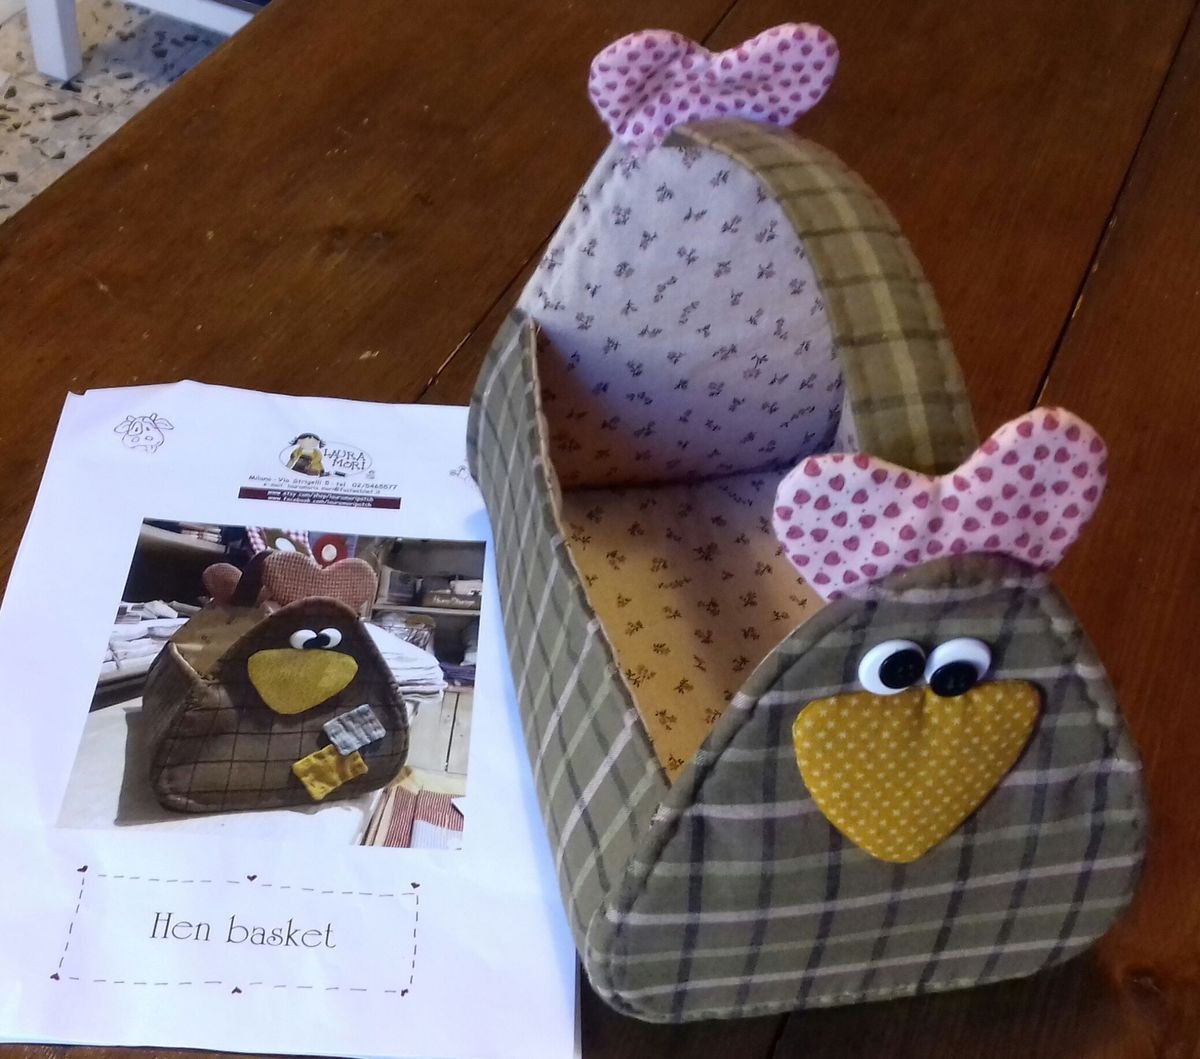
The design of the Patchwork Egg Holder Chicken – Tutorial usually includes a rounded body, wings, a tail, and a small head with a comb and beak. These elements work together to form the recognizable silhouette of a chicken.
The body of the chicken often contains quilted or padded sections that safely hold eggs in place. This makes the Patchwork Egg Holder Chicken – Tutorial both decorative and functional.
Many crafters enjoy making several versions of the Patchwork Egg Holder Chicken – Tutorial using different patchwork fabrics. This allows them to match seasonal decorations or create handmade gifts.
In addition, this project is a great opportunity to practice patchwork techniques while working on a smaller and manageable sewing project.
2. Materials and Tools for the Patchwork Egg Holder Chicken – Tutorial
Before starting the Patchwork Egg Holder Chicken – Tutorial, it is helpful to gather all the necessary materials and tools.
The primary material used in the Patchwork Egg Holder Chicken – Tutorial is cotton quilting fabric. This fabric is durable, easy to sew, and perfect for patchwork designs.
You will also need a variety of fabric pieces for the patchwork effect. Many crafters enjoy mixing floral prints, polka dots, gingham, or country-style fabrics to create a lively and colorful chicken design.
Batting or lightweight padding is often used in the Patchwork Egg Holder Chicken – Tutorial to give the chicken body structure and softness.
A rotary cutter, cutting mat, and quilting ruler are essential for cutting fabric pieces accurately.
You will also need basic sewing tools such as thread, pins or clips, scissors, and a sewing machine to assemble the project.
Some additional materials may include felt or fabric for the chicken comb and beak, as well as embroidery thread for decorative details.
Finally, optional decorative elements such as buttons or small appliqué shapes can add extra personality to the finished chicken.
3. Step-by-Step Overview of the Patchwork Egg Holder Chicken – Tutorial
The Patchwork Egg Holder Chicken – Tutorial typically begins with cutting the patchwork pieces that will form the body of the chicken.
These fabric pieces are arranged and sewn together to create a patchwork panel. In the Patchwork Egg Holder Chicken – Tutorial, this panel becomes the main body of the chicken.
Next, the body shape is cut from the patchwork panel using a template. The chicken’s wings, tail, and head pieces are also prepared at this stage.
The egg holder sections are then created. In many versions of the Patchwork Egg Holder Chicken – Tutorial, small quilted pockets or padded sections are sewn into the body to hold individual eggs securely.
After preparing the pockets, the chicken pieces are assembled and sewn together. Batting is inserted between the fabric layers to give the chicken a soft but sturdy shape.
The decorative elements such as the comb, beak, and eyes are added next. These details bring the Patchwork Egg Holder Chicken – Tutorial to life and give the project its playful character.
Finally, the seams are pressed and the chicken is gently shaped to complete the finished egg holder.
4. Creative Ideas for the Patchwork Egg Holder Chicken
One of the most enjoyable parts of the Patchwork Egg Holder Chicken – Tutorial is the opportunity to customize the design.
For example, you can choose bright farmhouse fabrics to create a colorful kitchen decoration.
Another idea is to use seasonal fabrics. Spring-themed prints, pastel colors, or floral patterns work beautifully in the Patchwork Egg Holder Chicken – Tutorial.
You can also experiment with different patchwork layouts to create unique fabric combinations for each chicken.
Some crafters enjoy adding embroidered details such as feathers or decorative stitching to enhance the design.
Another creative idea is to make several chickens in different sizes to create a matching kitchen décor set.
Finally, the Patchwork Egg Holder Chicken – Tutorial makes a thoughtful handmade gift for friends who enjoy cooking, farming, or country-style décor.
FAQ About the Patchwork Egg Holder Chicken – Tutorial
1. Is the Patchwork Egg Holder Chicken – Tutorial suitable for beginners?
Yes. The Patchwork Egg Holder Chicken – Tutorial can be completed by beginners who have basic sewing and patchwork skills.
2. What type of fabric should I use?
Cotton quilting fabric works best for the Patchwork Egg Holder Chicken – Tutorial because it is durable and easy to sew.
3. How many eggs can the holder store?
The capacity of the Patchwork Egg Holder Chicken – Tutorial depends on the pattern size, but many versions hold between four and eight eggs.
4. Can the chicken be washed?
Yes. Most versions of the Patchwork Egg Holder Chicken – Tutorial can be gently hand washed if needed.
5. Can I adjust the size of the pattern?
Yes. The Patchwork Egg Holder Chicken – Tutorial can often be resized to create larger or smaller egg holders.
6. Is this project suitable as a gift?
Absolutely. The Patchwork Egg Holder Chicken – Tutorial makes a charming and practical handmade gift.
Conclusion
The Patchwork Egg Holder Chicken – Tutorial is a delightful sewing and quilting project that combines patchwork techniques with a practical kitchen accessory. By following this tutorial, you can create a charming chicken-shaped egg holder that adds personality and warmth to your kitchen.
Throughout this article, we explored how the Patchwork Egg Holder Chicken – Tutorial works, the materials needed, the basic steps involved, and several creative ways to personalize the finished design.
PATTERN VIDEO:
If you enjoyed this tutorial and found the instructions helpful, feel free to share your honest opinion and suggestions. Your feedback helps inspire more creative quilting ideas and handmade projects for the crafting community. Happy quilting and sewing!

