The Pineapple Block – Easy Tutorial is one of the most charming and versatile quilt patterns you can learn, especially if you love combining traditional designs with a modern twist. This iconic block creates a stunning geometric illusion that looks intricate but can be broken down into simple, manageable steps. By following this guide, beginners and experienced quilters alike can enjoy a rewarding project that highlights creativity, precision, and vibrant fabric choices. Throughout this article, you will see the term Pineapple Block – Easy Tutorial frequently, helping reinforce essential keywords for SEO and clarity.
This pattern is especially loved because it allows quilters to play with color contrast and repetitive stitching to create a striking visual effect. Despite its polished look, the process is simpler than many expect, making it a great opportunity for learners who want to challenge themselves while still staying within comfortable techniques. As you explore the Pineapple Block – Easy Tutorial, you’ll gain confidence in working with layers, trimming, and structured piecing.
Before diving into the detailed steps, we’ll begin with a thorough explanation of the block, its origin, and why it remains a timeless favorite. The Pineapple Block – Easy Tutorial brings together history, design, and practical instruction in a way that makes quilting not only enjoyable but deeply fulfilling. Whether you’re crafting a full quilt, a wall hanging, or a pillow, this pattern is the perfect addition to your quilting journey.
1. Understanding the Pineapple Block Structure
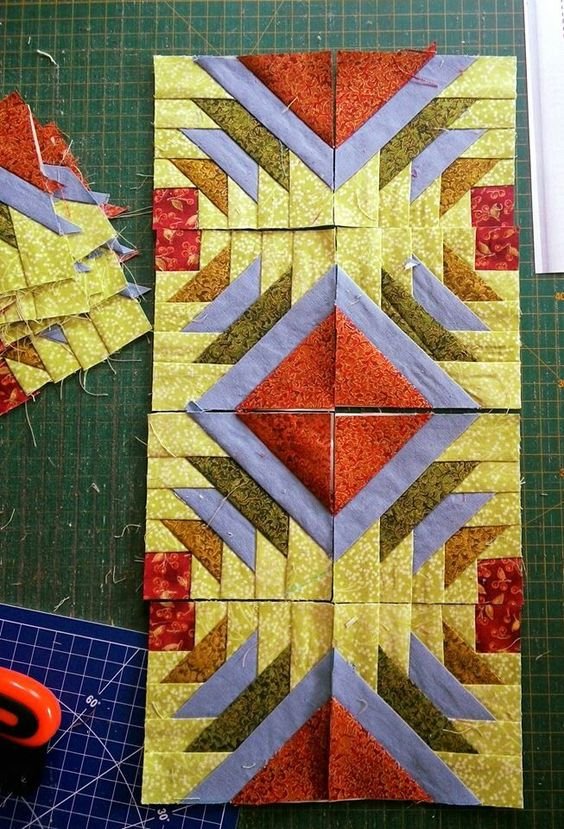
The Pineapple Block – Easy Tutorial starts with understanding the block’s layered structure. At first glance, the pineapple block resembles a log cabin with additional steps, since it is built in rounds that radiate from a center square. Each round adds corners and strips that create the distinctive pineapple shape and expanding diamond-like effect. Learning this structure is essential because it guides your fabric placement and stitching accuracy.
SEE OTHER FACE PATTERNS HERE!
To build this block successfully, you’ll work with small pieces, which helps keep the design crisp and clean. This also allows for creativity in color, making the Pineapple Block – Easy Tutorial an excellent choice for scrap projects. Using scraps or coordinating fabrics creates visual depth and texture that enhance the geometric design. Choosing fabrics with good contrast ensures the layers stand out beautifully.
One of the best things about the pineapple block is that it’s highly forgiving. Even if your seams aren’t perfect at first, the repeated trimming and layering help refine the block’s shape. This makes the Pineapple Block – Easy Tutorial accessible to beginners who are still developing their precision. It’s also a great practice block for improving your overall accuracy.
The structure of the block relies heavily on trimming between rounds. Each round is sewn, pressed, and trimmed before moving to the next. This pattern continues until you reach the desired block size. Because of this consistent trimming, the Pineapple Block – Easy Tutorial teaches discipline in construction and helps maintain a clean, symmetrical design. It also reduces bulk and keeps the seams aligned.
Another important detail is staying consistent with your seam allowance. A standard 1/4-inch seam keeps the block proportional and ensures each round fits together. It’s helpful to use a quilting ruler, or even better, a pineapple trimming ruler if you have one. While the special ruler is optional, it can make the Pineapple Block – Easy Tutorial even simpler.
Once you understand the structure, the rest of the process becomes straightforward. Having this overview prepares you to begin sewing confidently and ensures that your pineapple block turns out neat, polished, and beautifully layered.
2. Materials Needed to Create Your Pineapple Block
To follow the Pineapple Block – Easy Tutorial, you’ll need basic quilting tools and a selection of fabrics. The material requirements are simple, yet choosing the right supplies can greatly influence the finished look. Begin with fabrics in contrasting colors or tones to help the layers stand out. This contrast is what makes the pineapple block visually appealing.
Your foundation will be a center square, typically cut at 2 inches, though the size can vary depending on the final block size you want. You’ll also need fabric strips in varying widths, and they can be precut or cut from scraps. The beauty of the Pineapple Block – Easy Tutorial is that it welcomes creativity, so don’t hesitate to mix fabrics and experiment with color placement. High contrast is ideal for creating a dramatic design.
A reliable rotary cutter and a self-healing cutting mat are essential for clean, straight cuts. Accuracy is important because the pineapple block includes many narrow strips. Having sharp tools ensures your pieces align properly, making the Pineapple Block – Easy Tutorial easier to follow and helping you achieve neat results. A quilting ruler will also be used continuously.
Your sewing machine should be set to a straight stitch with a 1/4-inch foot if possible. This foot helps you maintain a consistent seam allowance, which is important for keeping the block proportional. The Pineapple Block – Easy Tutorial relies on repeated stitching, pressing, and trimming, so a consistent seam allowance eliminates many issues before they arise. Keep spare needles on hand for smooth stitching.
You will also need an iron and pressing board. Pressing after every step ensures your fabric lies flat and your seams stay crisp. While some quilters prefer finger-pressing early rounds, using a real iron gives cleaner results. Since the Pineapple Block – Easy Tutorial involves many layers, proper pressing helps prevent bulk buildup and ensures a flat block.
Finally, consider using a pineapple block trimming ruler if you want a quicker trimming process. While not required, this tool is designed specifically for the block and can make measurements faster and more precise. If you don’t have one, a standard square quilting ruler works perfectly for following the Pineapple Block – Easy Tutorial.
3. Step-by-Step Process for Sewing the Pineapple Block
Now that you understand the materials and structure, it’s time to start sewing the Pineapple Block – Easy Tutorial. Begin with your center square and sew strips to opposite sides. Press and trim before repeating the process on the remaining sides. This first round resembles a traditional log cabin block, which makes it familiar and unintimidating.
Once the first round is complete, add corner triangles to shape the block and begin forming the pineapple effect. These triangles help expand the design and create the beginning of the layered look that the pineapple block is known for. Sewing accurately during this step ensures your rounds stay even, which keeps the Pineapple Block – Easy Tutorial visually balanced.
After adding the triangles, you continue with the next layer of fabric strips. These strips should be slightly longer than the previous round. Sew, press, and trim as before. Trimming at each step keeps the edges clean and helps the block maintain its shape as it grows. Repetition is key in the Pineapple Block – Easy Tutorial, and the rhythm becomes enjoyable once you find your pace.
As you progress, pay attention to fabric placement. Alternating colors or creating a gradient effect can enhance the geometric style. Whether you opt for coordinated fabrics or a scrappy look, the layers should look intentional. The Pineapple Block – Easy Tutorial gives you the freedom to explore creativity while maintaining structure.
Continue adding strips and corner triangles until the block reaches your desired size. Common finished sizes include 8, 10, or 12 inches, though you can create larger blocks for dramatic quilt designs. The block remains flat and precise thanks to the trimming between rounds, a key reason the Pineapple Block – Easy Tutorial produces such clean results.
Finish the block by giving it a final press. At this stage, your pineapple block should have sharp lines, repeating shapes, and a polished geometric appearance. You can now use the block in quilts, pillows, bags, or wall hangings. The simplicity and flexibility of the Pineapple Block – Easy Tutorial make it a valuable addition to your quilting skills.
4. Tips for Success When Making the Pineapple Block
Following the Pineapple Block – Easy Tutorial becomes easier with a few helpful tips. First, always starch your fabric before beginning. Starching reduces stretch and keeps your strips from shifting, which is especially helpful when working with narrow pieces. Pressing with starch also adds crispness that enhances the final look.
Next, consider chain piecing similar steps. While the pineapple block is built individually, you can prepare and sew certain rounds consecutively to save time. This makes the Pineapple Block – Easy Tutorial more efficient without losing accuracy. Maintaining an organized workspace also helps you avoid mixing strips or losing track of color order.
Take your time with trimming. While it may feel repetitive, trimming is what keeps your rounds proportional and your block symmetrical. Use your ruler carefully to ensure straight edges and clean corners. When followed correctly, the trimming steps in the Pineapple Block – Easy Tutorial guarantee a professional-looking finish.
Another important tip is to use high-contrast fabrics to highlight the shape. Low-contrast fabrics may blend too much and hide the geometric detail. The goal of the Pineapple Block – Easy Tutorial is to make the layers visible and visually dynamic, so contrast plays an essential role in the finished design.
Always press, don’t iron. Pressing means lifting and lowering the iron rather than dragging it. Dragging can warp your strips or distort the block. Because the pineapple block includes so many layers, proper pressing keeps your seams flat and aligned throughout the Pineapple Block – Easy Tutorial.
Finally, allow yourself room to experiment. Whether you’re adjusting color placement, strip width, or block size, customizing the design makes the process even more rewarding. The Pineapple Block – Easy Tutorial is meant to encourage creativity while offering structure, so don’t hesitate to adapt it as you gain experience.
FAQ – Pineapple Block – Easy Tutorial
1. Is the pineapple block suitable for beginners?
Yes, the pineapple block is beginner-friendly, especially when following a clear guide like the Pineapple Block – Easy Tutorial. The repetitive trimming and step-by-step layering make it manageable even for new quilters.
2. Do I need a special ruler for this pattern?
A pineapple trimming ruler can make the process faster, but it is not required. A standard quilting ruler works perfectly for the Pineapple Block – Easy Tutorial.
3. How important is fabric contrast?
Contrast is essential because it highlights the layered structure of the block. The Pineapple Block – Easy Tutorial benefits from high-contrast fabrics that enhance the geometric design.
4. Can I make this block using scraps?
Absolutely. The pineapple block is excellent for scrap quilting since the strips are small. This makes the Pineapple Block – Easy Tutorial a great option for reducing leftover fabric.
5. What size should my pineapple block be?
Sizes vary depending on preference. Common sizes include 8, 10, and 12 inches. The Pineapple Block – Easy Tutorial works well at any scale.
6. How many fabrics should I use in this block?
You can use as few as two or as many as ten. The Pineapple Block – Easy Tutorial is flexible and supports a wide range of color combinations.
Conclusion
The Pineapple Block – Easy Tutorial is a captivating quilting project that blends tradition, creativity, and simplicity. By understanding the block’s structure, gathering the right materials, following the sewing steps, and applying helpful tips, you can create a polished and beautiful design that fits into quilts, pillows, or decorative pieces. This tutorial empowers quilters of all skill levels to enjoy a rewarding and confidence-building experience.
If this guide helped you, please consider leaving a sincere opinion and sharing suggestions for future tutorials. Your feedback helps me keep improving and creating content you enjoy!

