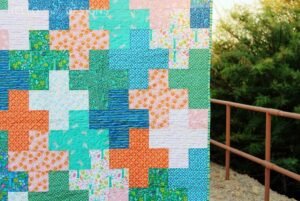
The Plus Baby Quilt is a beautiful, minimalist design that adds a modern touch to traditional quilting.
Known for its clean lines and simple plus sign pattern, this quilt is perfect for beginners and experienced quilters alike. It’s a versatile design that works well for baby quilts, throws, or even full-size quilts. In this tutorial, we’ll walk you through the process of creating your own Plus Baby Quilt, including fabric selection, cutting instructions, and assembly tips.
Whether you’re crafting a gift for a newborn or adding a charming piece to your home decor, this step-by-step guide will help you achieve stunning results.
Choosing Fabrics for Your Plus Baby Quilt
Fabric selection plays a crucial role in making your Plus Baby Quilt visually appealing. The design is simple, but the right choice of fabrics can elevate the overall look, creating a quilt that is both modern and timeless.
- Picking Main Colors: The beauty of the Plus Baby Quilt lies in its simplicity. For a classic look, choose two or three colors that contrast well. Think about using a solid neutral like white, cream, or grey for the background, paired with bold colors like navy blue, mustard yellow, or even soft pastels for the plus signs. This contrast will make the plus signs pop and create a clean, modern feel.
- Considering Fabric Texture: While cotton is the go-to fabric for most quilt patterns, you can experiment with other textures such as linen or flannel to give your quilt a softer, more luxurious feel. Flannel, in particular, is an excellent choice for baby quilts, adding extra warmth and coziness.
- Incorporating Prints: If you prefer a quilt with more visual interest, consider mixing solid fabrics with subtle prints or patterns. Geometric designs, small florals, or polka dots can add depth without overwhelming the minimalist look of the Plus Baby Quilt.
Cutting Instructions for the Plus Baby Quilt
Now that you’ve chosen your fabrics, it’s time to start cutting. Accurate cutting is key to ensuring your quilt pieces fit together perfectly and give you those clean lines the Plus Baby Quilt is known for.
- For the Plus Signs:
- Cut 40 squares of your main “plus” fabric, each measuring 4.5 inches by 4.5 inches. These squares will form the center cross of each plus sign in your quilt.
- Cut 80 rectangles (40 for the horizontal and 40 for the vertical arms of the plus sign) measuring 2.5 inches by 4.5 inches. These will be sewn on either side of the main square to form the plus shape.
- For the Background:
- Cut 40 squares of your background fabric, each measuring 4.5 inches by 4.5 inches. These will be placed around the plus signs to fill in the negative space and create the overall grid effect of the quilt.
- For the Border (optional):
- If you’d like to add a border around your quilt, cut strips of background fabric (or a coordinating fabric) to measure 2.5 inches wide by the length of each side of your quilt. The exact length will depend on how many plus signs you include in your quilt, but for a standard baby quilt, you’ll need strips around 40-45 inches long.
SEE OTHER FACE PATTERNS HERE!
Assembling Your Plus Baby Quilt
Once you’ve cut all your fabric pieces, it’s time to start assembling your quilt top. The assembly process is straightforward, making this a perfect project for beginners or for quilters who want a quick and satisfying project.
- Laying Out the Quilt: Before you start sewing, lay out all of your cut pieces on a large surface (or even the floor). Arrange your plus signs and background squares in a grid, alternating between plus signs and background squares. This will give you a preview of how your quilt will look and allow you to make any changes to the color arrangement before sewing.
- Sewing the Plus Blocks: Begin by assembling each plus block individually. Take one center square and sew a 4.5-inch rectangle on either side of it using a ¼-inch seam allowance. Press the seams open or to the side, depending on your preference. Then, sew the remaining two rectangles to the top and bottom of the center square, forming the plus sign. Repeat this process for all 40 plus signs.
- Sewing the Rows Together: Once all the plus blocks are complete, it’s time to sew them together into rows. Alternate between a plus block and a background square in each row. Sew all rows together, making sure to press the seams between rows to reduce bulk.
Quilting and Finishing Your Plus Baby Quilt
With your quilt top assembled, you’re ready to move on to quilting and finishing the project. This final step is where your quilt really comes to life, as you add texture and dimension through quilting stitches.
- Quilting Your Design: For the Plus Baby Quilt, simple straight-line quilting works beautifully and complements the clean lines of the design. You can either quilt in the ditch (along the seams) or create a grid pattern by quilting parallel lines across the entire quilt, spaced 1 or 2 inches apart. If you prefer a more intricate design, free-motion quilting in a looping or swirled pattern can add extra texture.
- Adding the Batting and Backing: Once you’ve chosen your quilting design, sandwich your quilt top with batting and a backing fabric. Cotton or bamboo batting works well for a lightweight, breathable quilt, while polyester batting will give it a fluffier finish. The backing fabric can be a matching solid or a fun print that complements the front of the quilt.
- Binding the Edges: Finally, add binding to the edges of your quilt to finish it off. You can use a solid color that matches the background fabric or choose a contrasting color for a pop of interest. Cut your binding strips 2.5 inches wide, fold them in half, and sew them around the edge of the quilt, mitering the corners for a clean, professional finish.
🌟 Join our exclusive Quilt broadcast list on Messenger! Receive the best patterns, tips, and updates directly in your inbox. Our team is ready to send you delightful content that will inspire your projects. Don’t miss this opportunity to stay updated and create amazing pieces. Join now and be part of this passionate quilt community! ✨📩
Customizing Your Plus Baby Quilt
One of the best things about the Plus Baby Quilt pattern is its versatility. You can easily customize the size, color palette, and even the quilting design to suit your personal style or the needs of the recipient.
- Changing the Size: If you want to make a larger quilt, simply increase the number of plus blocks in the grid. For example, instead of a 5×5 grid, you could make a 7×7 or even a 9×9 grid for a throw or full-size quilt. Just remember to adjust the amount of fabric accordingly.
- Color Variations: While the classic quilt patterns often use two contrasting colors, you can experiment with more complex color schemes. Consider using ombré fabric for the plus signs to create a gradient effect or alternate between light and dark shades of the same color for a more subtle look.
- Personal Touches: If you’re making this quilt as a gift, you can add personal touches like embroidered initials, a monogram, or even a special patch sewn into one of the plus blocks. These small details can make your quilt even more meaningful and unique.
Conclusion: A Timeless and Easy Quilt Pattern
The Plus Baby Quilt is a timeless pattern that offers simplicity and beauty in equal measure. With its clean lines and minimalist design, it’s perfect for modern homes or as a thoughtful gift for a new baby. Plus, it’s a great project for quilters of all skill levels, whether you’re just starting out or looking for a quick and satisfying quilt to complete.
By following this step-by-step quilt tutorial, you’ll be able to create a beautiful Plus Baby Quilt that will be cherished for years to come. With the right fabric choices and attention to detail, your finished quilt will be a stunning example of the modern quilting style. So gather your supplies, start cutting, and enjoy the process of bringing this simple yet elegant design to life!


