The Rose Twirl Quilt – Tutorial is a beautiful quilting project that blends elegance, creativity, and traditional quilting artistry into a stunning design. Inspired by the graceful movement of rose petals and swirling patterns, the Rose Twirl Quilt – Tutorial offers quilters a wonderful opportunity to create a visually captivating quilt that stands out in any home décor setting.
Quilters around the world are always searching for patterns that are both artistic and enjoyable to construct. The Rose Twirl Quilt – Tutorial fits perfectly into this category because it combines flowing shapes with structured piecing techniques. The result is a quilt pattern that looks intricate yet remains approachable for many skill levels.
In this comprehensive guide, you will discover everything you need to know about creating the Rose Twirl Quilt – Tutorial, including the inspiration behind the design, the materials required, step-by-step construction tips, and finishing techniques that bring the quilt to life. Whether you are a beginner eager to improve your quilting skills or an experienced quilter looking for a new creative challenge, this tutorial will help you confidently create your own stunning Rose Twirl Quilt.
1. The Inspiration Behind the Rose Twirl Quilt Design
The Rose Twirl Quilt – Tutorial draws inspiration from the natural beauty of roses and the graceful spiral patterns found in nature. Roses have long been symbols of elegance, beauty, and artistic inspiration, making them a perfect theme for a quilt pattern.
DISCOVER MORE FREE PATTERNS HERE!
The swirling motion in the Rose Twirl Quilt mimics the gentle unfolding of rose petals. When arranged across a quilt top, these shapes create a sense of movement that feels both soft and dynamic.
Many quilters love floral-inspired designs because they add warmth and charm to a quilt. The Rose Twirl Quilt – Tutorial captures that floral aesthetic while still maintaining the geometric structure that quilting is known for.
Another appealing aspect of this pattern is its visual depth. The swirling pieces interact with each other to create a layered appearance that draws attention across the quilt surface.
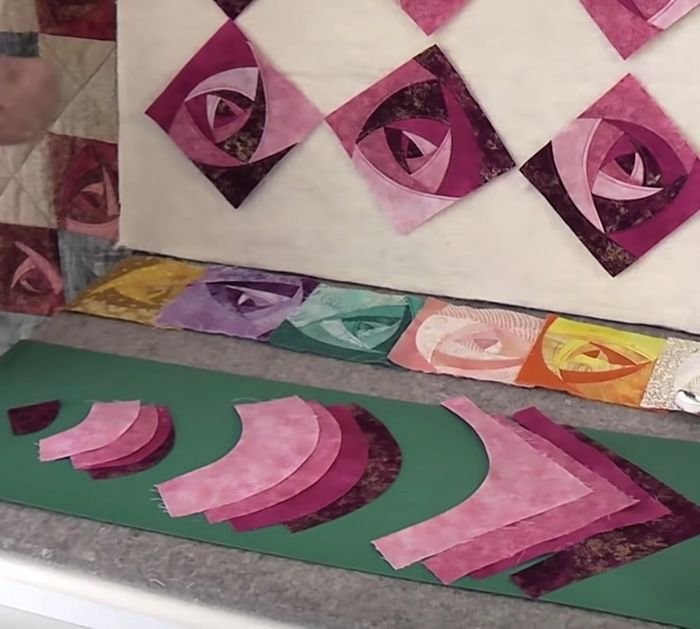
Color selection also plays a key role in emphasizing the rose-inspired design. Soft pinks, deep reds, and complementary greens can highlight the floral theme beautifully.
By understanding the inspiration behind the Rose Twirl Quilt – Tutorial, quilters can better appreciate the artistic intention of the pattern and create a quilt that truly reflects its elegant design.
2. Materials and Tools Needed for the Rose Twirl Quilt
Before starting the Rose Twirl Quilt – Tutorial, gathering the right materials will ensure a smooth and enjoyable quilting experience. Preparation is an important part of any successful quilting project.
The most important material is high-quality cotton quilting fabric. Cotton fabrics are durable, easy to sew, and widely used in quilting projects like the Rose Twirl Quilt.
A variety of fabric colors can enhance the swirling rose effect. Many quilters choose coordinated color palettes that highlight the movement of the pattern.
Basic quilting tools are also necessary. These include a rotary cutter, quilting ruler, cutting mat, sewing machine, pins, and high-quality thread.
Batting and backing fabric are required to complete the quilt sandwich. These layers provide structure, warmth, and durability to the finished quilt.
Some quilters also like to include specialty tools such as curved rulers or marking tools to assist with more detailed design work.
Having these materials ready before beginning the Rose Twirl Quilt – Tutorial will make the quilting process smoother and more enjoyable.
3. Step-by-Step Construction of the Rose Twirl Quilt
The construction process in the Rose Twirl Quilt – Tutorial begins with carefully cutting fabric pieces according to the pattern measurements. Precision cutting ensures that the swirling shapes align correctly.
Once the pieces are cut, the next step is arranging the sections to visualize the overall quilt layout. This allows quilters to experiment with color placement before sewing.
The Rose Twirl Quilt pattern typically uses piecing techniques to create curved or angled shapes that mimic the spiral of rose petals.
Each block is assembled step by step, gradually building the swirling effect across the quilt top. Consistent seam allowances help maintain accurate block sizes.
After completing the individual blocks, they are sewn together to form the full quilt top. Careful alignment ensures that the swirling design flows smoothly from one block to another.
Taking time during the construction stage of the Rose Twirl Quilt – Tutorial helps create a polished and professional-looking finished quilt.
4. Finishing the Rose Twirl Quilt with Style
Once the quilt top is assembled, the finishing stage of the Rose Twirl Quilt – Tutorial begins. This stage transforms the quilt top into a completed, functional quilt.
First, the quilt sandwich is created by layering the quilt top, batting, and backing fabric together. These layers are secured with pins or temporary adhesive spray.
The quilting process comes next. Quilters can choose from many quilting styles, such as straight-line quilting, free-motion quilting, or floral motifs that complement the rose theme.
Quilting stitches not only hold the layers together but also enhance the visual design of the Rose Twirl Quilt.
After quilting is complete, the edges of the quilt are trimmed and prepared for binding. Binding provides a clean and durable finish around the quilt edges.
Finally, a carefully sewn binding completes the quilt, giving the Rose Twirl Quilt – Tutorial a polished and professional appearance.
FAQ – Rose Twirl Quilt Tutorial
Is the Rose Twirl Quilt suitable for beginners?
Yes. While the design may appear complex, many beginners can successfully complete the Rose Twirl Quilt – Tutorial with patience and careful attention to instructions.
What type of fabric is best for the Rose Twirl Quilt?
High-quality cotton quilting fabric is the most recommended choice because it is durable and easy to sew.
How large can the Rose Twirl Quilt be?
The quilt size can vary depending on the number of blocks used. The pattern can be adapted to create lap quilts, bed quilts, or decorative wall quilts.
Do I need special tools to create the swirling shapes?
Most of the time, standard quilting tools are sufficient. However, curved rulers or templates can make the cutting process easier.
What colors work best for this quilt pattern?
Floral color palettes such as pink, red, rose, and green often highlight the rose theme beautifully.
How long does it take to complete the Rose Twirl Quilt?
Completion time depends on experience level and available crafting time, but many quilters finish the project over several sewing sessions.
Conclusion
The Rose Twirl Quilt – Tutorial is a wonderful quilting project that blends artistic inspiration with traditional quilting techniques. With its elegant swirling design inspired by roses, this quilt offers both visual beauty and a rewarding creative experience.
Throughout this article, we explored the inspiration behind the pattern, the materials needed, the step-by-step construction process, and the finishing techniques that transform fabric pieces into a stunning quilt.
Creating the Rose Twirl Quilt allows quilters to express creativity through color, movement, and craftsmanship while developing valuable quilting skills.
Now we would love to hear from you. Did you enjoy learning about the Rose Twirl Quilt – Tutorial? Do you have ideas for color combinations or design variations you would like to try?
Leave your honest opinion and share your suggestions. Your feedback helps inspire new quilting ideas and supports the creative quilting community.

