Creating a Scrappy Heart Block is a delightful way to add personality and warmth to any quilt.
This pattern offers flexibility with fabric choices, making it perfect for using up leftover scraps or adding a colorful patchwork effect.
In this step-by-step tutorial, we’ll guide you through everything from material selection and cutting measurements to piecing and assembly. Let’s dive in and create a beautiful Scrappy Heart Block together.

What is the Scrappy Heart Block Quilt Pattern?
The Scrappy Heart Block is a quilt pattern known for its charming patchwork style and versatility. By using small pieces of various fabrics, this block forms a heart shape with a unique, scrappy twist. It’s a great choice for anyone who enjoys mixing colors, textures, and patterns in a single quilt block.
SEE OTHER FACE PATTERNS HERE!
This quilt pattern is both visually appealing and economical since it makes use of fabric scraps you may already have. With this block, you can create a quilt full of personality, color, and texture. Plus, the heart design brings warmth to any quilt, making it a great gift idea for loved ones.
Whether you’re a beginner or an experienced quilter, the Scrappy Heart Block is a fun and achievable pattern. Let’s look at the materials you’ll need and how to start the project.
Materials Needed for the Scrappy Heart Block Quilt Pattern
Before we begin the Scrappy Heart Block tutorial, gather the following materials to ensure a smooth workflow. These materials are essential to create a finished, professional-looking block.
- Fabric Scraps: Gather a variety of fabric scraps in different colors and patterns. You’ll need enough to make several small squares.
- Rotary Cutter and Ruler: These tools are essential for precise cutting, especially when working with smaller pieces.
- Cutting Mat: A self-healing mat is ideal for protecting your surfaces and ensuring safety while cutting.
- Sewing Machine and Thread: Use a sewing machine with a consistent ¼-inch seam allowance, and choose a thread color that complements your fabric.
- Iron and Ironing Board: Pressing your seams as you sew helps keep everything neat and aligned.
Once you have everything on hand, it’s time to start the cutting process. Accuracy in cutting will make assembling the block easier and more precise.
Step 1: Cutting Fabric Pieces for the Scrappy Heart Block
For the Scrappy Heart Block, you’ll be working with a variety of small squares. Here’s what you’ll need to cut:
- Cut Sixteen 2.5-inch Squares: Choose a variety of fabric scraps for these squares. These pieces will form the heart’s patchwork look, so select colors and patterns that you love.
- Cut Eight 2.5-inch Background Squares: These squares will form the outside of the heart shape. Choose a background fabric that contrasts with the heart for a distinct shape.
- Optional Border Pieces: If you’d like a border around the block, cut two 1.5-inch strips in a complementary color.
Carefully cut each piece using a rotary cutter and ruler to ensure uniformity. Since this is a scrappy block, mixing different colors and patterns will add charm and depth to your quilt.
Step 2: Arranging the Heart Shape
Once you’ve cut your squares, it’s time to arrange them in a heart shape. This step will help you visualize the final pattern and make adjustments before sewing.
- Lay Out the Squares: Arrange the sixteen colored squares into a heart shape. Place them in a 4×4 grid, forming the top curve and bottom point of the heart.
- Add Background Squares: Position the eight background squares around the heart shape to frame it. This contrast will help define the heart pattern.
- Experiment with Color Placement: Feel free to rearrange the colored squares to create a balanced look. You can create a gradient effect or randomly scatter colors for a whimsical appearance.
Laying out your squares beforehand allows you to see how the colors and patterns interact, making it easier to achieve a balanced look in the finished block.
Step 3: Assembling Rows in the Scrappy Heart Block
Now that you have your layout, it’s time to begin sewing the squares together. Start by assembling each row.
- Sew the Squares in Rows: Starting from the top row, sew each square to its neighbor with a ¼-inch seam allowance. Use consistent seam allowances to ensure even rows.
- Press Seams Between Each Row: Press the seams to one side for each row, alternating the direction in each row to reduce bulk and create flatter intersections.
- Repeat for All Rows: Complete each row individually, pressing each one as you go. This will give you neat rows that are ready to assemble.
Assembling the rows individually and pressing seams as you go makes it easier to match up seams when joining rows.
Step 4: Joining Rows to Complete the Heart Shape
With each row complete, you’re ready to join the rows and bring the heart shape to life.
- Align and Pin Rows Together: Begin by pinning two rows together, aligning the seams for a smooth fit. Pinning will keep the rows in place as you sew.
- Sew the Rows Together: Using a ¼-inch seam allowance, sew each row to the next, one pair at a time. Press the seams as you go to keep them flat.
- Complete the Block: Once all rows are joined, press the entire heart block. Check for any uneven edges and trim if necessary.
Completing the heart shape is a rewarding step, as you start to see the block take its final form. This block can be used as a focal point in a larger quilt or combined with other blocks to create a full scrappy quilt.
Adding a Border to the Scrappy Heart Block (Optional)
A border can add a finishing touch to your Scrappy Heart Block, giving it a framed appearance and making it easier to join with other blocks.
- Cut and Attach Border Strips: If you cut border strips earlier, sew them to each side of the heart block with a ¼-inch seam allowance.
- Press and Trim the Border: Press the seams towards the border fabric, then trim any excess to ensure the block is square.
- Repeat for Additional Blocks: If making multiple blocks for a quilt, repeat this step to give each block a cohesive border.
Adding a border can also help enlarge the block if needed, making it a versatile option depending on your quilt’s design.
Joining Scrappy Heart Blocks in a Quilt
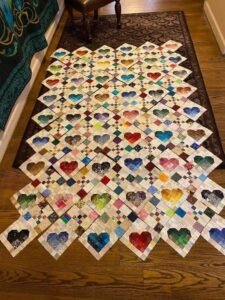
If you’re planning to make a full quilt, consider creating multiple Scrappy Heart Blocks and arranging them in a visually pleasing layout.
- Lay Out Your Blocks: Arrange the blocks on a flat surface to decide on the layout. Experiment with different orientations and placements for variety.
- Sew Blocks Together in Rows: Begin by sewing blocks together in rows, then join rows to complete the quilt top.
- Add Sashing or Borders: For a more finished look, consider adding sashing (strips of fabric) between each block or a larger border around the entire quilt top.
The Scrappy Heart Block can be the centerpiece of a unique, vibrant quilt that’s full of personal touches.
🌟 Join our exclusive Quilt broadcast list on Messenger! Receive the best patterns, tips, and updates directly in your inbox. Our team is ready to send you delightful content that will inspire your projects. Don’t miss this opportunity to stay updated and create amazing pieces. Join now and be part of this passionate quilt community! ✨📩
Tips for Success with the Scrappy Heart Block Quilt Pattern
- Mix Colors and Patterns: The beauty of this pattern lies in its scrappy appearance, so don’t be afraid to use a variety of colors and patterns.
- Press Seams Consistently: Pressing your seams as you go will help keep the blocks flat and easier to assemble.
- Experiment with Backgrounds: Different background colors can dramatically change the look of your quilt, so feel free to try bold or neutral shades to suit your style.
This Scrappy Heart Block tutorial gives you a chance to dive into the world of colorful, patchwork quilting. By following these steps and embracing creativity with fabric choices, you’ll craft a beautiful quilt block that adds warmth and character to any project. Whether it’s part of a larger quilt or a standalone piece, the Scrappy Heart Block is sure to be a cherished creation.


