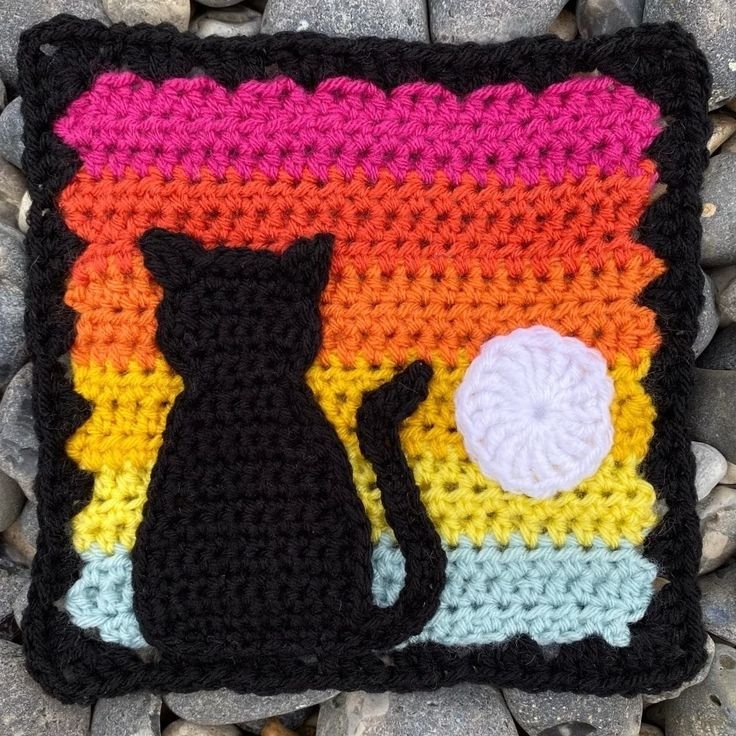
Crocheting has always been a timeless craft that allows people to express their creativity through intricate patterns and designs. One of the most beloved and classic patterns in the crochet community is the Silhouette Granny Square pattern. This particular pattern has garnered a lot of attention due to its versatility and the beauty it brings to various projects, from blankets and throws to garments and accessories. In this article, we will explore the Silhouette Granny Squares pattern in detail, including its origin, how to make it, and how to incorporate it into your crochet projects.
The Silhouette Granny Squares pattern is a beautiful design that combines simple crochet techniques with striking visual appeal. Its design often features a contrasting color or “silhouette” effect, which can make it stand out from the more traditional granny square patterns. This pattern is perfect for those who want to add a touch of modernity to their crochet work while still maintaining the cozy, traditional feel of granny squares. If you are a beginner or an experienced crocheter, you will find this pattern both accessible and rewarding to create.
Whether you’re creating a full blanket, a cushion cover, or just using the squares to make decorative motifs, the Silhouette Granny Squares pattern allows you to explore different color schemes and textures. You can even modify the pattern to fit your personal style and preferences, making it a versatile choice for any crochet project. In the following sections, we will break down everything you need to know about the Silhouette Granny Squares pattern, from the materials you’ll need to the step-by-step process of creating your own beautiful squares.
1. Understanding the Basics of Silhouette Granny Squares
Before you dive into creating your own Silhouette Granny Squares, it’s essential to understand the basics of this pattern. The foundation of any granny square is a combination of chain stitches, slip stitches, and double crochet stitches. The Silhouette Granny Square builds upon this by incorporating a contrasting color technique, which gives it its signature silhouette effect.
SEE OTHER FACE PATTERNS HERE!
The pattern begins with a simple central motif that you will crochet in a particular color. Afterward, the edges of the square are worked in a contrasting color to form the silhouette. The beauty of this pattern lies in the use of bold colors, which allows you to create stunning visual effects. You can use vibrant colors for a lively and energetic feel or go for more muted tones for a subtler look.
For a basic Silhouette Granny Square, you will need to start by creating a traditional granny square. Once you’ve completed the first few rounds, you will change the color to create the contrasting silhouette effect around the edges of the square. The contrast is what makes these squares stand out, offering an interesting and modern twist on the classic granny square design.
2. Materials You Need to Start Your Silhouette Granny Squares
Creating Silhouette Granny Squares requires a few basic materials that are easy to gather. The main items you’ll need include yarn, a crochet hook, and scissors. The yarn you choose will significantly affect the final appearance of your squares, so it’s important to choose wisely.
For the yarn, a medium-weight yarn like worsted weight is an excellent choice, as it provides the right amount of thickness for easy crochet work. You’ll need at least two colors of yarn—one for the base of the square and one for the contrasting silhouette effect. The color choice is up to you, but it’s recommended to pick colors that complement each other well. Bold color combinations, such as a bright yellow silhouette with a deep purple background, can create a striking visual effect, while softer color pairings like pastel pink and cream can give a more delicate and subtle look.
Additionally, selecting the right crochet hook size is crucial for achieving the right tension and stitch consistency. For worsted weight yarn, a 5.5mm (I-9) crochet hook is typically recommended. Make sure to check the yarn’s recommended hook size on the packaging to ensure you’re using the appropriate one. Finally, don’t forget your trusty pair of scissors for cutting your yarn after each round or color change.
3. Step-by-Step Guide to Making Silhouette Granny Squares
Now that you’re familiar with the materials and basics, it’s time to dive into the step-by-step process of creating your Silhouette Granny Squares. Follow these simple instructions to create your own unique and beautiful granny squares.
- Start with a foundation ring: Begin by making a slip knot and then chaining 4 stitches. Join the last chain to the first with a slip stitch to form a ring.
- Create the center: Chain 3 (this counts as your first double crochet) and work 2 more double crochets into the ring. Then, chain 2, and work 3 double crochets into the ring again. Repeat this process two more times until you have four groups of three double crochets, each separated by a chain-2 space.
- Change colors for the silhouette effect: Once the center of your square is complete, change to the contrasting color. Work the next round by joining the new color into any of the chain-2 spaces from the previous round. For this round, you’ll work three double crochets into each chain-2 space, separated by a chain 2.
- Finish the square: Continue working in rounds until your square reaches the desired size. The number of rounds you do will depend on the size of the square you want to create. Each round should end with a slip stitch to close the loop, and you can fasten off the yarn once the square is finished.
Once you’ve mastered the basic pattern, feel free to experiment with different color combinations, sizes, and shapes. You can even create larger projects by joining multiple Silhouette Granny Squares together.
4. Tips for Customizing Your Silhouette Granny Squares
While the Silhouette Granny Squares pattern is already beautiful as is, there are several ways to customize it to suit your unique preferences and projects. Here are some tips to help you add your personal touch to each square you create.
- Experiment with color placement: The silhouette effect can be made more dramatic by changing the position of the contrasting colors. Try using the darker color for the base of the square and the lighter color for the silhouette to create a reverse effect.
- Play with textures: Instead of using smooth, basic yarn, try experimenting with textured yarns like tweed or bouclé. These yarns add an interesting depth to your squares.
- Vary the square size: You don’t have to stick to the standard granny square size. Increase or decrease the number of rounds to create smaller or larger squares, depending on your project.
- Add embellishments: To further customize your Silhouette Granny Squares, you can add small embellishments like buttons, beads, or even crochet flowers in the center of the square.
The options are endless when it comes to customizing your squares. Let your creativity guide you and don’t be afraid to try new combinations.
🌟Join our exclusive Quilt broadcast list on Messenger! Receive the best patterns, tips, and updates directly in your inbox. Our team is ready to send you delightful content that will inspire your projects. Don’t miss this opportunity to stay updated and create amazing pieces. Join now and be part of this passionate quilt community!✨📩
FAQ
- What is a Silhouette Granny Square? A Silhouette Granny Square is a crochet pattern where the square features a contrasting color around the edges to create a silhouette effect. This adds a modern twist to the classic granny square design.
- Can I use any yarn for the Silhouette Granny Squares? While you can technically use any yarn, it’s recommended to use medium-weight yarn, such as worsted weight, for the best results. This will give your squares the right texture and stitch consistency.
- How do I join Silhouette Granny Squares together? To join multiple Silhouette Granny Squares, you can use a whip stitch, slip stitch, or a join-as-you-go method. The whip stitch is the easiest and most common method for joining granny squares.
- Can I make other items with Silhouette Granny Squares? Yes, you can create a wide variety of items, including blankets, cushions, scarves, bags, and even garments. The Silhouette Granny Squares pattern is incredibly versatile.
- Do I need to follow a specific color scheme? No, the color scheme is entirely up to you! Choose contrasting colors that complement each other to create your desired effect.
Conclusion
In this article, we’ve explored the beautiful Silhouette Granny Squares pattern and shared a step-by-step guide to help you create your own stunning crochet squares. From understanding the basics to customizing your squares and adding unique touches, there are many ways to make this pattern your own. We hope this guide inspires you to start a new crochet project and experiment with different colors and textures.
If you enjoyed this article, we’d love to hear your thoughts! Please leave a sincere opinion or suggestions for future topics you’d like to see covered. Happy crocheting!


